📚 Trading Education:
Demand Zone Rejection vs. Trendline Breakout Entries
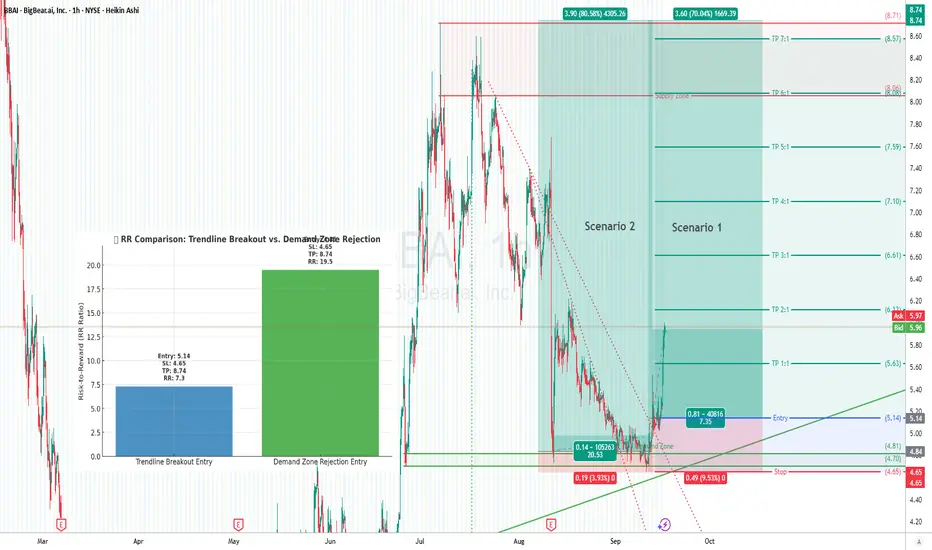
In trading, where you enter makes a massive difference in your Risk-to-Reward (RR) ratio. Two common approaches:
🔹 Scenario 1: Entry at the Trendline Breakout
Wait for confirmation → price breaks the downtrend line.
Entry: $5.14
Stop Loss: $4.65 (below demand)
Risk: 0.49
Target: $8.74
Reward: 3.60
RR = ~1:7.3
✅ Higher probability (confirmation from breakout).
❌ Smaller RR because you’re entering later.
🔹 Scenario 2: Entry at the Demand Zone Rejection
Enter aggressively on the first demand zone bounce.
Entry: $4.85
Stop Loss: $4.65
Risk: 0.20
Target: $3.90 upside → $8.74
Reward: 3.90
RR = ~1:19.5
✅ Insane RR potential.
❌ Higher risk of fakeouts (price might pierce deeper before breakout).
The Takeaway
Breakout Entry = safer, confirmed, good RR (~1:7).
Demand Rejection Entry = aggressive, riskier, but monster RR (~1:19).
👉 The best traders scale in: small position at demand, add on breakout. That way you capture the high RR edge while also waiting for confirmation.
⚖️ Risk Management Rule
Always risk just 1–3% of account equity.
Huge RR setups don’t mean overleveraging — stick to risk discipline.
"Opportunities come infrequently. When it rains gold, put out the bucket, not the thimble." – Warren Buffett
By Dubai Traders Hub
Follow us on X , YouTube, and Join our Telegram Channel
Follow us on X , YouTube, and Join our Telegram Channel
Penafian
Maklumat dan penerbitan adalah tidak bertujuan, dan tidak membentuk, nasihat atau cadangan kewangan, pelaburan, dagangan atau jenis lain yang diberikan atau disahkan oleh TradingView. Baca lebih dalam Terma Penggunaan.
