📊 Breakdown
1. Confirmed Retest
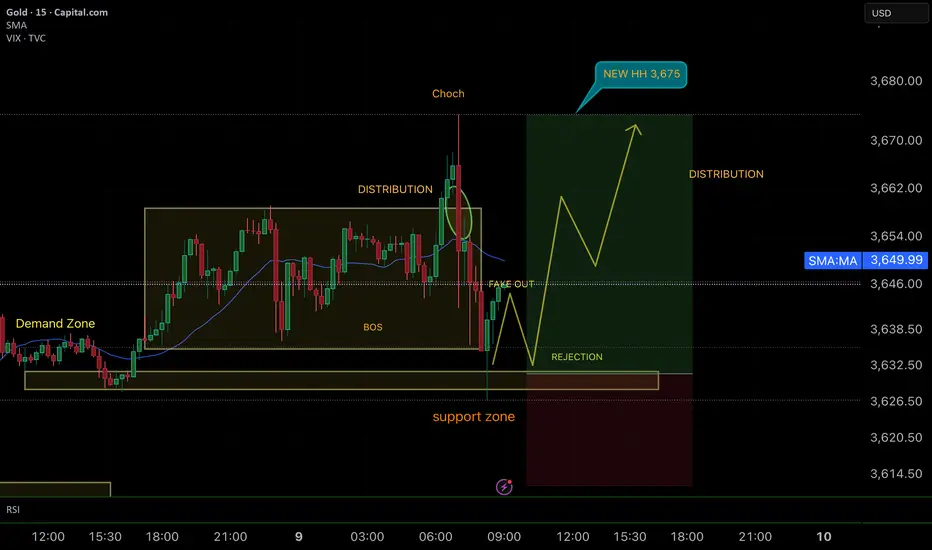
• Price left the distribution zone and came back to test the support zone.
• This acts as a retest, showing buyers are still in control.
2. Fake Out + Rejection
• Before moving higher, liquidity was taken with a fake out.
• The rejection at support confirms bullish continuation.
3. Bullish Structure
• Previous BOS and ChoCh confirm the bullish order flow.
• Demand is defended → institutions are holding the upside momentum.
4. Entry & Target
• Entry after retracement confirmation (clear rejection at support).
• Target: new Higher High (HH) at 3,675.
🔑 Lesson: Waiting for the retest prevents fake entries and gives clean setups with better risk-to-reward. GOOD LUCK TRADERS ;)
1. Confirmed Retest
• Price left the distribution zone and came back to test the support zone.
• This acts as a retest, showing buyers are still in control.
2. Fake Out + Rejection
• Before moving higher, liquidity was taken with a fake out.
• The rejection at support confirms bullish continuation.
3. Bullish Structure
• Previous BOS and ChoCh confirm the bullish order flow.
• Demand is defended → institutions are holding the upside momentum.
4. Entry & Target
• Entry after retracement confirmation (clear rejection at support).
• Target: new Higher High (HH) at 3,675.
🔑 Lesson: Waiting for the retest prevents fake entries and gives clean setups with better risk-to-reward. GOOD LUCK TRADERS ;)
Penafian
Maklumat dan penerbitan adalah tidak dimaksudkan untuk menjadi, dan tidak membentuk, nasihat untuk kewangan, pelaburan, perdagangan dan jenis-jenis lain atau cadangan yang dibekalkan atau disahkan oleh TradingView. Baca dengan lebih lanjut di Terma Penggunaan.
Penafian
Maklumat dan penerbitan adalah tidak dimaksudkan untuk menjadi, dan tidak membentuk, nasihat untuk kewangan, pelaburan, perdagangan dan jenis-jenis lain atau cadangan yang dibekalkan atau disahkan oleh TradingView. Baca dengan lebih lanjut di Terma Penggunaan.