PROTECTED SOURCE SCRIPT
EMA8/21+VWAP+MOM+ADX Filter
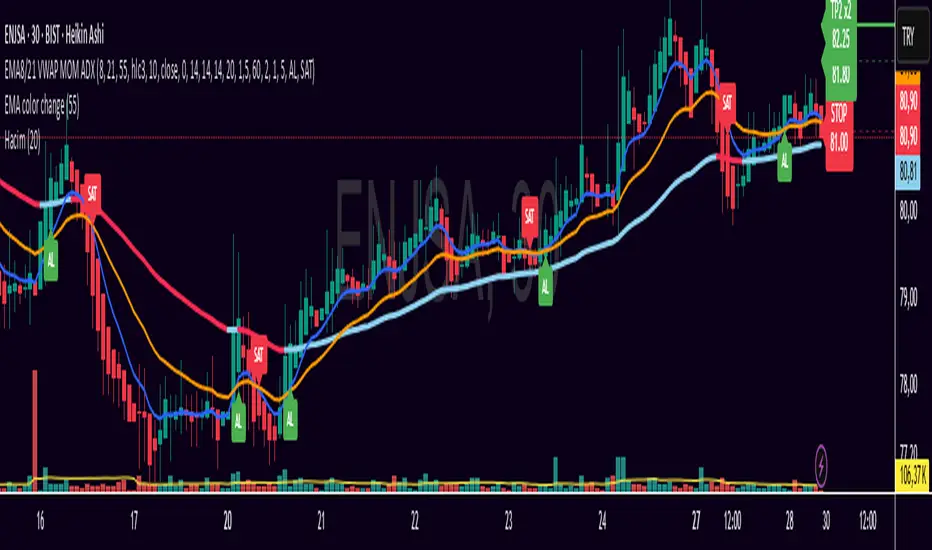
EMA8/21 MTF Momentum-ADX Trade Assistant
This script is not a basic “EMA crossover” indicator. The goal is not just to flash a signal, but to provide an actual trade plan: entry, confirmation, stop, profit targets, and position management in one package.
1. Core Logic
The main trigger of the indicator is the EMA8 and EMA21 crossover:
When EMA8 crosses ABOVE EMA21 → potential LONG signal.
When EMA8 crosses BELOW EMA21 → potential EXIT / WEAKNESS signal.
This structure is designed to work on 30-minute and 60-minute charts.
Fast EMA: default 8
Slow EMA: default 21
Trend EMA: for 30m charts ~50–55, for 60m charts ~100 (this is adjustable via input)
2. Advanced confirmations for LONG entries
The LONG signal is not taken blindly at every crossover. It can be filtered (optionally) by several confirmation layers. All of these can be turned on/off from the inputs:
Momentum filter: Is price actually pushing, or did it just barely cross? A long is only confirmed if momentum is above a chosen threshold.
ADX / DMI filter: Is there real trend strength? The script can require ADX above a threshold and +DI > -DI (bullish directional bias). This helps avoid fake breakouts in choppy, sideways zones.
Relative Volume filter: Is there real participation behind the move? The script can require current volume to be at least X times the recent average volume (for example 1.5x the 20-bar average). This helps avoid signals that appear on “empty” volume.
Higher Timeframe Trend filter (MTF): Example: if you’re trading on the 30-minute chart, you can force longs to only trigger when the 60-minute trend is already bullish. This prevents going long against the dominant higher-timeframe direction. (On a 60m chart you might compare against 240m / 4h, etc.)
The purpose of these filters is:
→ When entering long, don’t just chase any crossover. Demand alignment in trend, strength, demand, and higher timeframe structure.
Note: These filters are independent. You are NOT forced to enable all of them at once. Different tickers behave differently. The user can decide which confirmations make sense for that specific instrument.
3. How does the SHORT/EXIT signal work?
The exit/weakness signal is intentionally kept simple:
When EMA8 crosses BELOW EMA21, the script immediately fires a signal.
No extra conditions (no momentum, no ADX, etc.).
You can treat this as “take profit / reduce risk / exit warning.”
Why is it designed like that?
When entering a position, you want to be very selective.
When protecting profit or cutting risk, you want to be fast, not slow.
So LONG entry is filtered and disciplined. EXIT warning is fast and blunt.
4. Trade management (automatic Stop / Targets / Trailing Stop)
When a confirmed LONG signal appears, the indicator does more than say “go long.” It also drafts a mini plan on the chart:
Entry: Uses the close of the signal candle as the assumed entry.
Stop: Default stop level is placed at (or near) the low of the signal candle.
TP1 (Partial Take Profit): A first target such as 1R (customizable). Think of this as partial take profit. When TP1 is reached, the label updates visually (e.g. “TP1 ✅”).
TP2 (Final target): A second target such as 2R (customizable). This is plotted separately with its own line and label.
Trailing Stop: While the position is “open,” the stop level can automatically trail upward as new higher lows form. The stop is never moved downward. You can turn trailing on/off.
All of these levels (Stop / TP1 / TP2) are drawn directly on the chart, with readable labels.
After an EXIT (bearish crossover) is triggered and the position is considered closed, those lines/labels are grayed out. Visually this makes it clear: “that trade is done.”
5. Position state tracking
The script internally tracks whether you are considered “in a position” or “flat”:
When a confirmed LONG triggers and you are not already in a position → it marks you as “in position.”
When an EXIT signal triggers → it marks you as flat / position closed.
While in position, it keeps updating Stop / TP levels and the trailing stop logic.
It will not spam repeated “long long long” signals every bar.
This makes the tool behave more like a lightweight trade assistant rather than a dumb arrow plotter.
6. How to actually use it
This tool does NOT force a single style. Instead, it gives you building blocks (filters and management rules) that you can mix depending on the instrument and market condition.
For example:
Profile A: Trend-Following / Swing-Style
ADX filter: ON
Higher Timeframe filter: ON
Momentum filter: ON
Relative Volume filter: optional
Larger R targets (TP2 ~2R or more), trailing stop ON
This profile is for cleaner, directional names that actually trend. You’re trying to ride continuation, not scalp noise.
Profile B: Intraday Momentum / One-Shot Burst
Momentum filter: ON
Relative Volume filter: ON (you want expansion in volume)
ADX filter: OFF (ADX often lags on the first impulse bar)
Higher Timeframe filter: can be looser if you’re just playing the spike
Focus on TP1 / fast partial exit more than holding forever
This profile tries to catch sharp breakouts that come with volume. You care about speed, not holding all day.
Profile C: Simple / Low-Stress Mode
Only Higher Timeframe filter: ON
Other filters: OFF
Idea: “I’ll only take longs if the bigger timeframe is already bullish. Otherwise I do nothing.”
This is useful when you don’t want to overthink. Fewer rules, less noise.
So in practice, instead of forcing the same confirmation stack on every ticker, you select the subset of filters that best fits how that ticker usually moves and how YOU want to trade it. That flexibility is intentional.
7. Time-of-day context
Signal quality is not only about technical conditions, it’s also about timing:
A “perfect” long setup in the first strong impulse of the session is not the same as a random crossover in low-liquidity midday chop.
Near the close, a signal might mean “carry this into the next session,” which is a different risk profile than a quick intraday scalp.
The script does not automatically block signals by session time, but you should treat early-session breakouts, midday noise, and late-session continuation differently in your decision-making. The filters (volume, higher timeframe alignment, ADX) help, but discretion about timing still matters.
8. Mental discipline
One very important workflow tip:
Before you take a trade, say (to yourself), which “profile” you are using.
For example:
“This is a Momentum Burst trade. I’m using volume + momentum. I only care about TP1. I’m not trying to swing this overnight.”
or
“This is a Trend-Follow trade. ADX is on, higher timeframe is aligned. I will trail this and aim for TP2.”
Why is this important?
It stops you from panicking mid-trade and changing your plan emotionally.
After 10–20 trades, you can review which profile actually performs for you. You’ll see which filters are truly adding edge, and which are just “comfort filters” that feel safe but don’t actually improve results.
That review is how this tool goes from “indicator” to “personal trading process.”
9. Disclaimer
This script is for educational and experimental trading workflow support.
It is NOT financial advice.
Trading involves significant risk. All decisions and outcomes are your own.
Do not use this live with real capital without forward testing and proper risk management.
Summary:
This script is not just an arrow that says “BUY/SELL.”
It’s a compact trade assistant built around the EMA8/21 structure.
It can:
filter long entries using momentum, ADX/DMI strength, higher timeframe alignment, and relative volume,
generate fast exit warnings on bearish cross,
automatically draw stop, TP1, TP2, and even trail the stop while the position is active,
and track whether you’re “in a trade” or flat.
You’re not forced into one rigid style. You choose which confirmation layers match the personality of the ticker you’re trading — and you get visual risk management on the chart.
Skrip dilindungi
Skrip ini diterbitkan sebagai sumber tertutup. Akan tetapi, anda boleh menggunakannya dengan percuma dan tanpa had – ketahui lebih lanjut di sini.
Penafian
Maklumat dan penerbitan adalah tidak dimaksudkan untuk menjadi, dan tidak membentuk, nasihat untuk kewangan, pelaburan, perdagangan dan jenis-jenis lain atau cadangan yang dibekalkan atau disahkan oleh TradingView. Baca dengan lebih lanjut di Terma Penggunaan.