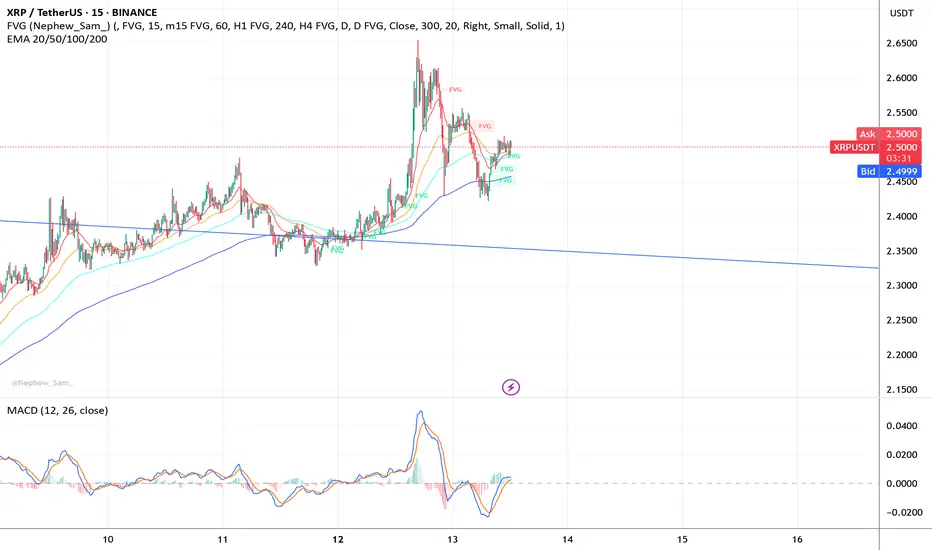
Trend Context:
The price successfully broke out of the descending wedge (resistance line).
It is now retesting key support zones formed by previous breakout levels, FVG areas, and the 100/200 EMA zone.
A consolidation phase is occurring right below the key resistance zone 2.62–2.65 USDT, making this a healthy correction in a bullish structure.
The MACD on the daily and 4H chart shows potential for continuation after temporary consolidation.
📈 Trade Setup – Long (Futures)
🟢 Position Type:
Long (Buy)
📍 Entry Range:
2.50 – 2.52 USDT
This zone is supported by:
FVG fair value gaps
EMA100/200 on the 1H and 4H timeframes
Retest of breakout zone
📉 Stop-Loss (SL):
2.44 USDT
Set slightly below the major EMAs and the lower support of the FVG range — if broken, it invalidates the bullish structure short-term.
🎯 Take-Profit Targets:
TP1: 2.59 USDT (resistance from last peak)
TP2: 2.63–2.65 USDT (major horizontal resistance zone)
TP3 (optional long-term): 2.85 – 3.14 USDT (based on the daily breakout wedge target)
📊 Risk-Reward Ratio (R:R):
Between 1:2 and 1:3, depending on final exit point.
🧮 Leverage:
5x to 10x Futures leverage
📌 Additional Notes & Confirmation
MACD: Daily and 4H bullish momentum remains intact.
EMA Alignment: Price still above 50/100/200 EMAs in higher timeframes — bullish alignment.
Structure: Breakout and retest confirmed — looking for higher low formation.
⚙️ OCO Order Setup (Optional)
If using Binance Futures:
Entry: Limit Buy at 2.51
Take Profit: 2.59 and 2.63 (split your position or trail stop)
Stop Loss Trigger: 2.45
Final Stop Price: 2.44
Penafian
Maklumat dan penerbitan adalah tidak dimaksudkan untuk menjadi, dan tidak membentuk, nasihat untuk kewangan, pelaburan, perdagangan dan jenis-jenis lain atau cadangan yang dibekalkan atau disahkan oleh TradingView. Baca dengan lebih lanjut di Terma Penggunaan.
Penafian
Maklumat dan penerbitan adalah tidak dimaksudkan untuk menjadi, dan tidak membentuk, nasihat untuk kewangan, pelaburan, perdagangan dan jenis-jenis lain atau cadangan yang dibekalkan atau disahkan oleh TradingView. Baca dengan lebih lanjut di Terma Penggunaan.