[F][IND] - Time Range HighlighterDescription:
Introducing the Time Range Highlighter script for TradingView – a precision tool designed to enhance your chart analysis experience with a focus on simplicity and functionality. This script caters to traders who find value in isolating specific time intervals for a more detailed market study, akin to the concept of trading "macros".
Key Features:
1. Effortless Customization:
Define and highlight your preferred time ranges effortlessly. Tailor the script to align with your trading strategy by setting specific start and end times for enhanced precision.
2. Multi-Interval Support:
Seamlessly analyze multiple time ranges concurrently. Toggle between highlighted intervals with ease, allowing for a comprehensive examination of various market conditions without cluttering your chart.
3. Enable/Disable On-Demand:
Maintain control over the clutter on your chart. The enable/disable feature lets you activate or deactivate the highlighted time ranges at your discretion, ensuring a clean and unobstructed view when needed.
4. Focused Chart Analysis:
By visually emphasizing chosen time intervals, the script facilitates a focused analysis of critical market movements, enabling traders to identify patterns and trends with efficiency. This feature is particularly beneficial for those employing trading "macros" to filter out noise and concentrate on key periods.
Usage Instructions:
1. Apply the Time Range Highlighter script to your TradingView chart.
2. Customize the script settings to define specific time ranges tailored to your trading preferences.
3. Toggle between enabled and disabled states as needed to maintain clarity on your chart.
4. Leverage the script to streamline your chart analysis process and make more informed trading decisions, especially when employing trading "macros" to focus on specific market intervals.
Disclaimer:
This indicator is provided for educational purposes only. Trading involves risk, and users should consult with a financial professional before making any trading decisions.
Your Feedback Matters!
Please feel free to comment or reach out if you have any improvement suggestions or if you would like to request the development of a specific indicator. Your feedback is invaluable!
Cari dalam skrip untuk "range"

Average Range Levels [Pro+]Description:
The Average Range Levels builds on the concepts of ADR projections showcased in its lite version.
Average Daily Range (ADR) is a common metric used to measure volatility in an asset. It calculates the average difference between the highest and lowest price over a time interval – normally five days.
The Inner Circle Trader teaches the importance of this metric from an algorithmic point of view; in particular the 1/3ADR price level is deemed to be a threshold used to determine the area at which a Judas Swing – false move to trick market participants, protraction, manipulation – might exhaust.
Another key difference in the ICT-use of this metric compared to the classic approach is that the average range is calculated from New York midnight Time, rather than the daily candle's open.
This exact concept was upscaled to higher Timeframe fractals obtaining the Average Weekly Range (AWR) and the Average Monthly Range (AMR). The latter two metrics are anchored at the first Monday’s midnight (New York Time) of the respective interval – however they also have the option to be anchored at the True Week Open (Tuesday’s Daily Open) and True Month Open (Second Week Open).
It is crucial to remember that the elements of Time are key when it comes to interpreting how price action will, or won't, react to these levels: what Time of the day is it? what day of the week? what week of the month?
If one thinks about the Power of Three of a candle (Accumulation, Manipulation Distribution), it is highly unlikely that a Manipulation event will happen later in the candle’s development – seeing the 1/3ADR hold in London session or New York open, seeing the 1/3AWR hold on Tuesday or Wednesday, or seeing price race to the 1/3AMR early on in the month gives undeniable edge to an Analyst.
Apart from the 1/3 level seen from a Judas perspective, the opposing 1/3 level, and the full AR projections, are excellent algorithmic levels at which we will see orderflow or reactions worth studying. These can be take profit targets, reversal opportunities, pyramid entries, …
Last but not least, the tool is equipped with a Data Table. You have a clear narrative but you are unsure of when price will expand? Track the previous 5 ARs and the current Range for Daily, Weekly, and Monthly – the smaller the AR the higher the chance for an expansion, the larger the AR the higher the chance for a consolidation.
Tool Features:
Auto Color the drawings based on your chart’s background or choose your own
Decide whether to consider daily candles, or New York (00:00 to 00:00 NY Time) for the basis of the calculation
Show the last 10 Historical Levels
– See the AR Range, the AR price levels and 1/3AR price levels by hovering over the text labels
Plot the AR levels from their Time Anchor, or as offset markers on the side for a cleaner look
Show/Hide all elements individually
In the Idea below, you can see how INDEX:BTCUSD hit the 1/3AMR level at the end of the second week of the month. The subsequent rejection from this level suggests we might have witnessed a Judas Swing, hence we flip to bullish bias.
In the more recent AWR levels, we can see how price did not touch any level until friday – this is a consolidation week with low probability setups. This was expected, if one looks at the precious two week's ranges and respective average ranges in the Data Table: both breached the AR value, due to to the great expansion higher.
Lastly for the ADR levels we can see how the Judas higher got beautifully stopped at the 1/3 level, and the full ADR level on the opposite side catches price while it falls.
To Get Access, and Level Up see the Author's Instructions below!
This indicator is available only on the TradingView platform.
⚠️ Intellectual Property Rights ⚠️
While this tool's base concepts are public, its interpretation, code, and presentation are protected intellectual property. Unauthorized copying or distribution is prohibited.
⚠️ Terms and Conditions ⚠️
This financial tool is for educational purposes only and not financial advice. Users assume responsibility for decisions made based on the tool's information. Past performance doesn't guarantee future results. By using this tool, users agree to these terms.
Skrip berbayar

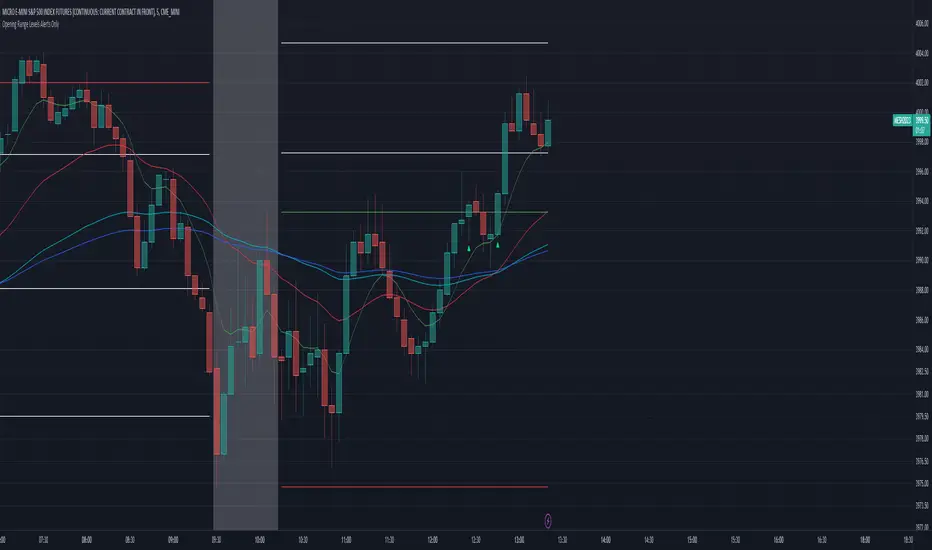
Zazzamira 50-25-25 Trend System Alerts OnlyPublishing my trading system script. It consist of several conditions to happen in order to open a trade. Work best on ES/MES 5 minute timeframe.
I like to use it with this settings:
- UTC -6 (don't tick Exchange Timezone)
and rest as default
To enter a trade, the following conditions must be met: Entry 1: the opening range (8:30AM - 9:15AM UTC-6) must be defined and the price must close above or below the opening range on the 5-minute timeframe. This entry condition defines the trade direction (above = long / below = short). Once the opening range is defined, the Trend-Based Fib Extension is applied from the range high to the range low (and vice versa). Fib levels are required for Exit conditions. Entry 2: the 8 - 27 - 67 - 97 EMAs must be defined. If the EMAs value order is 8 > 27 > 67 > 97, long-only trades are allowed. If the EMAs value order is 8 < 27 < 67 < 97, short-only trades are allowed. This entry condition filters fake breakouts of Entry 1. Entry 3: no trades are allowed after 12:59 UTC-6 (2PM EST). Entry 4: if Entry 1, Entry 2, and Entry 3 conditions are valid and the price hasn't reached the 23.6% Fib line, an entry order can be set at the range high/long with 4 contracts. To exit a trade, the following conditions must be met: Exit 1 (Stop loss): set a trailing stop based on 2.1x ATR (14) from entry. Exit 2: take 50% profits at the 23.6% Fib and leave trailing stop untouched. Exit 3: if Exit 2 triggers, take 50% (25% of total entry) off at 61.8% Fib, leaving Exit 2 trailing stop values valid. Exit 4: exit the full position at the FIB 100% value. Exit 5: all trades must be closed at 3pm UTC-6 (4PM EST). So basically Take Profit are 50%-25%-25% of position.
Code has been written by © Hiubris_Indicators who has been an amazing coder and gave me the possibility to make this script public so a really big shoutout to him.
This indicator only works for alerts, please check version without alerts to backtest or tweaks. This indicator is meant to be used to automate the system via webhooks
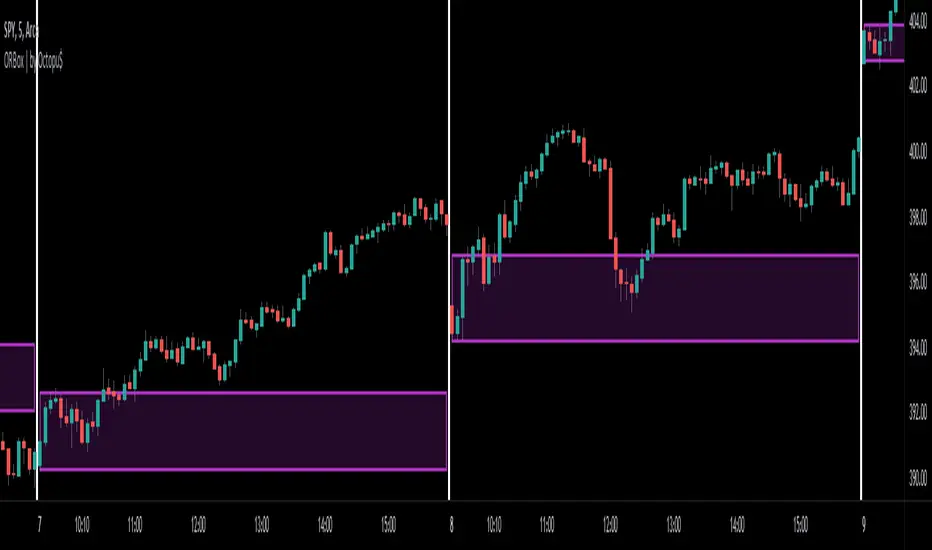
ORBox | by Octopu$📈 ORBox | by Octopu$
ORBox is a Box for the Opening Range Breakout
The Box is added automatically according to the User preferences through GUI
This Indicator includes a Dropdown selection for which Range for the Breakout you want to use
ORBox has built-in Alerts for when the Breakout happens according to your preferences
Works in any Timeframe with any Ticker
(Using SPY 5m just as an example:)
www.tradingview.com
SPY
Features:
• Opening Breakout Range (ORB)
• Dropdown menu selection to choose which TF to watch
• Built-in Alerts for Momentum Awareness
Options:
• Customization for Box Colors and Sizes
• Display ORB for Current Day or Previous
Notes:
v1.0
ORBox Indicator release
Changes and updates can come in the future for additional functionalities or per requests.
Did you like it? Shoot me a message! I'd appreciate if you dropped by to say thanks.
- Octopu$
🐙
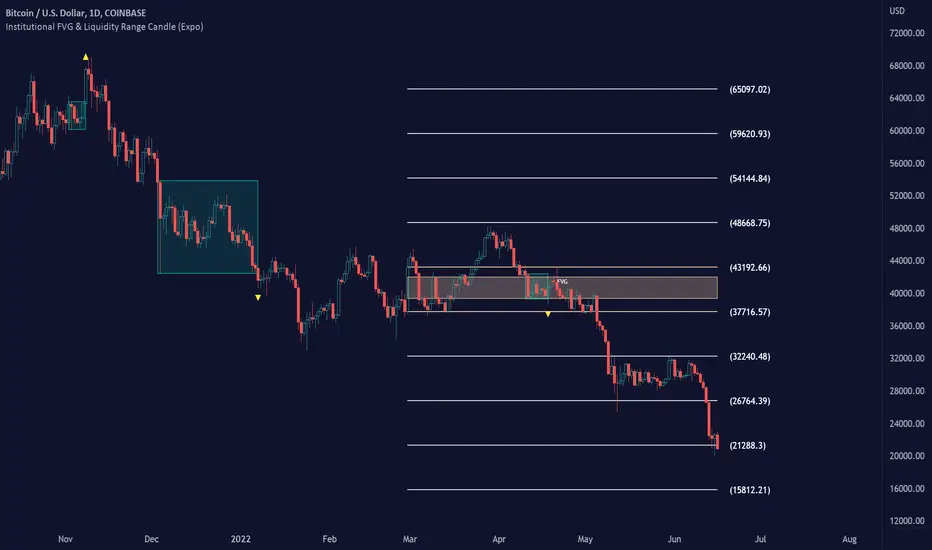
Institutional FVG & Liquidity Range Candle (Expo)█ Institutional FVG with predicted SR levels & Liquidity Range Candle is an indicator that uses Smart Money Concepts to give you the insights needed to make informed decisions based on the theory in SMC. This premium toolkit work in any market and timeframe.
█ Institutional Fair Value Gap , also known as imbalance, inefficiencies, and Liquidity void, identifies the most significant FVG within the lookback period. This is often referred to as Institutional Fair Value Gap since only big players can cause these liquidity voids.
Fair Value Gap, Liquidity voids are sudden price changes without enough liquidity at a stable price, and the price jumps from the originating price level to the final price level, creating an imbalance in price.
The price tends to fill or retest the FVG area, and traders understand at which price level institutional players have been active. FVG is a valuable concept in trading, as they provide insights about where many orders were injected, creating this inefficiency in the market. The price tends to restore the balance.
This indicator highlights the most significant Fair Value Gap on the chart and plots predicted future support and resistance levels based on the price action created at the FVG. A super simple and yet effective way to get solid market levels that acts as a magnet for the price.
█ Liquidity Range Candle is another trading concept used by large market players where they manipulate the price to stay inside a specific market area, creating a tight consolidation zone. Once the price breaks the liquidity range, liquidity flows into the market. It's an easy way to grab liquidity from retail traders. Stop losses are triggers, breakout traders jump into the market, and institutional traders absorb the liquidity.
If you don't see the liquidity, you become the liquidity!
A break of a liquidity range is a sign of a breakout, potential continuation, retracement, or reversal. Use it together with an overall market analysis. It's common that traders also mark the previous 1-3 liquidity ranges and plot them into the future. These zones can act as a future magnet for the price, and we can get a retest of the zones, or if we break above/below a previous range can be a sign of a trend change. We also know that these liquidity ranges have been important levels for institutional players, who may be willing to accumulate or distribute more orders at these levels.
█ HOW TO USE
Use the indicator to identify several important and commonly used trading concepts taught within the SMC.
Find Significant FVG
Find Significant liquidity ranges
-----------------
Disclaimer
Copyright by Zeiierman.
The information contained in my Scripts/Indicators/Ideas/Algos/Systems does not constitute financial advice or a solicitation to buy or sell any securities of any type. I will not accept liability for any loss or damage, including without limitation any loss of profit, which may arise directly or indirectly from the use of or reliance on such information.
All investments involve risk, and the past performance of a security, industry, sector, market, financial product, trading strategy, backtest, or individual’s trading does not guarantee future results or returns. Investors are fully responsible for any investment decisions they make. Such decisions should be based solely on an evaluation of their financial circumstances, investment objectives, risk tolerance, and liquidity needs.
My Scripts/Indicators/Ideas/Algos/Systems are only for educational purposes!
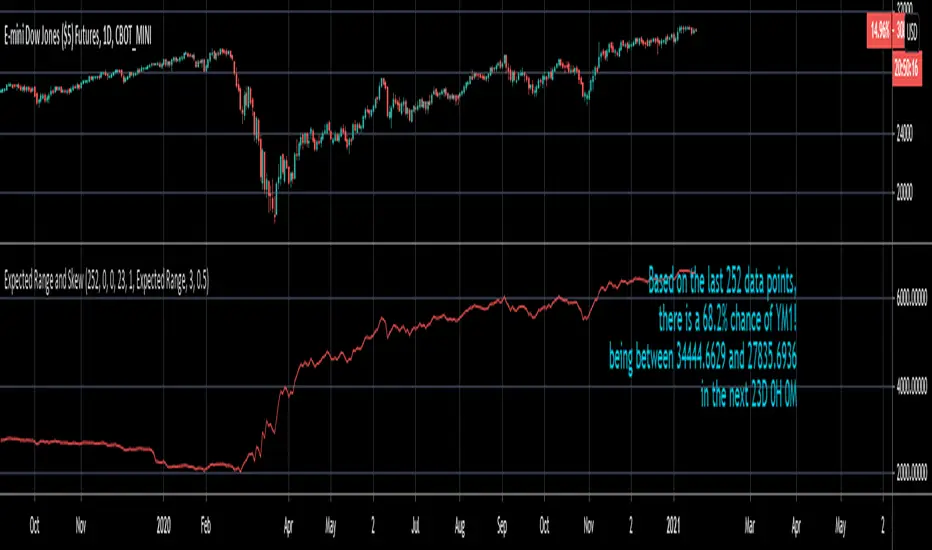
Expected Range and SkewThis is an open source and updated version of my previous "Confidence Interval" script. This script provides you with the expected range over a given time period in the future and the skew of that range. For example, if you wanted to know the expected 1 standard deviation range of MSFT over the next 20 days, this will tell you that. Additionally, this script will also tell you the skew of the expected range.
How to use this script:
1) Enter the length, this will determine the number of data points used in the calculation of the expected range.
2) Enter the amount of time you want projected forward in minutes, hours, and days.
3) Input standard deviation of the expected range.
4) Pick the type of data you want shown from the dropdown menu. Your choices are either the expected range or the skew of the expected range.
5) Enter the x and y coordinates of the label (optional). This is useful so it doesn't impede your view of the plot.
Here are a few notes about this script:
First, the expected range line gives you the width of said range (upper bound - lower bound), and the label will tell you specifically what the upper and lower bounds of the expected range are.
Second, this script will work on any of the default timeframes, but you need to be careful with how far out you try to project the expected range depending on the timeframe you're using. For example, if you're using the 1min timeframe, it probably won't do you any good trying to project the expected range over the next 20 days; or if you're using the daily timeframe it doesn't make sense to try to project the expected range for the next 5 hours. You can tell if the time horizon you're trying to project doesn't work well with the chart timeframe you're using if the current price is outside of either the upper or lower bounds provided in the label. If the current price is within the upper and lower bounds provided in the label, then the time horizon that you're projecting over is reasonable for the chart timeframe you're using.
Third, this script does not countdown automatically, so the time provided in the label will stay the same. For example, in the picture above, the expected range of Dow Futures over the next 23 days from January 12th, 2021 is calculated. But when tomorrow comes it won't count down to 22 days, instead it will show the range over the next 23 days from January 13th, 2021. So if you want the time horizon to change as time goes on you will have to update this yourself manually.
Lastly, if you try to set an alert on this script, you will get a warning about it possibly repainting. This is because of the label, not the plot itself. The label constantly updates itself, which triggers the warning. I tested setting alerts on this script both with and without the inclusion of the label, and without the label the repainting warning did not occur. So remember, if you set an alert on this script you will get a warning about it possibly repainting, but this is because of the label constantly updating, not the plot itself.
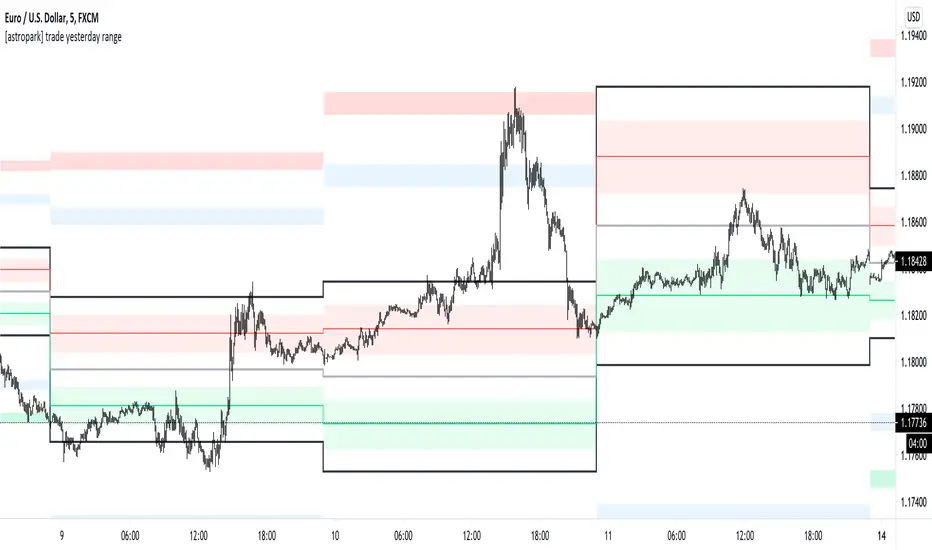
[astropark] trade yesterday rangeDear followers,
today a nice scalping tool for day trading on low time frames (1-3-5 minutes)!
Each day the indicator will print some important levels and ranges related to the trading day before:
yesterday high (black line)
yesterday day range averange (silver line)
yesterday low (black line)
average between yesterday high and yesterday average, together with a resistance range (red)
average between yesterday low and yesterday average, together with a support range (green)
two extension ranges above yesterday high (first is blue, second is red)
two extension ranges below yesterday low (first is blue, second is green)
Trading levels is one of most effective trading tecniques:
once a level is broken upwards, you can long (buy) the bullish retest with stoploss below recent low
once a level is broken downwards, you can short (sell) the bearish retest with stoploss below recent high
consolidation below or at a resistance level is bullish, so long (buy) breakout upwards and long more on a bullish retest of broken level
consolidation above or at a support level is bearish, so short (sell) breakout downwards and short more on a bearish retest of broken level
many times you see a level to be tested 2 or 3 times: short (sell) double and triple top, long (buy) double or triple bottom
Here you can see the levels described above and basic usage in a consolidation trading day:
A trader who wants to be a winner must understand that money and risk management are very important, so manage your position size and always have a stop loss in your trades.
Here you can see many examples on how to use this indicator.
Triple top on yesterday range high: perfect short setup (5 take profits targets in the example)
Resistance levels broken: long setup on bullish retest (2 take profits targets in the example)
Double top and support broken: 2 short setups (2 and 3 take profits targets in the example)
Here some examples how to basically use the indicator in a consolidation trading day: short (sell) resistance levels, long (buy) support levels
This is a premium indicator , so send me a private message in order to get access to this script.
1of1 Trades Expected Ranges (Friday Close Calculator)Expected Ranges (Friday Close Calculator)
Expected Ranges is a simple, non-plotting calculator designed for weekly market preparation.
It uses the most recent Friday’s daily close as the base price and calculates an expected trading range for the upcoming week.
This indicator is intentionally built as a calculator only — it does not draw lines or zones on the chart. This ensures there is no bleed between symbols and allows traders to convert levels into permanent TradingView drawings (horizontal lines and shaded rectangles) that are stored per symbol in their account.
How It Works
Friday Close is automatically detected from the daily chart.
You input a single value for Expected Weekly Move.
The indicator calculates:
Upper Range = Friday Close + Expected Move
Lower Range = Friday Close − Expected Move
Values are displayed in a clean top-right panel for quick reference.

CRT Market Structure Toolkit v4 ALEXCRT Market Structure Toolkit v4 — Developer Overview
CRT Market Structure Toolkit v4 is a public, protected TradingView indicator designed for discretionary traders who focus on market structure, liquidity, session behavior, and higher-timeframe (HTF) context.
The script combines multiple widely known institutional trading concepts into a single, highly configurable overlay.
It is intended to provide context and structural insight, not automated trading signals.
All logic is implemented in a protected format to prevent source-code access, while remaining fully usable as a public analysis tool.
Core Features
1. Previous Day High / Low (PDH / PDL) — Original Logic
Full 24-hour New York session tracking.
Dynamically records the true daily high and low.
Levels extend in real time until a liquidity sweep occurs.
Once swept:
Line style switches to dashed.
Level freezes permanently.
Optional clean labels that follow price until mitigation.
Configurable history depth.
PDH / PDL calculation, sweep detection, level freezing, and labeling behavior are original implementations.
2. HTF High / Low Sweep Levels — Original Logic
Tracks High / Low of any user-defined higher timeframe (default: 4H).
Levels extend forward and freeze after being swept.
Optional dynamically positioned labels.
Independent history controls.
HTF sweep logic and level lifecycle management are original to this script.
3. Fair Value Gaps (FVG) & Balanced Price Range (BPR)
Detection of bullish and bearish Fair Value Gaps using classic three-candle displacement logic.
Configurable filters:
Lookback window
Minimum gap size
Mitigation models (full, partial, or none)
Automatically highlights the nearest active FVG relative to price.
Marks Balanced Price Ranges (BPR) where bullish and bearish gaps overlap.
Credits / Inspiration
Fair Value Gap (FVG) and Balanced Price Range (BPR) concepts commonly used in institutional and ICT-style market structure methodologies.
4. Killzones (Sessions)
Time-based session boxes with dynamic high/low expansion.
Custom session times and colors.
Designed to integrate cleanly with PDH and HTF levels.
Credits / Inspiration
Killzone session concepts (Asia, London, New York).
5. Multi-Session Framework & Volume Profile
Up to six configurable global trading sessions.
Each session supports:
Visual box / area / line rendering
Session high and low
Optional Volume Profile
Volume Profile includes:
Point of Control (POC)
Value Area High / Low (VAH / VAL)
Low Volume Nodes (LVN)
Optional session status table (open / closed).
Credits / Inspiration
Session profiling and Market Profile / Volume Profile theory.
6. Auto Fibonacci Retracement
Automatic Fibonacci projection based on ZigZag pivots.
Dynamic deviation using ATR.
Supports extensions, custom levels, labels, and background fills.
Credits
Uses TradingView’s official ZigZag library (TradingView/ZigZag).
7. Opening Gaps (NWOG / NDOG)
New Week Opening Gap (NWOG)
New Day Opening Gap (NDOG)
Optional Consequent Encroachment (CE) and midpoint logic.
Historical gap management with cleanup routines.
Credits
Opening gap and consequent encroachment concepts used in institutional price delivery models.
8. HTF Candle Overlay (Advanced)
Higher timeframe candle reconstruction on lower timeframe charts.
Supports:
Multiple HTFs
Liquidity sweeps
Midpoints
FVGs and volume imbalances
HTF timers and bias filtering
Credits / Inspiration
Higher timeframe candle overlay and liquidity-based market structure methodologies.
9. SMT Divergence
Detection of Smart Money Technique (SMT) divergence between correlated instruments.
Pivot-based relative strength and weakness comparison.
Visual marking of bullish and bearish SMT conditions.
Credits
SMT divergence concept (inter-market analysis).
Design Philosophy
No trade signals.
No execution automation.
No repainting logic for decision levels.
State-aware drawings with controlled lifecycle management.
Built for discretionary traders prioritizing:
Market structure
Liquidity behavior
Higher timeframe bias
Session context
Usage, Visibility & Protection
Data Source & Instrument Note
Higher timeframe ranges (such as 4H highs and lows) may differ between futures and CFD instruments due to differences in data sources, session times, and candle construction.
This indicator calculates all levels based strictly on the selected symbol and its native data feed.
Users should be aware that HTF ranges and sweep behavior may not align perfectly across different instrument types, even when tracking the same underlying market.
This indicator is published as Public with Protected source code.
The script is fully usable by the public on TradingView charts.
Source code access, copying, modification, or derivative redistribution is not permitted.
The script is provided for personal, educational, and analytical use only.
It is not intended for commercial redistribution, resale, or inclusion in paid products or services.
Intellectual Property & Credits
PDH / PDL and HTF sweep systems are original implementations owned by the author.
Other components represent integrations or adaptations of publicly known trading concepts, credited at a conceptual level.
The script is built using original code and publicly documented methodologies only.
It does not contain or reuse any private, paid, or proprietary indicators or scripts.
Disclaimer
This script does not constitute financial advice and does not provide trade signals.
Trading involves risk. Users are solely responsible for their trading decisions and risk management.
Best settings for personal use :
imgur.com

Dealing Range Auto-Zone v2.1Dealing Range Auto-Zone v2.1 - Summary
Purpose: Automatically creates zone-based support/resistance levels within a dealing range using percentage-based spacing with ATR-driven recommendations.
How It Works:
Click two points to define dealing range (high and low)
Set step % (e.g., 0.25% = one zone every 0.25% move)
Indicator calculates exact zone count and draws upper/lower zone boundaries
Optional center lines show midpoint of each zone
Key Features:
Zone-based S/R - Upper and lower boundaries instead of single lines (creates "price zones" rather than precise levels)
Auto-calculated spacing - Uses exact % steps with math.round() for optimal coverage (minimizes gaps near boundaries)
Adjustable zone width - Default 50% of step (e.g., 0.25% step = 0.125% zone width on each side)
Ghost zones - Extends zones above/below range for anticipating breakouts
ATR-based recommendations - Calculates Daily ATR and suggests Tight/Balanced/Wide step % based on current volatility
Smart validation - Compares your step % to ATR recommendations and shows if it's appropriate for current market conditions
Use Case:
Converts dealing ranges into tradeable S/R zones for 15s-5m intraday scalping. Makes it clear when price is "in a zone" vs "at a precise line." Ideal for MNQ, MGC, and other liquid futures/crypto.
Version 2.1 Changes:
New Features:
Daily ATR calculation with automatic Tight/Balanced/Wide step % recommendations
Volatility-based auto-recommendations (compares ATR(14) vs ATR(50))
Smart validation system that evaluates your step % choice and provides feedback
Info table shows all three ATR recommendations (Tight/Balanced/Wide)
Improvements:
Changed from math.floor() to math.round() for zone count calculation (eliminates gaps near boundaries)
Streamlined info table (removed redundant rows: Range points, Step %, Total Lines)
Added color-coded validation (green checkmark for appropriate settings, orange warning for extreme values)
Bug Fixes:
Fixed tooltip compilation error (moved dynamic ATR data to info table only)
Corrected validation logic to properly categorize step % ranges
Info Table Now Shows:
Range % (dealing range size as %)
Exact Zones (calculated, including fractional)
Zones Drawn (rounded to nearest whole number)
Zone Width (in price points and % of step)
Daily ATR (value and %)
Auto Rec (all three recommendations: T/B/W)
Your Step (with validation: ✓ Tight/Balanced/Wide or ⚠️ Very Tight/Wide)

Fear Greed RangesFear Greed Ranges Indicator: A Practical Guide to Market Sentiment Analysis
Introduction: Understanding Market Psychology
The "Fear Greed Ranges" indicator is a specialized technical analysis tool designed to visualize market sentiment through the lens of the Relative Strength Index (RSI). Unlike traditional RSI displays that show only a line graph, this indicator transforms raw RSI data into intuitive, color-coded zones that immediately signal whether markets are driven by fear, greed, or balanced sentiment. By providing this visual context, it helps traders identify potential turning points and manage risk more effectively.
Rational Integration: Why RSI Forms the Core
The indicator's foundation rests on the well-established RSI oscillator, chosen for several compelling reasons. First, RSI has stood the test of time since its development by J. Welles Wilder Jr. in 1978, with decades of empirical validation across various asset classes. Second, its mathematical construction—comparing the magnitude of recent gains to recent losses—directly measures momentum, which often precedes price reversals at extremes. Third, RSI's bounded nature (0-100 range) makes it ideal for creating clearly defined zones without subjective interpretation.
The integration transforms this numerical oscillator into a spatial visualization system. Rather than simply reading RSI values, traders can immediately perceive market conditions through color psychology: red triggers caution, green suggests opportunity, and yellow indicates neutrality. This multi-sensory approach reduces cognitive load during fast-moving markets and helps overcome confirmation bias that might occur when interpreting raw numbers.
Component Synergy: How the System Works Together
The indicator comprises three interconnected layers that create a unified analytical framework:
Core Calculation Layer: The traditional RSI calculation processes price data using the specified period length (default 14 periods). This generates the fundamental sentiment metric that drives all subsequent visualizations. The RSI calculation serves as the "brain" of the indicator, continuously analyzing market momentum.
Sentiment Classification Layer: This layer applies threshold logic to categorize each RSI reading into one of three emotional states. Readings above 70 are classified as "Greed" (market potentially overbought), below 30 as "Fear" (market potentially oversold), and between 30-70 as "Neutral" (balanced market conditions). These thresholds are based on the conventional RSI interpretation framework that has been widely adopted in technical analysis.
Visual Translation Layer: The most innovative aspect transforms numerical classifications into immediate visual cues. The colored ribbon area creates a "sentiment atmosphere" around price action, while the background tint provides subtle contextual framing. Horizontal reference lines at 30, 50, and 70 offer precise anchoring points, and the floating label provides real-time status updates. These elements work in concert: the ribbon shows sentiment intensity, the background provides persistent context, and the reference lines offer precise measurement points.
Practical Application: How to Use the Indicator Effectively
For optimal results, traders should incorporate this tool into a comprehensive analysis framework:
Initial Setup: Apply the indicator to any financial chart (stocks, forex, cryptocurrencies, etc.) using the default 14-period setting for general purposes. For shorter timeframes, consider reducing the period to 10; for longer-term analysis, increase to 20-25 periods.
Signal Interpretation:
When the ribbon turns red and the background tints crimson, exercise caution with new long positions and consider profit-taking on existing holdings.
Green zones may indicate accumulation opportunities, particularly if accompanied by bullish divergence (price making lower lows while RSI makes higher lows).
Yellow areas suggest normal market fluctuation where trend-following strategies may be more appropriate than reversal anticipation.
Confirmation Protocol: Always wait for additional confirmation before acting on extreme readings. For greed zone signals, look for bearish candlestick patterns, resistance at key price levels, or decreasing volume. For fear zone signals, watch for bullish reversal patterns, support levels holding, or increasing volume on down moves.
Timeframe Harmony: Analyze multiple timeframes simultaneously. A greed signal on a daily chart carries more weight than one on a 15-minute chart. Look for alignment across timeframes for higher-probability setups.
Alert Utilization: Enable the built-in alert system to receive notifications when sentiment zones change, ensuring you never miss potential opportunities or risk scenarios.
Original Contribution: What Sets This Indicator Apart
While RSI indicators are ubiquitous, the "Fear Greed Ranges" implementation offers several distinctive advantages:
Cognitive Efficiency: By converting numerical data into immediate visual perception, the indicator reduces the mental processing required to assess market conditions. Traders can glance at a chart and instantly understand the sentiment landscape without calculating or interpreting raw values.
Contextual Persistence: The colored background maintains a subtle but constant reminder of the prevailing sentiment, preventing the common pitfall of overlooking extreme conditions that might develop gradually.
Dual-Layer Communication: The system operates on both conscious (reference lines, labels) and subconscious (color psychology) levels, engaging multiple cognitive pathways for more reliable signal recognition.
Integrated Risk Framework: By explicitly naming emotional extremes ("Fear" and "Greed"), the indicator constantly reminds traders of the psychological forces driving markets, encouraging more disciplined decision-making.
Important Considerations and Limitations
No technical indicator guarantees future performance, and this tool should form only one component of a comprehensive trading strategy. Several critical factors require attention:
Market Context Matters: During strong trending markets, RSI can remain in extreme zones for extended periods without immediate reversal. In such conditions, the indicator signals strength rather than imminent reversal.
Volatility Adjustments: Highly volatile instruments may generate frequent zone changes that could lead to overtrading if not filtered appropriately.
Complementary Tools: This indicator works best when combined with price action analysis, volume studies, support/resistance levels, and fundamental factors where applicable.
Personal Adaptation: Traders should backtest the indicator on their preferred markets and timeframes to understand its characteristics before live implementation, potentially adjusting the RSI period or zone thresholds to match specific instrument behaviors.
The "Fear Greed Ranges" indicator serves as a visual translator of market psychology, converting mathematical momentum readings into intuitive emotional landscapes. By making RSI interpretation more immediate and accessible, it helps traders maintain objectivity during emotionally charged market conditions and supports more disciplined execution of their trading strategies. Remember that successful trading involves risk management, continuous learning, and adapting tools to your individual approach—this indicator provides one lens through which to view the markets, not a complete trading system in itself.

Aivance Opening Range & Vol FactorAivance Opening Range & Volume Factor
Overview
The Aivance Opening Range & Volume Factor is a comprehensive tool designed for Day Traders and Scalpers who rely on the "Opening Drive" or "Opening Range Breakout" (ORB) strategies.
The first candle of the trading session often sets the tone for the entire day. This indicator not only visualizes the price action of that critical first candle but also contextualizes the Volume to help you determine if there is enough institutional participation to sustain a trend.
Key Features
1. Opening Volume Factor
Unlike standard volume indicators, this tool calculates a specific Volume Factor for the opening candle:
Formula: (Volume of 1st Candle / Total Volume of Previous Day) * 100
Why it matters: A high Volume Factor (thresholds vary significantly depending on the chart timeframe and asset) suggests strong institutional interest immediately at the open. This often increases the probability of a sustained trend day rather than a choppy range day.
2. Automatic Session Detection
No manual time inputs are required.
The indicator uses time("D") to automatically detect the start of the trading day.
RTH vs. ETH: It adapts to your chart settings. If you use "Regular Trading Hours" (RTH), it marks the 09:30 NY open. If you use "Extended Trading Hours" (ETH), it marks the pre-market open.
3. Visual Opening Range
Box & Lines: Draws a box highlighting the High/Low and the Body (Open/Close) of the opening candle.
Extension: Extends support/resistance lines across the session to help identify breakouts or retests of the opening range later in the day.
4. Smart "Pullback" Logic (Optional)
This script includes a unique filter called "Show only on Pullback":
Default (False): The range is drawn immediately when the first candle closes.
Enabled (True): The range is hidden until the market prints a candle in the opposite direction of the opening move.
Strategy: This helps filter out impulsive moves and encourages trading the "retest" or the failure of the initial drive, rather than chasing the first tick.
How to Use
Trend Confirmation: Look for a breakout of the Opening Box combined with a high Volume Factor.
Support/Resistance: Use the extended gray lines (High/Low of the first candle) as key pivot points for stop-losses or entry targets.
Context: Compare the Volume Factor across different days to establish a baseline for your specific asset (e.g., what constitutes "High Volume" for NQ vs. ES vs. AAPL).
Settings
Colors: Fully customizable colors for Long (Bullish) and Short (Bearish) opening ranges.
Volume Factor: Toggle the text label on/off and adjust size/color.
Logic: Toggle the "Pullback" requirement on/off.
Disclaimer: This tool is for informational purposes only and does not constitute financial advice. Always manage your risk.

eBacktesting - Learning: BreakoutseBacktesting - Learning: Breakouts highlights ranges & breakout behaviors in a clean, visual way.
It automatically:
- Detects consolidation ranges (tight price action) and draws a range box
- Marks a breakout only when a candle CLOSES outside the range (no wick-only breakouts)
Adds a label on the breakout candle (↑ bullish breakout / ↓ bearish breakout)
These indicators are built to pair perfectly with the eBacktesting extension, where traders can practice these concepts step-by-step. Backtesting concepts visually like this is one of the fastest ways to learn, build confidence, and improve trading performance.
Educational use only. Not financial advice.

Sessions + Prev + PDH/PDL + Killzones SuiteDescription
This indicator is designed to provide time-based and price-based market context by combining session ranges with commonly referenced prior levels into a single, unified framework.
The purpose of the script is contextual analysis, not signal generation.
What the script does
The script tracks and plots the following elements directly on the price chart:
• High and Low ranges for multiple trading sessions (Asia, London, New York morning, and New York afternoon)
• High and Low levels from the previous occurrence of each session
• Prior Day High (PDH) and Prior Day Low (PDL)
• Optional session “killzone” boxes that visually mark active session time windows
All calculations are performed using time-based session boundaries and price extrema (high/low) within those windows.
Why these components are combined
Sessions, previous session levels, and prior day levels are frequently analyzed together by discretionary traders because they represent:
• Where liquidity formed earlier in the day or previous day
• Where price previously paused, expanded, or reversed
• Natural reference points for intraday structure and range analysis
Instead of plotting these elements using multiple separate scripts, this indicator integrates them into one consistent framework so that all levels are calculated using the same timezone, session logic, and display rules.
This avoids mismatched session times, duplicate levels, or conflicting calculations that can occur when multiple scripts are used simultaneously.
How the script works (high-level)
• Each session is defined using user-selectable session times and timezone
• During a session, the script tracks the highest and lowest traded price
• When a session ends, its final high and low are stored as the “previous session” levels
• PDH and PDL are calculated using the completed trading day
• Lines and labels are anchored to the bars where levels are formed, rather than extending indefinitely
• Optional display filters allow users to show only the current trading day to reduce chart clutter
No forward-looking logic, prediction, alerts, or trade execution logic is included.
How to use it
This script is intended to be used as a visual reference tool to help traders:
• Identify session boundaries and intraday ranges
• Observe how price reacts near prior session highs and lows
• Assess where price is trading relative to PDH and PDL
• Maintain consistent session timing across different timezones
The script does not provide trade entries, exits, alerts, or performance claims.
Important notes
• This indicator does not generate buy or sell signals
• It does not predict future price movement
• It is not a trading strategy
• All decisions remain the responsibility of the user
Disclaimer
This script is provided for educational and informational purposes only.
It does not constitute financial advice. Trading involves risk, and users should apply appropriate risk management and personal judgment when using any technical tool.

HTF High/Low/Open RangesHTF High/Low/Open Ranges is an indicator designed to visualize higher-timeframe (HTF) ranges on lower-timeframe charts.
It automatically groups candles by the selected timeframe (15m, 1H, 4H, Daily, Weekly) and plots:
the High level of the range,
the Low level of the range,
the Open level of the range,
vertical lines marking the start of each new HTF period.
Тime offset support (useful for New York / London sessions).
How to use
Use HTF High / Low as key liquidity and price reaction levels.
HTF Open often acts as an intraday equilibrium level.
Vertical lines help visually track transitions between trading periods.

[GYTS-Pro] Market Regime Detector🧊 Market Regime Detector (Professional Edition)
🌸 Part of GoemonYae Trading System (GYTS) 🌸
🌸 --------- INTRODUCTION --------- 🌸
💮 What is the Market Regime Detector?
The Market Regime Detector (Pro) is an elite, consensus-based market state analyzer designed to filter noise and identify the true underlying market structure. By distinguishing between trending (bullish or bearish) and cyclic (range-bound) market conditions with high precision, this detector acts as the "brain" of your trading system. Instead of forcing a single strategy across incompatible market conditions, the detector empowers you to deploy the right tactic at exactly the right time.
💮 The Importance of Market Regimes
Markets constantly shift between different behavioural states or "regimes":
• Bullish trending markets - characterised by sustained upward price movement
• Bearish trending markets - characterised by sustained downward price movement
• Cyclic markets - characterised by range-bound, oscillating behaviour
Each regime requires fundamentally different trading approaches. Trend-following strategies excel in trending markets but fail in cyclic ones, while mean-reversion strategies shine in cyclic markets but underperform in trending conditions. However, detecting these regimes is easier said than done, and we have gone through hundreds of hours of testing to create the Market Regime Detector, using multiple very sophisticated methods in an easy-to-use indicator.
💮 Professional vs Community Edition
The Market Regime Detector comes in two versions: a comprehensive Professional Edition and a streamlined Community Edition.
Key advantages of the Professional Edition:
• Enhanced detection accuracy - Utilises 5 advanced detection methods (compared to only 2 in the CE version)
• Proprietary cycle measurement - Automatically detects the market's dominant cycle instead of requiring manual input
• Superior consensus mechanism - Includes a unique "strength-weighted decision" mode that gives more influence to stronger signals
• Reduced false signals - Multiple complementary methods working together provide more reliable regime identification
• Advanced DSP algorithms - Implements sophisticated digital signal processing techniques for superior market analysis
The Professional Edition delivers significant improvements in detection accuracy, signal stability, and overall trading performance.
🌸 --------- KEY FEATURES --------- 🌸
💮 Consensus-Based Detection
Rather than relying on a single method, our detector employs multiple complementary detection methodologies that analyse different aspects of market behaviour:
• Advanced digital signal processing techniques
• Volatility and momentum analysis
• Adaptive filters and mathematical transformations
• Cycle identification
• Channel breakout detection
These diverse perspectives are synthesised into a robust consensus that minimises false signals while maintaining responsiveness to genuine regime changes.
💮 Proprietary Dominant Cycle Measurement ( Pro Edition only )
At the heart of our Professional Edition detector is a proprietary dominant cycle measurement system that automatically and adaptively identifies the market's natural rhythm. This system provides a stable reference framework that continuously adapts to changing market conditions while avoiding the erratic behaviour of typical cycle-finding algorithms like Hilbert Transforms, Discrete Fourier Transforms, or autocorrelation measurements.
Unlike the Community Edition which requires manual input of a single, constant dominant cycle period, the Professional Edition automatically detects and continuously adapts this critical parameter. This automated and adaptive approach ensures optimal detection accuracy across different markets and timeframes without requiring user expertise in cycle analysis, and provides significantly better responsiveness to evolving market conditions.
💮 Intuitive Parameter System
We've distilled complex technical parameters into intuitive controls that traders can easily understand:
• Adaptability - how quickly the detector responds to changing market conditions
• Sensitivity - how readily the detector identifies transitions between regimes
• Consensus requirement - how much agreement is needed among detection methods
This approach makes the detector accessible to traders of all experience levels while preserving the power of the underlying algorithms.
💮 Visual Market Feedback
The detector provides clear visual feedback about the current market regime through:
• Colour-coded chart backgrounds (purple shades for bullish, pink for bearish, yellow for cyclic)
• Colour-coded price bars
• Strength indicators showing the degree of consensus
• Customisable color schemes to match your preferences or trading system
💮 Integration in the GYTS suite
What is of paramount importance, is that the Market Regime Detector is compatible with the GYTS Suite , i.e. it passes the regime into the Order Orchestrator where you can set how to trade the trending and cyclic regime. The intention is to integrate it with more indicators.
🌸 --------- CONFIGURATION SETTINGS --------- 🌸
💮 Adaptability
Controls how quickly the Market Regime detector adapts to changing market conditions. You can see it as a low-frequency, long-term change parameter:
• Very Low: Very slow adaptation, most stable but may miss regime changes
• Low: Slower adaptation, more stability but less responsiveness
• Normal: Balanced between stability and responsiveness
• High: Faster adaptation, more responsive but less stable
• Very High: Very fast adaptation, highly responsive but may generate false signals
This setting affects lookback periods and filter parameters across all detection methods.
💮 Sensitivity
Controls the conviction threshold required to trigger a regime change. This acts as a high-frequency, short-term filter for market noise:
• Very Low: Requires overwhelming evidence to identify a regime change.
• Low: Prioritizes stability; reduces false signals but may delay transition detection.
• Normal: Balanced sensitivity suitable for most liquid markets.
• High: Highly responsive; detects subtle regime changes early but may react to market noise.
• Very High: Extremely sensitive; detects minor fluctuations immediately.
Pro Feature Note: In the Strength-Weighted Decision mode, this setting acts as a dynamic calibrator. It not only adjusts individual method thresholds but also scales the global consensus threshold . A 'High' sensitivity lowers the barrier for the weighted consensus, allowing the system to react to early-stage breakouts even if not all methods fully agree yet.
💮 Consensus Mode
Determines how the signals from all detection methods are combined to produce the final market regime:
• Any Method (OR) : Signals bullish/bearish if any method detects that regime. If methods conflict, the stronger signal wins. More sensitive, catches more regime changes but may produce more false signals.
• All Methods (AND) : Signals only when all methods agree on the regime. More conservative, reduces false signals but might miss some legitimate regime changes.
• Weighted Decision : Balances all methods with equal voting rights. Signals bullish/bearish when the weighted consensus reaches a fixed majority (0.5). Provides a middle ground between sensitivity and stability.
• Strength-Weighted Decision ( Pro Edition only ): A "meritocratic" approach where methods reporting extreme confidence (high signal strength) are given proportionally more weight than those reporting weak signals. Unlike standard voting, a single clear signal from a highly reliable method can override indecision from others.
Note: The threshold for this decision is dynamically calibrated by your 'Sensitivity' setting, ensuring the logic adapts to your desired risk profile.
Each mode also calculates a continuous regime strength value that drives the color intensity in the 'unconstrained' display mode, giving you a visual heatmap of trend conviction.
💮 Display Mode
Choose how to display the market regime colours:
• Unconstrained regime: Shows the regime strength as a continuous gradient. This provides more nuanced visualisation where the intensity of the color indicates the strength of the trend.
• Consensus only: Shows only the final consensus regime with fixed colours based on the detected regime type.
The background and bar colours will change to indicate the current market regime:
• Purple shades : Bullish trending market. In 'unconstrained' mode, darker purple indicates a stronger bullish trend.
• Pink shades : Bearish trending market. In 'unconstrained' mode, darker pink indicates a stronger bearish trend.
• Yellow : Cyclic (range-bound) market.
💮 Custom Color Options
The Market Regime Detector allows you to customize the color scheme to match your personal preferences or to coordinate with other indicators:
• Use custom colours: Toggle to enable your own color choices instead of the default scheme
• Transparency: Adjust the transparency level of all regime colours
• Bullish colours: Define custom colours for strong, medium, weak, and very weak bullish trends
• Bearish colours: Define custom colours for strong, medium, weak, and very weak bearish trends
• Cyclic color: Define a custom color for cyclic (range-bound) market conditions
🌸 --------- DETECTION METHODS --------- 🌸
💮 Five-Method Consensus Architecture
The Professional Edition employs a sophisticated multi-stage architecture to determine market regimes with high precision.
The detection process flows through four logical stages:
1. Market Data & Cycle Detection
Price data flows into the system where the Dominant Cycle Detector automatically identifies the market's natural rhythm. This adaptive cycle length calibrates all subsequent calculations, ensuring the detector remains in sync with changing market conditions without manual adjustments.
2. Five Detection Methods
Using the detected cycle, five complementary algorithms independently evaluate the market state:
• Cyclic Centroid Analysis : Calculates the market's 'centre point' over its dominant cycle and measures price displacement to determine trend or equilibrium.
• Spectral Momentum : Measures momentum across the market's frequency spectrum to identify trend concentration.
• Energy Distribution Gauge : Gauges how price movement energy is distributed to flag cyclic or trending states.
• Volatility Channel : Models the market's volatility state, using band breakouts to indicate a trend.
• Phase Coherence Detector : Analyses phase relationships between adaptive low-pass filters to detect trend stability and identify early regime shifts.
3. Consensus Engine
The signals from all five methods are fed into the Consensus Engine. Depending on your configuration, it aggregates these votes using one of four logic modes (Any, All, Weighted, or Strength-Weighted) to filter out noise and confirm the true market regime.
4. Regime Output
The final result is broadcast as a clear market state:
• Bullish (1) : Trending upwards
• Bearish (-1) : Trending downwards
• Cyclic (0) : Range-bound or oscillating
This output drives the visual feedback on your chart and can be streamed directly to the Order Orchestrator for automated strategy switching.
💮 Synergy & Complementarity
What makes these methods powerful is not just their individual sophistication, but how they complement one another:
• Some excel at early detection while others provide confirmation
• Some analyse time-domain behaviour while others work in the frequency domain
• Some focus on momentum characteristics while others assess volatility patterns
• Some respond quickly to changes while others filter out market noise
This creates a comprehensive analytical framework that can detect regime changes more accurately than any single method. All methods utilize the automatically detected and continuously adaptive dominant cycle period, ensuring they remain precisely calibrated to current market conditions without manual intervention.
🌸 --------- USAGE GUIDE --------- 🌸
💮 Starting with Default Settings
The default settings (Normal for Adaptability, Sensitivity, and Consensus) provide a balanced starting point suitable for most markets and timeframes. Begin by observing how these settings identify regimes in your preferred instruments.
💮 Adjusting Parameters
• If you notice too many regime changes → Decrease Sensitivity or increase Consensus requirement
• If regime changes seem delayed → Increase Adaptability
• If a trending regime is not detected, the market is automatically assigned to be in a cyclic state. The majority of methods actually measure this explicitly.
• If you want to see more nuanced regime transitions → Try the "unconstrained" display mode (note that this will not affect the output to other indicators)
💮 Trading Applications
Regime-Specific Strategies:
• Bullish Trending Regime - Use trend-following strategies, trail stops wider, focus on breakouts, consider holding positions longer, and emphasise buying dips
• Bearish Trending Regime - Consider shorts, tighter stops, focus on breakdown points, sell rallies, implement downside protection, and reduce position sizes
• Cyclic Regime - Apply mean-reversion strategies, trade range boundaries, apply oscillators, target definable support/resistance levels, and use profit-taking at extremes
Strategy Switching:
Create a set of rules for each market regime and switch between them based on the detector's signal. This approach can significantly improve performance compared to applying a single strategy across all market conditions. The Pro Edition's multiple detection methods and advanced consensus mechanisms provide more reliable regime transitions, leading to better strategy switching decisions.
GYTS Suite Integration:
• In the GYTS 🎼 Order Orchestrator, select the '🔗 STREAM-int 🧊 Market Regime' as the market regime source
• Note that the consensus output (i.e. not the "unconstrained" display) will be used in this stream
• Create different strategies for trending (bullish/bearish) and cyclic regimes. The GYTS 🎼 Order Orchestrator is specifically made for this.
• The output stream is actually very simple, and can possibly be used in indicators and strategies as well. It outputs 1 for bullish, -1 for bearish and 0 for cyclic regime.
🌸 --------- FINAL NOTES --------- 🌸
💮 Development Philosophy
The Market Regime Detector has been developed with several key principles in mind:
1. Robustness - The detection methods have been rigorously tested across diverse markets and timeframes to ensure reliable performance.
2. Adaptability - The detector automatically adjusts to changing market conditions, requiring minimal manual intervention.
3. Complementarity - Each detection method provides a unique perspective, with the collective consensus being more reliable than any individual method.
4. Intuitiveness - Complex technical parameters have been abstracted into easily understood controls.
💮 Ongoing Refinement
The Market Regime Detector is under continuous development. We regularly:
• Fine-tune parameters based on expanded market data using state-of-the-art Machine Learning techniques
• Research and integrate new detection methodologies
• Optimise computational efficiency for real-time analysis
Your feedback and suggestions are very important in this ongoing refinement process!

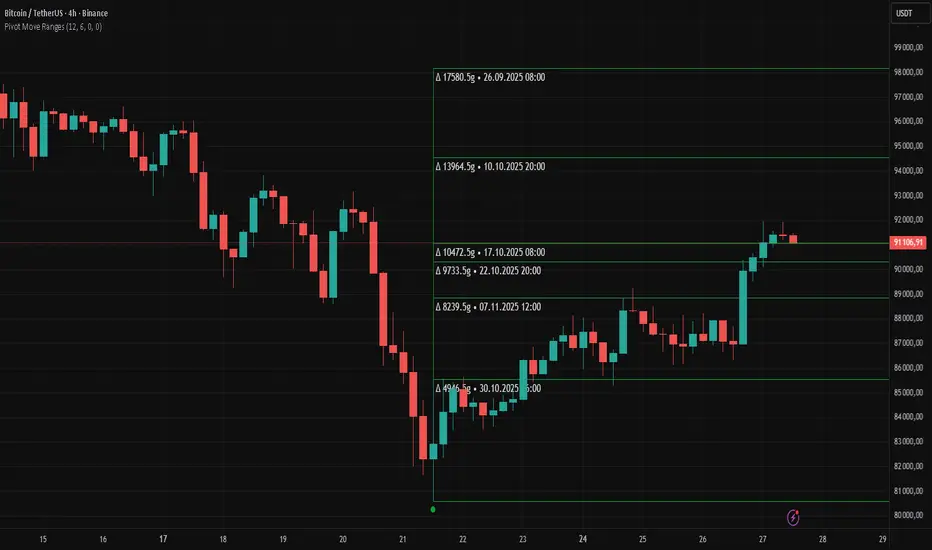
Pivot Move Ranges█ OVERVIEW
“Pivot Move Ranges” is an indicator that displays only the historical price ranges of moves that match the direction of the current swing.
It measures the price range of each individual swing and draws them as horizontal Δ-boxes positioned at the level of the most recently detected pivot.
The indicator operates with a delay equal to the set pivot detection length – after each new Pivot High, only red Δ-boxes appear showing the sizes of previous downward moves; after each new Pivot Low, only green Δ-boxes appear showing the sizes of previous upward moves. When the swing direction changes, the displayed set of levels instantly switches to the opposite direction.
█ CONCEPTS
The indicator was created to instantly provide the trader with objective, real historical price ranges – perfectly reinforcing classic tools such as Fibonacci extension/retracement, daily/weekly pivots, moving averages, order blocks, or Volume Profile.
It detects classic Pivot High and Pivot Low points:
- New Pivot High → only previous downward moves are shown (red Δ-boxes)
- New Pivot Low → only previous upward moves are shown (green Δ-boxes)
This ensures that at any moment you see only the historical ranges that match the current market direction. Price moves very often repeat themselves – the indicator makes these recurring levels immediately visible and ready to serve as natural reinforcement for other technical analysis tools.
█ FEATURES
- Pivot High / Pivot Low detection with adjustable length (default 12)
- Δ-boxes – thin horizontal lines showing the exact size of previous moves that match the current swing
- Automatic switching of the Δ-box set whenever a new opposite pivot appears
- Memory of the last N moves (default 6, max. 50) – oldest are automatically removed
- Labels showing move size (Δ) and start date/time
- Full color customization (separate for up and down), border and text transparency
- Choice of date format (DD.MM.YYYY or MM/DD/YYYY)
- Small circles marking the exact pivot locations
█ HOW TO USE
Add the indicator to your TradingView chart → paste the code → Add to Chart.
Settings:
- Pivot Length – higher values = fewer but more significant pivots (detected with a delay equal to this length)
- Max Corrections to Keep – how many previous matching moves are displayed at once
- Upward / Downward Box Color – colors of the Δ-boxes
- Box Border Transparency (%) – 0 = solid lines, 50–70 = subtle
- Show Δ Text + Move Start Date – turn labels on/off
Interpretation:
At any given moment the chart shows only the historical ranges of moves in the current direction:
- after a Pivot High → red Δ-boxes = “how far the market previously fell”
- after a Pivot Low → green Δ-boxes = “how far the market previously rose”
█ APPLICATIONS
- Instant reinforcement of technical levels – historical moves matching the current swing direction often coincide with Fibonacci levels, daily/weekly pivots, moving averages, or order blocks
- Fast cluster detection – set a high Max Corrections value (30–50) to see where the largest number of similarly sized moves cluster, then reduce to 6–10 and focus only on the most recent levels
█ NOTES
- On very strong trends, Δ-boxes can be extremely long – this is normal and correct behavior
- Always use as a supporting layer alongside other technical analysis tools
Match on Selectable Percentage Change + RangeIndicator Overview:
Match on Selectable Percentage Change + Range is a powerful analytical tool designed for traders and analysts who want to identify historical price bars that match a specific percentage variation, and then evaluate how price evolved in the following days. It combines precision filtering with visual tabular feedback, making it ideal for pattern recognition, backtesting, and scenario analysis.
What It Does
This indicator scans historical bars to find instances where the percentage change between two consecutive closes matches a user-defined target (± a customizable tolerance). Once matches are found, it displays:
The date of each match (most recent first)
The actual variation searched
The percentage change after 2, 10, 20, and 30 bars
The min-max range (in %) over those same periods
All results are shown in a dynamic table directly on the chart.
Inputs & Controls
Input Description
Which variation do you want to analyze? (%)
Set the target percentage change to look for (e.g. 2.5%)
% deviation from the variation to be considered (%) Define the tolerance range around the target (e.g. ±0.5%)
Bars to analyze (max 9999) Set how many past bars to scan
Show match table Toggle to enable/disable the entire table
Show percentage variations (2d, 10d, 20d, 30d) Toggle to show/hide post-match percentage changes
Show min-max ranges (2d, 10d, 20d, 30d) Toggle to show/hide post-match high/low ranges
Table Structure
Each row in the table represents a historical match. Columns include:
Date: When the match occurred
Variation in: The actual % change that triggered the match
2d / 10d / 20d / 30d: % change after those days
Min-Max 2d / 10d / 20d / 30d: Range of price movement after those days
Color coding helps quickly identify bullish (green) vs bearish (red) outcomes.
Use Cases
Backtesting: See how similar past moves evolved over time
Scenario modeling: Estimate potential outcomes after a known variation
Pattern recognition: Spot recurring setups or volatility clusters
Risk analysis: Understand post-variation drawdowns and upside potential
Tips for Use
Use tighter deviation (e.g. 0.3%) for precision, or wider (e.g. 1%) for broader pattern capture.
Combine with other indicators to validate setups (e.g. volume, RSI, trend filters).
Toggle off variation or range columns to focus only on the metrics you need.

Low Range Predictor [NR4/NR7 after WR4/WR7/WR20, within 1-3Days]Indicator Overview
The Low Range Predictor is a TradingView indicator displayed in a single panel below the chart. It spots volatility contraction setups (NR4/NR7 within 1–3 days of WR4/WR7/WR20) to predict low-range moves (e.g., <0.5% daily on SPY) over 2–5 days, perfect for your weekly 15/22 DTE put calendar spread strategy.
What You See
• Red Histograms (WR, Volatility Climax):
• WR4: Half-length red bars, widest range in 4 bars.
• WR7: Three-quarter-length red bars, widest in 7 bars.
• WR20: Full-length red bars, widest in 20 bars.
• Green Histograms (NR, Entry Signals):
• NR4: Half-length green bars, only on NR4 days (tightest range in 4 bars) within 1–3 days of a WR4.
• NR7: Full-length green bars, only on NR7 days within 1–3 days of a WR7.
• Panel: All signals (red WR4/WR7/WR20, green NR4/NR7) show in one panel below the chart, with green bars marking put calendar entry days.
Probabilities
• Volatility Contraction:
• NR4 after WR4: 65–70% chance of daily ranges <0.5% on SPY for 2–5 days (ATR drops 20–30%). Occurs ~2–3 times/month.
• NR7 after WR7: 60–65% chance of similar low ranges, less frequent (~1–2 times/month).
• Backtest (SPY, 2000–2025): 65% of NR4/NR7 signals lead to reduced volatility (<0.7% daily range) vs. 50% for random days.
• Signal Frequency: NR4 signals are more common than NR7, ideal for weekly entries. WR20 provides context but isn’t tied to NR signals.

Dual Volume Profiles: Session + Rolling (Range Delineation)Dual Volume Profiles: Session + Rolling (Range Delineation)
INTRO
This is a probability-centric take on volume profile. I treat the volume histogram as an empirical PDF over price, updated in real time, which makes multi-modality (multiple acceptance basins) explicit rather than assumed away. The immediate benefit is operational: if we can read the shape of the distribution, we can infer likely reversion levels (POC), acceptance boundaries (VAH/VAL), and low-friction corridors (LVNs).
My working hypothesis is that what traders often label “fat tails” or “power-law behavior” at short horizons is frequently a tail-conditioned view of a higher-level Gaussian regime. In other words, child distributions (shorter periodicities) sit within parent distributions (longer periodicities); when price operates in the parent’s tail, the child regime looks heavy-tailed without being fundamentally non-Gaussian. This is consistent with a hierarchical/mixture view and with the spirit of the central limit theorem—Gaussian structure emerges at aggregate scales, while local scales can look non-Gaussian due to nesting and conditioning.
This indicator operationalizes that view by plotting two nested empirical PDFs: a rolling (local) profile and a session-anchored profile. Their confluence makes ranges explicit and turns “regime” into something you can see. For additional nesting, run multiple instances with different lookbacks. When using the default settings combined with a separate daily VP, you effectively get three nested distributions (local → session → daily) on the chart.
This indicator plots two nested distributions side-by-side:
Rolling (Local) Profile — short-window, prorated histogram that “breathes” with price and maps the immediate auction.
Session Anchored Profile — cumulative distribution since the current session start (Premkt → RTH → AH anchoring), revealing the parent regime.
Use their confluence to identify range floors/ceilings, mean-reversion magnets, and low-volume “air pockets” for fast traverses.
What it shows
POC (dashed): central tendency / “magnet” (highest-volume bin).
VAH & VAL (solid): acceptance boundaries enclosing an exact Value Area % around each profile’s POC.
Volume histograms:
Rolling can auto-color by buy/sell dominance over the lookback (green = buying ≥ selling, red = selling > buying).
Session uses a fixed style (blue by default).
Session anchoring (exchange timezone):
Premarket → anchors at 00:00 (midnight).
RTH → anchors at 09:30.
After-hours → anchors at 16:00.
Session display span:
Session Max Span (bars) = 0 → draw from session start → now (anchored).
> 0 → draw a rolling window N bars back → now, while still measuring all volume since session start.
Why it’s useful
Think in terms of nested probability distributions: the rolling node is your local Gaussian; the session node is its parent.
VA↔VA overlap ≈ strong range boundary.
POC↔POC alignment ≈ reliable mean-reversion target.
LVNs (gaps) ≈ low-friction corridors—expect quick moves to the next node.
Quick start
Add to chart (great on 5–10s, 15–60s, 1–5m).
Start with: bins = 240, vaPct = 0.68, barsBack = 60.
Watch for:
First test & rejection at overlapping VALs/VAHs → fade back toward POC.
Acceptance beyond VA (several closes + growing outer-bin mass) → traverse to the next node.
Inputs (detailed)
General
Lookback Bars (Rolling)
Count of most-recent bars for the rolling/local histogram. Larger = smoother node that shifts slower; smaller = more reactive, “breathing” profile.
• Typical: 40–80 on 5–10s charts; 60–120 on 1–5m.
• If you increase this but keep Number of Bins fixed, each bin aggregates more volume (coarser bins).
Number of Bins
Vertical resolution (price buckets) for both rolling and session histograms. Higher = finer detail and crisper LVNs, but more line objects (closer to platform limits).
• Typical: 120–240 on 5–10s; 80–160 on 1–5m.
• If you hit performance or object limits, reduce this first.
Value Area %
Exact central coverage for VAH/VAL around POC. Computed empirically from the histogram (no Gaussian assumption): the algorithm expands from POC outward until the chosen % is enclosed.
• Common: 0.68 (≈“1σ-like”), 0.70 for slightly wider core.
• Smaller = tighter VA (more breakout flags). Larger = wider VA (more reversion bias).
Max Local Profile Width (px)
Horizontal length (in pixels) of the rolling bars/lines and its VA/POC overlays. Visual only (does not affect calculations).
Session Settings
RTH Start/End (exchange tz)
Defines the current session anchor (Premkt=00:00, RTH=your start, AH=your end). The session histogram always measures from the most recent session start and resets at each boundary.
Session Max Span (bars, 0 = full session)
Display window for session drawings (POC/VA/Histogram).
• 0 → draw from session start → now (anchored).
• > 0 → draw N bars back → now (rolling look), while still measuring all volume since session start.
This keeps the “parent” distribution measurable while letting the display track current action.
Local (Rolling) — Visibility
Show Local Profile Bars / POC / VAH & VAL
Toggle each overlay independently. If you approach object limits, disable bars first (POC/VA lines are lighter).
Local (Rolling) — Colors & Widths
Color by Buy/Sell Dominance
Fast uptick/downtick proxy over the rolling window (close vs open):
• Buying ≥ Selling → Bullish Color (default lime).
• Selling > Buying → Bearish Color (default red).
This color drives local bars, local POC, and local VA lines.
• Disable to use fixed Bars Color / POC Color / VA Lines Color.
Bars Transparency (0–100) — alpha for the local histogram (higher = lighter).
Bars Line Width (thickness) — draw thin-line profiles or chunky blocks.
POC Line Width / VA Lines Width — overlay thickness. POC is dashed, VAH/VAL solid by design.
Session — Visibility
Show Session Profile Bars / POC / VAH & VAL
Independent toggles for the session layer.
Session — Colors & Widths
Bars/POC/VA Colors & Line Widths
Fixed palette by design (default blue). These do not change with buy/sell dominance.
• Use transparency and width to make the parent profile prominent or subtle.
• Prefer minimal? Hide session bars; keep only session VA/POC.
Reading the signals (detailed playbook)
Core definitions
POC — highest-volume bin (fair price “magnet”).
VAH/VAL — upper/lower bounds enclosing your Value Area % around POC.
Node — contiguous block of high-volume bins (acceptance).
LVN — low-volume gap between nodes (low friction path).
Rejection vs Acceptance (practical rule)
Rejection at VA edge: 0–1 closes beyond VA and no persistent growth in outer bins.
Acceptance beyond VA: ≥3 closes beyond VA and outer-bin mass grows (e.g., added volume beyond the VA edge ≥ 5–10% of node volume over the last N bars). Treat acceptance as regime change.
Confluence scores (make boundary/target quality objective)
VA overlap strength (range boundary):
C_VA = 1 − |VA_edge_local − VA_edge_session| / ATR(n)
Values near 1.0 = tight overlap (stronger boundary).
Use: if C_VA ≥ 0.6–0.8, treat as high-quality fade zone.
POC alignment (magnet quality):
C_POC = 1 − |POC_local − POC_session| / ATR(n)
Higher C_POC = greater chance a rotation completes to that fair price.
(You can estimate these by eye.)
Setups
1) Range Fade at VA Confluence (mean reversion)
Context: Local VAL/VAH near Session VAL/VAH (tight overlap), clear node, local color not screaming trend (or flips to your side).
Entry: First test & rejection at the overlapped band (wick through ok; prefer close back inside).
Stop: A tick/pip beyond the wider of the two VA edges or beyond the nearest LVN, a small buffer zone can be used to judge whether price is truly rejecting a VAL/VAH or simply probing.
Targets: T1 node mid; T2 POC (size up when C_POC is high).
Flip: If acceptance (rule above) prints, flip bias or stand down.
2) LVN Traverse (continuation)
Context: Price exits VA and enters an LVN with acceptance and growing outer-bin volume.
Entry: Aggressive—first close into LVN; Conservative—retest of the VA edge from the far side (“kiss goodbye”).
Stop: Back inside the prior VA.
Targets: Next node’s VA edge or POC (edge = faster exits; POC = fuller rotations).
Note: Flatter VA edge (shallower curvature) tends to breach more easily.
3) POC→POC Magnet Trade (rotation completion)
Context: Local POC ≈ Session POC (high C_POC).
Entry: Fade a VA touch or pullback inside node, aiming toward the shared POC.
Stop: Past the opposite VA edge or LVN beyond.
Target: The shared POC; optional runner to opposite VA if the node is broad and time-of-day is supportive.
4) Failed Break (Reversion Snap-back)
Context: Push beyond VA fails acceptance (re-enters VA, outer-bin growth stalls/shrinks).
Entry: On the re-entry close, back toward POC.
Stop/Target: Stop just beyond the failed VA; target POC, then opposite VA if momentum persists.
How to read color & shape
Local color = most recent sentiment:
Green = buying ≥ selling; Red = selling > buying (over the rolling window). Treat as context, not a standalone signal. A green local node under a blue session VAH can still be a fade if the parent says “over-valued.”
Shape tells friction:
Fat nodes → rotation-friendly (fade edges).
Sharp LVN gaps → traversal-friendly (momentum continuation).
Time-of-day intuition
Right after session anchor (e.g., RTH 09:30): Session profile is young and moves quickly—treat confluence cautiously.
Mid-session: Cleanest behavior for rotations.
Close / news: Expect more traverses and POC migrations; tighten risk or switch playbooks.
Risk & execution guidance
Use tight, mechanical stops at/just beyond VA or LVN. If you need wide stops to survive noise, your entry is late or the node is unstable.
On micro-timeframes, account for fees & slippage—aim for targets paying ≥2–3× average cost.
If acceptance prints, don’t fight it—flip, reduce size, or stand aside.
Suggested presets
Scalp (5–10s): bins 120–240, barsBack 40–80, vaPct 0.68–0.70, local bars thin (small bar width).
Intraday (1–5m): bins 80–160, barsBack 60–120, vaPct 0.68–0.75, session bars more visible for parent context.
Performance & limits
Reuses line objects to stay under TradingView’s max_lines_count.
Very large bins × multiple overlays can still hit limits—use visibility toggles (hide bars first).
Session drawings use time-based coordinates to avoid “bar index too far” errors.
Known nuances
Rolling buy/sell dominance uses a simple uptick/downtick proxy (close vs open). It’s fast and practical, but it’s not a full tape classifier.
VA boundaries are computed from the empirical histogram—no Gaussian assumption.
This script does not calculate the full daily volume profile. Several other tools already provide that, including TradingView’s built-in Volume Profile indicators. Instead, this indicator focuses on pairing a rolling, short-term volume distribution with a session-wide distribution to make ranges more explicit. It is designed to supplement your use of standard or periodic volume profiles, not replace them. Think of it as a magnifying lens that helps you see where local structure aligns with the broader session.
How to trade it (TL;DR)
Fade overlapping VA bands on first rejection → target POC.
Continue through LVN on acceptance beyond VA → target next node’s VA/POC.
Respect acceptance: ≥3 closes beyond VA + growing outer-bin volume = regime change.
FAQ
Q: Why 68% Value Area?
A: It mirrors the “~1σ” idea, but we compute it exactly from empirical volume, not by assuming a normal distribution.
Q: Why are my profiles thin lines?
A: Increase Bars Line Width for chunkier blocks; reduce for fine, thin-line profiles.
Q: Session bars don’t reach session start—why?
A: Set Session Max Span (bars) = 0 for full anchoring; any positive value draws a rolling window while still measuring from session start.
Changelog (v1.0)
Dual profiles: Rolling + Session with independent POC/VA lines.
Session anchoring (Premkt/RTH/AH) with optional rolling display span.
Dynamic coloring for the rolling profile (buying vs selling).
Fully modular toggles + per-feature colors/widths.
Thin-line rendering via bar line width.

Candle Range Detector by TradeTech AnalysisCandle Range Detector by TradeTech Analysis
This advanced indicator identifies and visualizes price compression zones based on inside bar formations, then tracks how price behaves around those zones — offering valuable insights into liquidity sweeps, range expansions, and trap/mitigation behavior.
The script builds upon the foundational concept of range-based price action, commonly used by institutional traders, and adds automation, mitigation tracking, and sweep detection to map how price reacts around these critical ranges.
🔍 How It Works:
• Range Formation: A new range is detected when the current candle forms entirely within the high and low of the previous candle (i.e., an inside bar). This behavior often indicates price compression and potential breakout zones.
• Range Extension: Once a range is confirmed, the script projects upper and lower boundaries (using either a percentage-based multiplier or Fibonacci log extension), providing context for expected breakout zones.
• Mitigation Tracking: The script continuously monitors whether price breaks above or below the projected extensions, marking that range as mitigated — useful for confirming whether liquidity was absorbed.
• Sweep Detection: If price re-visits a mitigated zone and shows signs of a liquidity sweep (via wick + close behavior), the indicator triggers visual sweep labels and optional alerts.
🧠 Optional Visual Enhancements:
• Highlight range-forming candles with light blue background (toggle on/off)
• Midpoint dotted line for symmetry analysis
• Labels for “Range High” and “Range Low” for visual clarity
• Dynamic box drawing that adapts upon mitigation or continuation
⚙️ Customizable Features:
• Choose between Normal and Fibonacci-based detection modes
• Toggle visibility of range boxes, extension lines, and sweep markers
• Configure sweep alerts, mitigation window size, and visual transparency
⸻
🧪 Use Cases
• Identify consolidation zones before major price moves
• Confirm liquidity sweeps for entry/exit traps
• Visualize and test mitigation behavior of past zones
• Combine with Order Flow or Volume Profile tools to enhance context
⸻
⚠️ This is a fully original implementation that goes beyond classical inside-bar scanners by incorporating mitigation, extension projection, and liquidity sweeps — making it a powerful tool for intraday, swing, and even Smart Money-based trading setups.

3CRGANG - TRUE RANGEThis indicator helps traders identify key support and resistance levels using dynamic True Range calculations, while also providing a multi-timeframe trend overview. It plots True Range levels as horizontal lines, marks breakouts with arrows, and displays trend directions across various timeframes in a table, making it easier to align trades with broader market trends.
What It Does
The 3CRGANG - TRUE RANGE indicator calculates dynamic support and resistance levels based on the True Range concept, updating them as price breaks out of the range. It also analyzes trend direction across multiple timeframes (M1 to M) and presents the results in a table, using visual cues to indicate bullish, bearish, or neutral conditions.
Why It’s Useful
This script combines True Range analysis with multi-timeframe trend identification to provide a comprehensive tool for traders. The dynamic True Range levels help identify potential reversal or continuation zones, while the trend table allows traders to confirm the broader market direction before entering trades. This dual approach reduces the need for multiple indicators, streamlining analysis across different timeframes and market conditions.
How It Works
The script operates in the following steps:
True Range Calculation: The indicator calculates True Range levels (support and resistance) using price data (close, high, low) from a user-selected timeframe. It updates these levels when price breaks above the upper range (bullish breakout) or below the lower range (bearish breakout).
Line Plotting: Two styles are available:
"3CR": Plots one solid line after a breakout (green for bullish, red for bearish) and removes the opposing line.
"RANGE": Plots both upper and lower range lines as dotted lines (green for support, red for resistance) until a breakout occurs, then solidifies the breakout line.
Multi-Timeframe Trend Analysis: The script analyzes trend direction on multiple timeframes (M1, M5, M15, M30, H1, H4, D, W, M) by comparing the current close to the True Range levels on each timeframe. A trend is:
Trend Table: A table displays the trend direction for each timeframe, with color-coded backgrounds (green for bullish, red for bearish) and triangles to indicate the trend state.
Breakout Arrows: When price breaks above the upper range, a green ▲ arrow appears below the bar (bullish). When price breaks below the lower range, a red ▼ arrow appears above the bar (bearish).
Bullish (▲): Price is above the upper range.
Bearish (▼): Price is below the lower range.
Neutral (△/▽): Price is within the range, with the last trend indicated by an empty triangle (△ for last bullish, ▽ for last bearish).
Alerts: Breakout alerts can be set for each timeframe, with options to filter by trading sessions (e.g., New York, London) or enable all-day alerts.
Underlying Concepts
The script uses the True Range concept to define dynamic support and resistance levels, which adjust based on price action to reflect the most relevant price zones. The multi-timeframe trend analysis leverages the same True Range logic to determine trend direction, providing a consistent framework across all timeframes. The combination of breakout signals and trend confirmation helps traders align their strategies with both short-term price movements and longer-term market trends.
Use Case
Breakout Trading: Use the True Range lines and arrows to identify breakouts. For example, a green ▲ arrow below a bar with price breaking above the upper range suggests a potential long entry.
Trend Confirmation: Check the trend table to ensure the breakout aligns with the broader trend. For instance, a bullish breakout on the 1H chart is more reliable if the D and W timeframes also show bullish trends (▲).
Range Trading: When price is within the True Range (dotted lines in "RANGE" style), consider range-bound strategies, buying near support and selling near resistance, while monitoring the table for potential trend shifts.
Settings
Input Timeframe: Select the timeframe for True Range calculations (default: chart timeframe).
True Range Style: Choose between "3CR" (single line after breakout) or "RANGE" (both lines until breakout) (default: 3CR).
Change Symbol: Compare a different ticker if needed (default: chart symbol).
Color Theme: Select "LIGHT THEME" or "DARK THEME" for colors, or enable custom colors (default: LIGHT THEME).
Table Position: Set the trend table’s position (center, right, left) (default: right).
Multi Res Alerts Setup: Enable/disable breakout alerts for each timeframe (default: enabled for most timeframes).
Sessions Alerts: Filter alerts by trading sessions (e.g., New York, London) or enable all-day alerts (default: most sessions enabled).
Chart Notes
The chart displays the script’s output on XAUUSD (1H timeframe), showing:
Candlesticks representing price action.
True Range lines (green for support, red for resistance) in "3CR" style, with solid lines after breakouts and dotted lines during range-bound periods.
Arrows (green ▲ below bars for bullish breakouts, red ▼ above bars for bearish breakouts) indicating range breakouts.
A trend table in the top-right corner labeled "TREND EA," showing trend directions across timeframes (M1 to M) with triangles (▲/▼ for active trends, △/▽ for last trend) and color-coded backgrounds (green for bullish, red for bearish).
Notes
The script uses the chart’s ticker by default but allows comparison with another symbol if enabled.
Trend data for higher timeframes (e.g., M) may not display if the chart’s history is insufficient.
Alerts are triggered only during selected trading sessions unless "ALL DAY ALERTS" is enabled.
Disclaimer
This indicator is a tool for analyzing market trends and does not guarantee trading success. Trading involves risk, and past performance is not indicative of future results. Always use proper risk management.

[itradesize] ICT Opening range
This indicator automatically annotates the opening ranges of the AM and PM sessions. It should be used on the 1-minute timeframe , although you can check and build a further models when using a 2-3-4 or even 5-minute timeframe. You can customize this under the settings tab.
Additionally, it includes features such as standard deviations and the initial fair value gap presented. Everything is based on what ICT said in his algorithmic timing video.
The algorithm will continue to adjust prices higher or lower until it reaches a predetermined target price. This process will occur within specific time frames: the last 10 minutes before the hour and the first 10 minutes after a new hour begins.
For the AM session opening range, this is from 9:30 to 10:00 , and for the PM session, it's from 13:30 to 14:00 . Defining these ranges allows us to identify the first presented fair value gaps there, as the algorithm is designed to leave these signatures for smart money. This process of time-based delivery precision repeats every day. You can build a whole New York model on this.
It's important to journal and backtest your results results. If the market breaks the opening range on either side and there is evident liquidity, it is highly likely that it will pursue that liquidity.
However, before doing so, the market should retrace back to the first fair value gap if it hasn’t already occurred or back to the 0.75 or 0.5 level of the range at maximum.
When does this happen? Typically, when a macro event occurs— for example, during the lunch macro from 11:30 to 12:00 . In most cases, you can expect a retracement during lunch macro. If the market retraces beyond these levels, there is a higher probability that the expected scenario will not play out.
The algorithm primarily refers to the 30-minute opening range each time. The standard deviation levels can be used to establish algorithmic delivery targets and anticipate another run after the PM session opening range has occurred. The AM session often helps determine the likely direction of movement after the PM session range concludes.
The PM macro runs from 15:15 to 15:45 . At this time, the market will typically operate within the narrative that is currently underway.
