[CT] Smart Supertrend Smart Supertrend is an overlay trend and context indicator that combines three different ideas into one visual: a dynamic “cloud” that adapts to market cycle speed, a pivot-point anchored trailing line that behaves like a smarter Supertrend, and an ADX strength filter that helps separate real trends from noisy sideways movement. It is designed to keep you aligned with the dominant direction while giving you a clean framework for entries, pullbacks, and exits.
The “cloud” is the heart of the script’s regime read. Internally, it builds an adaptive smoothing engine that reacts to how efficiently the price is moving. When the price is moving in a clean, directional way, the cloud becomes more responsive. When the price is choppy and overlapping, the cloud becomes slower and steadier. The cloud itself is drawn as two lines, Cloud A and Cloud B, and the filled area between them. When the adaptive KAMA slope is rising, the cloud is treated as bullish and uses your Up color. When it is falling, the cloud is treated as bearish and uses your Down color. This creates a quick visual of whether the market is behaving like an uptrend regime or a downtrend regime without relying on one fixed moving average length that can be too fast in chop or too slow in trend.
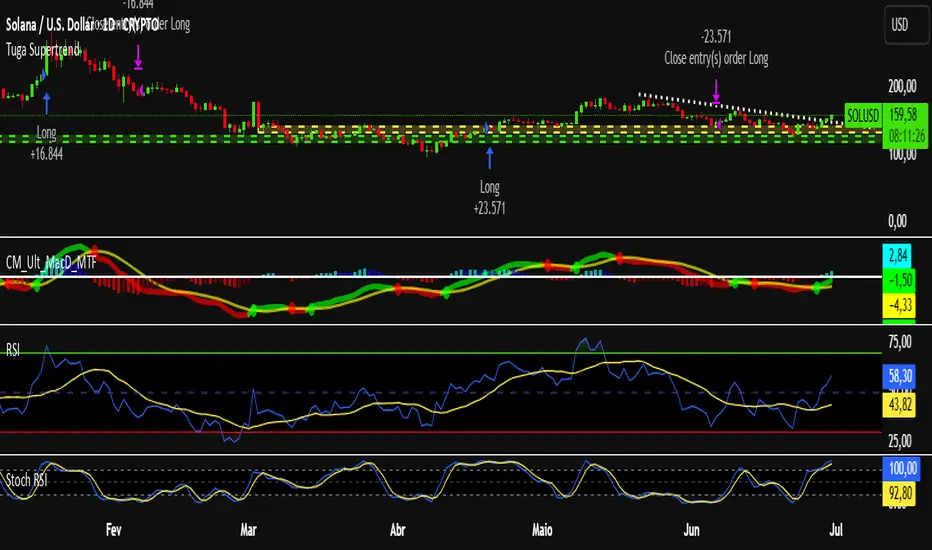
The PP line is the trade management spine. It is built from pivot logic that detects meaningful swing highs and swing lows using your PP Period. Those pivots are blended into a centerline, and then an ATR band is applied around that center using your ATR Period and ATR Factor. That band is turned into a trailing line that “ratchets” in the direction of the current trend. When the price is above the trailing logic, the script considers the trend state to be long. When the price is below, it considers the trend state to be short. The reason this feels different from a basic Supertrend is that the anchor comes from pivots and smoothing rather than only a direct ATR band around price, so it tends to track structure more naturally and reduce some of the fast flipping you see in choppy sections.
The ADX filter is the quality control layer. It computes plus DI, minus DI, and ADX over your ADX Length, and then checks whether ADX is above your threshold. When ADX is above the threshold, it suggests the market is trending enough for trend signals to matter. When ADX is below the threshold, the script is telling you the environment is more sideways, which is where most trend systems get chopped up. In the original logic, the “best” conditions occur when the cloud direction agrees with the DI direction, and ADX is strong, because that means direction and strength are aligned.
How you trade it starts with using the cloud as your directional bias. When the cloud is bullish, you prioritize longs and you treat shorts as lower quality or countertrend. When the cloud is bearish, you prioritize shorts and you treat longs as lower quality. Next, you use the PP line as the “line in the sand” for trend state and risk placement. In a bullish environment, price holding above the PP line is your confirmation that the structure-anchored trailing level is supporting the move. In a bearish environment, price holding below the PP line is your confirmation that the trailing level is capping rallies.
A clean, practical entry approach is to wait for agreement between the cloud and the PP line, then take pullbacks into that framework. For long trades, the highest quality setups occur when the cloud is bullish, the PP line is below price, and ADX is above the threshold with plus DI leading minus DI. In that state, you can look for pullbacks that dip toward the PP line or into the cloud region and then reject back upward, because you’re buying a retracement inside a confirmed trend regime rather than chasing extension. For short trades, the mirror applies: the cloud is bearish, the PP line is above price, ADX is above the threshold with minus DI leading, and you sell rallies back into the PP line or cloud that fail and rotate down.
Stops and exits can be built around the PP line because it is already an ATR-based trailing structure level. For a long, a conservative stop is placed just below the PP line with a buffer related to ATR, because if price closes and holds below that line you are likely seeing a trend condition break. For a short, the stop goes just above the PP line with a similar buffer. For profit taking, many traders scale out when price stretches far away from the PP line or when the cloud begins to lose slope and compress, because that often signals trend momentum is slowing. Another simple exit rule is to reduce or close when the PP line flips trend state against your position, or when the ADX falls back under the threshold after a run, because that frequently marks a transition into consolidation where trailing systems can give back gains.
If you enable signals in versions that plot them, the logic is meant to highlight moments when the PP line flips trend and the cloud is not contradicting that flip, then further filters those into “higher quality” conditions when cloud direction and ADX trend strength agree. In practice, you should still treat signals as prompts, not automatic trades. The best results come from using the signal as a timing cue while you still enforce the bigger rule of alignment: cloud direction, PP line trend state, and ADX strength all pointing the same way, with entries taken on pullbacks rather than on late breakout candles.
Finally, be aware that all adaptive smoothing systems will look different across markets and timeframes, so the main tuning knobs are your Cloud Length, PP Period, ATR Factor, and ADX Threshold. If you want fewer flips and more “position trading” behavior, increase the ATR Factor and consider a higher ADX threshold. If you want earlier entries and more sensitivity, lower ATR Factor and lower the threshold, but expect more chop. The indicator is at its best when you treat it as a regime and structure tool: let the cloud tell you the side, let the PP line define where you are wrong, and let ADX decide whether it’s a trend day or a chop day before you commit size.
Penunjuk Pine Script®