OPEN-SOURCE SCRIPT
Telah dikemas kini Smart Market Matrix
Smart Market Matrix
This indicator is designed for intraday, scalping, providing automated detection of price pivots, liquidity traps, and breakout confirmations, along with a context dashboard featuring volatility, trend, and volume.
## Summary Description
### Menu Settings & Their Roles
- **Swing Pivot Strength**: Controls the sensitivity for detecting High/Low pivots.
- **Show Pivot Points**: Toggles the display of HH/LL markers on the chart.
- **VWMA Length for Trap Volume** & **Volume Spike Multiplier**: Identify concentrated volume spikes for liquidity traps.
- **Wick Ratio Threshold** & **Max Body Size Ratio**: Detect candles with disproportionate wicks and small bodies (doji-ish) for traps.
- **ATR Length for Trap**: Measures volatility specific to trap detection.
- **VWMA Length for Breakout Volume**, **ATR Multiplier for Breakout**, **ATR Length for Breakout**, **Min Body/Range Ratio**: Set adaptive breakout thresholds based on volatility and volume.
- **OBV Smooth Length**: Smooths OBV momentum for breakout confirmation.
- **Enable VWAP Filter for Confirmations**: Optionally validate breakouts against the VWAP.
- **Enable Higher-TF Trend Filter** & **Trend Filter Timeframe**: Align breakout signals with the 1h/4h/Daily trend.
- **ADX Length**, **EMA Fast/Slow Length for Context**: Parameters for the context dashboard (Volatility, Trend, Volume).
- **Show Intraday VWAP Line**, **VWAP Line Color/Width**: Display the intraday VWAP line with custom style.
### Signal Interpretation Map
| Signal | Description | Recommended Action |
|--------------------------------|-----------------------------------------------------------|-------------------------------------------|
| 📌 **HH / LL (pivot)** | Market structure (support/resistance) | Note key levels |
| **Bull Trap(green diamond)** | Sweep down + volume spike + wick + rejection | Go long with trend filter
| **Bear Trap(red diamond)** | Sweep up + volume spike + wick + rejection | Go short with trend filter
| 🔵⬆️ **Breakout Confirmed Up** | Close > ATR‑scaled high + volume + OBV↑ | Go long with trend filter |
| 🔵⬇️ **Breakout Confirmed Down** | Close < ATR‑scaled low + volume + OBV↓ | Go short with trend filter |
| 📊 **VWAP Line** | Intraday reference to guide price | Use as dynamic support/resistance |
| ⚡ **Volatility** | ATR ratio High/Med/Low | Adjust position size |
| 📈 **Trend Context** | ADX+EMA Strong/Moderate/Weak | Confirm trend direction |
| 🔍 **Volume Context** | Breakout / Rising / Falling / Calm | Check volume momentum |
*This summary gives you a quick overview of the key settings and how to interpret signals for efficient intraday scalping.*
### Suggested Settings
- **Intraday Scalping (5m–15m)**
- `Swing Pivot Strength = 5`
- `VWMA Length for Trap Volume = 10`, `Volume Spike Multiplier = 1.6`
- `ATR Length for Trap = 7`
- `VWMA Length for Breakout Volume = 12`, `ATR Length for Breakout = 9`, `ATR Multiplier for Breakout = 0.5`
- `Min Body/Range Ratio for Breakout = 0.5`, `OBV Smooth Length = 7`
- `Enable Higher-TF Trend Filter = true` (TF = 60)
- `Show Intraday VWAP Line = true` (Color = orange, Width = 2)
- **Swing Trading (4h–Daily)**
- `Swing Pivot Strength = 10`
- `VWMA Length for Trap Volume = 20`, `Volume Spike Multiplier = 2.0`
- `ATR Length for Trap = 14`
- `VWMA Length for Breakout Volume = 30`, `ATR Length for Breakout = 14`, `ATR Multiplier for Breakout = 0.8`
- `Min Body/Range Ratio for Breakout = 0.7`, `OBV Smooth Length = 14`
- `Enable Higher-TF Trend Filter = true` (TF = D)
- `Show Intraday VWAP Line = false`
*Adjust these values based on the symbol and market volatility for optimal performance.*
Nota Keluaran
How the Indicator WorksThe indicator analyzes several aspects of the market:
Pivot Points – Identifies support and resistance levels (HH/LL).
Liquidity Traps – Detects liquidity traps (bull traps and bear traps) that can indicate false market movements.
Breakout Confirmation – Confirms breakouts with filters such as volume, OBV, and VWAP.
Market Context Dashboard – Displays information about volatility, trend, and volume to help you make informed decisions.
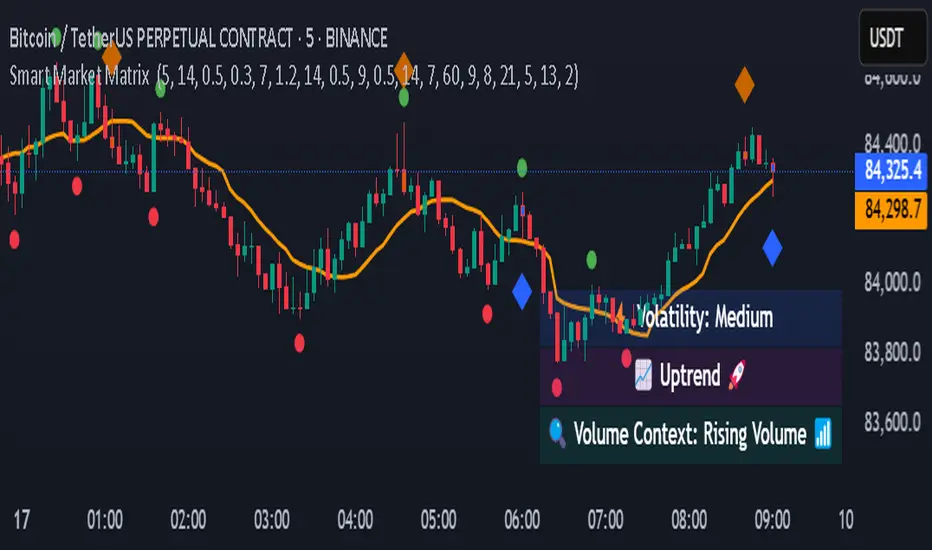
What the Symbols on the Chart Represent
Green Circles (above candles): Pivot High (HH) – Indicates a resistance level.
Red Circles (below candles): Pivot Low (LL) – Indicates a support level.
Blue Diamonds (below candles): Bull Trap – A false downward movement, followed by an increase. Long Signal: You can consider a buy (long) position, especially if it appears near support.
Orange Diamonds (above candles): Bear Trap – A false upward movement, followed by a decrease. Short Signal: You can consider a sell (short) position, especially if it appears near resistance.
Colored Bars:
Dark Blue: Confirmed Bull Trap (long signal).
Dark Orange: Confirmed Bear Trap (short signal).
Blue (without diamonds): Confirmed Breakout – Upward breakout (if the price is above VWAP) or downward breakout (if the price is below VWAP).
Orange Line (if activated): VWAP (Volume Weighted Average Price) – Calculated on the last 14 bars. Indicates the average price weighted by volume, useful for confirming the direction of breakouts.
Information Panel (Market Context Dashboard)
In the bottom right corner, you will find a panel with useful information:
Volatility: The level of volatility (High, Medium, Low) – High volatility may indicate larger movements.
Trend: The direction of the trend (Uptrend, Downtrend, Flat, etc.) – Based on EMAs and ADX.
Volume Context:
Breakout: Very high volume (over 1.5x the average) – Can confirm breakouts.
Rising Volume: Increasing volume (above average).
Calm: Normal volume (between 80% and 100% of the average).
Falling Volume: Low volume (below 80% of the average).
User Guide
Activate the indicator:
Add the "Smart Market Matrix" indicator to your TradingView chart.
You can adjust the settings (e.g., VWAP length, pivot length) in the configuration menu.
Identify key levels:
Watch the green circles (resistances) and red circles (supports) to identify important levels.
Look for liquidity traps:
Blue Diamonds (Bull Trap): Long signal – Enter a long position if it appears near support and the trend is upward (check the "Trend" panel).
Orange Diamonds (Bear Trap): Short signal – Enter a short position if it appears near resistance and the trend is downward.
Risk Management:
Stop Loss: Below the lower wick (for bull traps) or above the upper wick (for bear traps).
Take Profit: At the next resistance level (for long) or support level (for short).
Confirm Breakouts:
Blue bars indicate potential breakouts. Check the panel for "Volume Context" (Breakout or Rising Volume) and the trend.
Use the information panel:
Check "Volatility" and "Trend" to understand the market context.
"Volume Context" helps you confirm the strength of movements (e.g., Breakout indicates a strong movement).
Important Settings
Swing Pivot Strength (lenSwing): The length for detecting pivot points (default 5 bars).
VWMA Length for Trap/Breakout: The VWMA length for traps (14 bars) and breakouts (14 bars).
VWAP Length: The VWAP length (default 14 bars) – You can adjust to make the VWAP more sensitive.
Enable VWAP Filter: Activates the VWAP filter for breakouts (default: disabled).
Enable Higher-TF Trend Filter: Activates the trend filter on a higher timeframe (default: enabled).
The indicator is optimized for short and medium timeframes (e.g., 5 minutes, 15 minutes, 1 hour), but it can be adjusted for other timeframes by modifying the settings.
Test the indicator on a demo account before using it in live trading.
Combine the signals with your own analysis for better results.
Skrip sumber terbuka
Dalam semangat TradingView sebenar, pencipta skrip ini telah menjadikannya sumber terbuka, jadi pedagang boleh menilai dan mengesahkan kefungsiannya. Terima kasih kepada penulis! Walaupuan anda boleh menggunakan secara percuma, ingat bahawa penerbitan semula kod ini tertakluk kepada Peraturan Dalaman.
Penafian
Maklumat dan penerbitan adalah tidak bertujuan, dan tidak membentuk, nasihat atau cadangan kewangan, pelaburan, dagangan atau jenis lain yang diberikan atau disahkan oleh TradingView. Baca lebih dalam Terma Penggunaan.