I Want My ScalpsTops/bottoms.
Bull/bear traps.
Designed for NQ / MNQ on 1 min during cash hours.
Time filter update coming soon.
Candlestick analysis

Essa - Market Structure & Fibonacci ToolkitOverview
The Essa Market Structure & Fibonacci Toolkit is a comprehensive trading indicator that combines advanced market structure analysis with customizable fibonacci levels and fair value gap detection. It identifies high-probability trading opportunities by detecting confluence zones where multiple technical factors align, providing traders with precise entry and exit points based on institutional trading concepts.
Key Features
📊Market Structure Analysis
Pattern Recognition: Automatically detects Higher Highs (HH), Higher Lows (HL), Lower Highs (LH), Lower Lows (LL)
Change of Character (CHoCH): Identifies trend changes and market structure breaks
Pattern Locking: Fibonacci levels lock to specific swing patterns (LH→LL for bearish, HL→HH for bullish)
Multi-Timeframe Analysis: Analyzes trend strength across multiple timeframes with scoring system
🧮 Custom Fibonacci System
Fully Configurable Levels: Set any percentage (e.g., 25%, 65%, 87.5%) - not limited to traditional levels
Dynamic Labels: Shows your actual percentages, not hardcoded values
Golden Zone Trading: Customizable optimal entry zones between any two fibonacci levels
Auto-Extension: Levels automatically extend as price moves
Distance Tables: Real-time pip distances to nearest fibonacci levels
📈 Fair Value Gap (FVG) Detection
Smart Detection: Identifies bullish and bearish fair value gaps with size filtering
Age Tracking: Shows how long each FVG has been active (bars or time format)
Confluence Highlighting: Enhanced colors when FVGs overlap with fibonacci golden zones
Width Filtering: ATR-based minimum width requirements to filter noise
🎯 Confluence Trading
Multi-Factor Analysis: Combines market structure + fibonacci + FVGs + golden zones
High-Probability Zones: Highlights areas where multiple factors converge
Trend Strength Scoring: 0-100% scoring system based on multiple confluence factors
Smart Alerts: Notifications for high-confluence setups only
⚡ Advanced Features
Trend Analysis Table: Real-time trend bias, strength score, and pattern identification
Adaptive Sensitivity: Automatically adjusts to market volatility using ATR
Professional Alerts: Customizable alerts for structure breaks, golden zone touches, and FVG confluence
Clean Interface: Basic/Advanced settings organization with inline controls
🎨 Visual Excellence
Professional Styling: Clean, institutional-grade visual presentation
Customizable Colors: Full color customization for all elements
Smart Labeling: Context-aware labels that don't overlap
Performance Optimized: Efficient rendering with visual element limits
Perfect for: Swing traders, day traders, and institutional-style traders who want to identify high-probability setups using confluence of market structure, fibonacci levels, and fair value gaps.

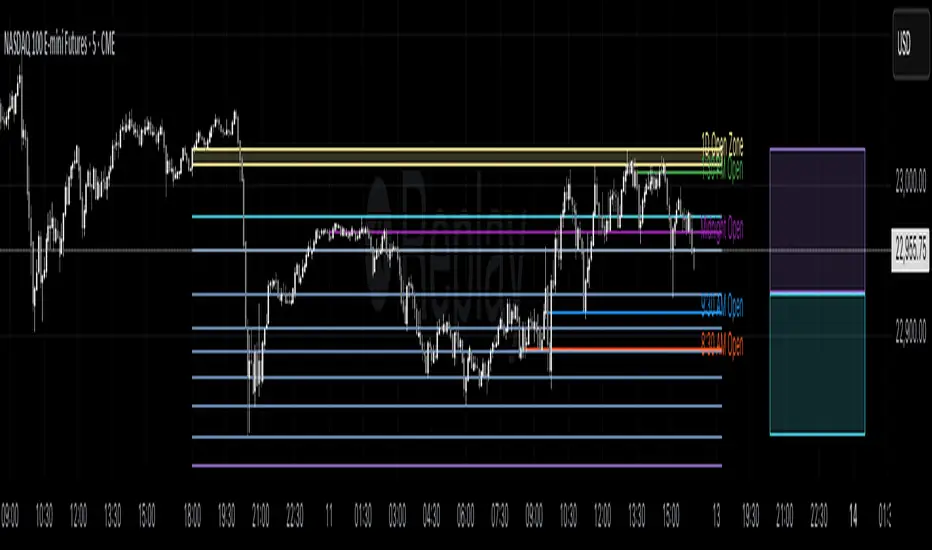
Profitable Loser Model [MMT]Profitable Loser Model
Overview
The Profitable Loser Model is a powerful PineScript v6 indicator designed to enhance your trading by visualizing key price levels, session open zones, Fibonacci retracements, and premium/discount zones. This overlay indicator provides traders with a customizable toolkit to analyze market structure across any timeframe, making it ideal for intraday and swing trading strategies.
Features
Open Zone Visualization
- Plots a box based on the open and close of the first candle in a user-defined timeframe (default: 5-minute).
- Customizable box color, projection offset, and label size (Tiny, Small, Normal, Large).
- Displays a timeframe label (e.g., "5m Open Zone") for quick reference, toggleable on/off.
Session Open Lines
- Optionally draws horizontal lines at key session opens (8:30 AM, 9:30 AM, 1:30 PM, Midnight, New York time).
- Customize line color, style (Solid, Dashed, Dotted), width, and label size for each session.
- Perfect for identifying critical intraday price levels.
Premium and Discount Zones
- Highlights premium (above midpoint) and discount (below midpoint) zones based on session high/low.
- Toggleable with customizable colors and projection offsets.
- Helps traders spot overbought/oversold areas for potential mean-reversion trades.
Fibonacci Retracement Levels
- Plots user-defined Fibonacci levels (default: 0.23, 0.35, 0.5, 0.62, 0.705, 0.79, 0.886, 1, 1.1).
- Customizable line style, width, color, and labels (showing percentage and/or price).
- Dynamically adjusts based on price movement relative to the open zone.
Take Profit (TP) and Stop Loss (SL) Levels
- Highlights TP (default: 0.23) and SL (default: 1.1) Fibonacci levels with distinct colors.
- Fully customizable to align with your risk-reward strategy.
How It Works
- Session Detection : Resets daily (or per user-defined timeframe) to capture the first candle's open, high, low, and close.
- Open Zone : Draws a box between the open and close, extended forward by the projection offset.
- Session Lines : Plots lines at specified session opens with customizable styles and labels.
- Fibonacci Retracement : Adjusts levels dynamically based on session high/low and price action.
- Premium/Discount Zones : Calculated from the session range midpoint, updated in real-time.
Settings
- Open Zone :
- Timeframe (default: 5m), Calculate Timeframe (default: Daily).
- Toggle label, adjust size, box color, and projection offset.
- Session Open Lines :
- Enable/disable lines for 8:30 AM, 9:30 AM, 1:30 PM, Midnight.
- Customize color, style, width, label size, and vertical offset.
- Premium/Discount Zones :
- Toggle visibility, set colors, and adjust projection offset.
- Fibonacci Retracement :
- Toggle visibility, set custom levels, line style, width, color, and label options.
- Adjust projection offset.
- TP/SL :
- Set TP/SL Fibonacci levels and colors.
Use Cases
- Intraday Trading : Use session open lines and open zones to trade key market hours.
- Swing Trading : Leverage Fibonacci levels for potential reversal or continuation zones.
- Risk Management : Set precise TP/SL levels based on Fibonacci retracements.
- Market Structure : Identify overbought/oversold zones with premium/discount areas.
Notes
- Optimized with `dynamic_requests = true` for efficient real-time data handling.
- Visual elements (boxes, lines, labels) are cleaned up at the start of each new session.
- Session lines use New York time (`America/New_York`) for alignment with major markets.
Universal Renko Bars by SiddWolfUniversal Renko Bars or UniRenko Bars is an overlay indicator that applies the logic of Renko charting directly onto a standard candlestick chart. It generates a sequence of price-driven bricks, where each new brick is formed only when the price moves a specific amount, regardless of time. This provides a clean, price-action-focused visualization of the market's trend.
WHAT IS UNIVERSAL RENKO BARS?
For years, traders have faced a stark choice: the clean, noise-free world of Renko charts, or the rich, time-based context of Candlesticks. Choosing Renko meant giving up your favorite moving averages, volume profiles, and the fundamental sense of time. Choosing Candlesticks meant enduring the market noise that often clouds true price action.
But what if you didn't have to choose?
Universal Renko Bars is a revolutionary indicator that ends this dilemma. It's not just another charting tool; it's a powerful synthesis that overlays the pure, price-driven logic of Renko bricks directly onto your standard candlestick chart. This hybrid approach gives you the best of both worlds:
❖ The Clarity of Renko: By filtering out the insignificant noise of time, Universal Renko reveals the underlying trend with unparalleled clarity. Up trends are clean successions of green bricks; down trends are clear red bricks. No more guesswork.
❖ The Context of Candlesticks: Because the Renko logic is an overlay, you retain your time axis, your volume data, and full compatibility with every other time-based indicator in your arsenal (RSI, MACD, Moving Averages, etc.).
The true magic, however, lies in its live, Unconfirmed Renko brick. This semi-transparent box is your window into the current bar's real-time struggle. It grows, shrinks, and changes color with every tick, showing you exactly how close the price is to confirming the trend or forcing a reversal. It’s no longer a lagging indicator; it’s a live look at the current battle between buyers and sellers.
Universal Renko Bars unifies these two powerful charting methods, transforming your chart into a more intelligent, noise-free, and predictive analytical canvas.
HOW TO USE
To get the most out of Universal Renko Bars, here are a few tips and a full breakdown of the settings.
Initial Setup for the Best Experience
For the cleanest possible view, it's highly recommended that you hide the body of your standard candlesticks, that shows only the skelton of the candle. This allows the Renko bricks to become the primary focus of your chart.
→ Double click on the candles and uncheck the body checkbox.
Settings Breakdown
The indicator is designed to be powerful yet intuitive. The settings are grouped to make customization easy.
First, What is a "Tick"?
Before we dive in, it's important to understand the concept of a "Tick." In Universal Renko, a Tick is not the same as a market tick. It's a fundamental unit of price movement that you define. For example, if you set the Tick Size to $0.50, then a price move of $1.00 is equal to 2 Ticks. This is the core building block for all Renko bricks. Tick size here is dynamically determined by the settings provided in the indicator.
❖ Calculation Method (The "Tick Size" Engine)
This section determines the monetary value of a single "Tick."
`Calculation Method` : Choose your preferred engine for defining the Tick Size.
`ATR Based` (Default): The Tick Size becomes dynamic, based on market volatility (Average True Range). Bricks will get larger in volatile markets and smaller in quiet ones. Use the `ATR 14 Multiplier` to control the sensitivity.
`Percentage` : The Tick Size is a simple percentage of the current asset price, controlled by the `Percent Size (%)` input.
`Auto` : The "set it and forget it" mode. The script intelligently calculates a Tick Size based on the asset's price. Use the `Auto Sensitivity` slider to make these automatically calculated bricks thicker (value > 1.0) or thinner (value < 1.0).
❖ Parameters (The Core Renko Engine)
This group controls how the bricks are constructed based on the Tick Size.
`Tick Trend` : The number of "Ticks" the price must move in the same direction to print a new continuation brick. A smaller value means bricks form more easily.
`Tick Reversal` : The number of "Ticks" the price must move in the opposite direction to print a new reversal brick. This is typically set higher than `Tick Trend` (e.g., double) to filter out minor pullbacks and market noise.
`Open Offset` : Controls the visual overlap of the bricks. A value of `0` creates gapless bricks that start where the last one ended. A value of `2` (with a `Tick Reversal` of 4) creates the classic 50% overlap look.
❖ Visuals (Controlling What You See)
This is where you tailor the chart to your visual preference.
`Show Confirmed Renko` : Toggles the solid-colored, historical bricks. These are finalized and will never change. They represent the confirmed past trend.
`Show Unconfirmed Renko` : This is the most powerful visual feature. It toggles the live, semi-transparent box that represents the developing brick. It shows you exactly where the price is right now in relation to the levels needed to form the next brick.
`Show Max/Min Levels` : Toggles the horizontal "finish lines" on your chart. The green line is the price target for a bullish brick, and the red line is the target for a bearish brick. These are excellent for spotting breakouts.
`Show Info Label` : Toggles the on-chart label that provides key real-time stats:
🧱 Bricks: The total count of confirmed bricks.
⏳ Live: How many chart bars the current live brick has been forming. These bars forms the Renko bricks that aren't confirmed yet. Live = 0 means the latest renko brick is confirmed.
🌲 Tick Size: The current calculated value of a single Tick.
Hover over the label for a tooltip with live RSI(14), MFI(14), and CCI(20) data for additional confirmation.
TRADING STRATEGIES & IDEAS
Universal Renko Bars isn't just a visual tool; it's a foundation for building robust trading strategies.
Trend Confirmation: The primary use is to instantly identify the trend. A series of green bricks indicates a strong uptrend; a series of red bricks indicates a strong downtrend. Use this to filter out trades that go against the primary momentum.
Reversal Spotting: Pay close attention to the Unconfirmed Brick . When a strong trend is in place and the live brick starts to fight against it—changing color and growing larger—it can be an early warning that a reversal is imminent. Wait for the brick to be confirmed for a higher probability entry.
Breakout Trading: The `Max/Min Levels` are your dynamic breakout zones. A long entry can be considered when the price breaks and closes above the green Max Level, confirming a new bullish brick. A short entry can be taken when price breaks below the red Min Level.
Confluence & Indicator Synergy: This is where Universal Renko truly shines. Overlay a moving average (e.g., 20 EMA). Only take long trades when the green bricks are forming above the EMA. Combine it with RSI or MACD; a bearish reversal brick forming while the RSI shows bearish divergence is a very powerful signal.
A FINAL WORD
Universal Renko Bars was designed to solve a fundamental problem in technical analysis. It brings together the best elements of two powerful methodologies to give you a clearer, more actionable view of the market. By filtering noise while retaining context, it empowers you to make decisions with greater confidence.
Add Universal Renko Bars to your chart today and elevate your analysis. We welcome your feedback and suggestions for future updates!
Follow me to get notified when I publish New Indicator.
~ SiddWolf

BBOB: Breaker + Order + Overlapping Blocks + Buy/Sell💎 Smart OBX Premium – Order Block, Breaker Block & Overlap Zones
Unleash the power of institutional trading levels with Smart OBX Premium, a next-generation indicator designed to identify Order Blocks, Breaker Blocks, and Overlap Zones with pinpoint precision and stunning visuals.
🔷 Key Features:
✅ Order Blocks (OB)
Detects bullish and bearish order blocks from smart money footprints. Zones are colored elegantly with clear, labeled boxes for instant recognition.
✅ Breaker Blocks (BB)
Identifies failed OBs that act as strong reversal or continuation zones. Visually distinct with premium-quality styling and easy-to-read tags.
✅ Overlap Zones
Highlights powerful confluence areas where OB and BB intersect — the most high-probability reaction zones. These are shaded uniquely with gold gradient tones for instant visual edge.
✅ Zone Labels & Reactions
All blocks are clearly labeled on chart with names like:
• 🔵 Bullish OB
• 🔴 Bearish OB
• 🟢 Bullish Breaker
• 🟠 Bearish Breaker
• ⭐ Overlap Zone
✅ Professional Design
Ultra-clear visuals with soft shadows, rounded edges, transparent layers, and precise alignment. Perfect for content creators and serious traders.
✅ Buy/Sell Signal Points
Automatic arrows or labels appear above/below candles whenever price reacts strongly to OB/BB/Overlap zones.
🧠 Smart Money Concept-Based
Built entirely on institutional price behavior — the same logic used by banks, hedge funds, and top-level smart money traders.


RB3 DEMO – Rejection Blocks Visual ExampleThis is a simplified demo version of a custom Rejection Block (RB) visual indicator. It identifies potential bullish and bearish rejection zones based purely on candle structure, without using any time-based or algorithmic filters.
🧠 What it does:
• Detects Bullish and Bearish Rejection Blocks using clean price action logic
• Highlights those zones with boxes, optional lines, and labels
• Designed to help traders visually study price rejections and market structure
⚙️ How it works:
• Bullish RB = red candle with a lower low than the previous and next candle
• Bearish RB = green candle with a higher high than the previous and next candle
• No time filters or hidden logic are used — this tool is purely structural
🎯 Best used by:
• Traders who want to visualize potential rejection zones
• Beginners studying price action and structural reversals
• Visual learners who prefer clean chart-based confirmations
✅ This demo does **not** include institutional filters, time anchors (e.g., TRAL‑03), or sequence-based validation.
📌 A more advanced version with time-reactive filtering logic is available privately.
ℹ️ To use: enable "Boxes" and/or "Labels" to highlight rejection blocks clearly. Works on all timeframes.

Lum3n Reversal IndicatorLum3n Reversal Indicator
The Lum3n Reversal Indicator is a powerful tool designed to detect high-probability reversal zones by combining candlestick patterns, momentum shifts, volume spikes, and trend confirmation. This script helps traders identify early turning points backed by smart logic—not just noise.
Core Features
Candlestick Pattern Detection
Recognizes over 18 classic bullish and bearish reversal patterns, including engulfing, harami, morning/evening star, tweezer tops/bottoms, and more.
Smart Buy/Sell Logic
Filters out weak signals using RSI thresholds, moving average distance, and high-volume confirmation.
Trend Confirmation with StochRSI
Uses a smoothed Stochastic RSI engine to confirm when a pattern aligns with broader momentum.
Halo Pulse Markers
Highlights ultra-strong reversal setups with high confidence scores and visual pulse effects.
Customizable Support Levels
Set personalized support zones to refine entry timing and accuracy.
Gradient Candle Coloring
Smooth candle color transitions based on momentum and trend strength for a clean visual experience.
Signal Toggle Option
Show or hide buy/sell labels for a less cluttered chart.
How to Use:
Use standard signals for early entries and confluence.
Wait for Halo signals (high score + volume + trend) for stronger conviction.
Combine with your existing support/resistance or smart money concepts for optimal results.
Effective across multiple timeframes from 15-minute to daily charts.

KHUSHI VERMA DEHRI ON SONEKhushi Verma Dehri On Sone - ZigZag Buy/Sell with Volume Pressure & Stop Loss
This indicator combines ZigZag-based Buy/Sell signals, dynamic stop-loss levels, and a Volume Pressure histogram to provide a powerful visual trading tool.
🔍 Key Features:
ZigZag Buy/Sell Detection:
Automatically identifies significant highs and lows using ZigZag logic with a user-defined lookback period (depth).
Red "SELL" labels at swing highs
Green "BUY" labels at swing lows
Connected with directional lines for clarity
Stop Loss Visualization:
For each signal, a horizontal dashed stop-loss line is drawn:
For SELL signals: SL = High + %SL
For BUY signals: SL = Low − %SL
Volume Pressure Histogram:
Visualizes the net buying/selling pressure based on candle direction:
Green bars: Positive (buying) pressure
Red bars: Negative (selling) pressure
Blue line: Smoothed pressure using EMA
⚙️ Inputs:
ZigZag Lookback: Number of bars to detect swing highs/lows
Stop Loss (%): Distance from pivot high/low to define SL
Volume Smoothing Length: EMA length for volume pressure
Show Histogram: Toggle for displaying the volume pressure bars

Orb [LUM3N]Orb – Opening Range Breakout Strategy with Confidence Engine
Description
The Orb script is a precision-engineered Opening Range Breakout (ORB) system designed for intraday and scalping strategies. Built around the first 15–30 minutes of price action, it identifies high-probability breakout entries, confirms momentum using 1-minute signals, and automatically calculates Fibonacci-based profit targets.
Key Features:
✅ Customizable ORB Timeframe (15 or 30 mins)
✅ Dynamic Stop Loss Options (Fixed %, ATR-based, EMA trailing)
✅ Fibonacci Take Profit Targets (1.272 / 1.618 / 2.0)
✅ Retest Logic with Smart Labels (confirms strength after breakout)
✅ Time-Based Exit Functionality (automatically closes trades after X minutes)
✅ Built-in Volume Spike Filter (optional)
✅ Multi-Factor Confidence Score using RSI, MACD Histogram, and VWAP
✅ Live Dashboard displaying entry price, TP levels, live % gain, and signal confidence
The confidence engine uses a weighted scoring system to determine if a breakout is High, Medium, or Low confidence — giving traders more control and clarity.
Ideal for structured day traders looking to automate key rules and reduce guesswork.

Strict S&D Zones with Real BoS (Wick Breaks)Marking supply and demand zones for you before a 3 candle push. Accurate for supply and demand zones

Dominance Candle Raja Saien (Detector with Alerts)Dominance Candle Finder with Alerts by Raja Saien
This powerful indicator is designed to detect dominance candles—those strong-bodied candles that often signify momentum and trend strength. Whether you're trading breakouts, trend continuations, or reversals, this tool helps you identify key market moves in real time with optional alerts.
🔍 Features:
Automatic Detection of Dominance Candles: Highlights candles with strong body size, showing decisive market movement.
Customizable Thresholds: Adjust sensitivity according to your strategy or asset volatility.
Built-in Alerts: Get notified the moment a dominance candle forms—no need to stare at charts all day!
Multi-Timeframe Compatibility: Works on any timeframe from 1-minute to daily or higher.
📊 Use Cases:
Entry confirmation on breakouts
Trend strength analysis
Volatility surge detection
Combine with support/resistance or order block zones for powerful setups
Tip: Best used with strong support/resistance levels or price action strategies for confluence

Smooth Cloud Pro [Markking77]📝 Premium Indicator Description: FVG Zones + Liquidity Concept + RSI + SMC
> "Unlock the power of institutional-grade trading analysis with this advanced indicator that blends Fair Value Gaps (FVG), Liquidity Sweeps, and Smart Money Concepts into one professional system. Designed for precision and clarity, this tool also includes RSI confirmation to support high-probability Buy and Sell setups. Ideal for scalpers, intraday, and swing traday
📌 Key Features:
🔹 Fair Value Gap Zones (FVG)
Automatically detects bullish and bearish imbalances in price.
Clearly marked premium-colored boxes for instant visual clarity.
Ideal for spotting institutional order flow zones.
🔹 Liquidity Sweeps
Identifies liquidity grabs where price takes out equal highs or lows.
Highlights potential reversal or continuation points based on Smart Money Concepts (SMC).
Great for front-running retail stop hunts.
🔹 Equal Highs & Lows
Highlights zones where liquidity pools build up (e.g., double tops/bottoms).
Helps you anticipate where price might target next.
🔹 RSI Confirmation (Color Gradient)
Uses a multi-timeframe RSI visual band to confirm overbought/oversold conditions.
Premium color gradient helps quickly identify bullish/bearish momentum shifts.
Synchronizes well with entry signals from FVG and CHoCH zones.
🔹 Buy/Sell Zones & CHoCH / BOS Labels
Automatic detection of Break of Structure (BOS) and Change of Character (CHoCH).
Clear Buy/Sell labels positioned above/below candles.
Excellent for following SMC entry models with visual clarity.
🧠 How to Use:
1. Look for a Liquidity Sweep followed by a CHoCH or BOS.
2. Confirm using RSI color gradient (green for bullish, red for bearish).
3. Enter trades within the FVG zone after confirmation.
4. Exit near opposing FVG or Liquidity Pools.

ZYTX RSI SuperTrendZYTX RSI SuperTrend
ZYTX RSI + SuperTrend Strategy
The definitive integration of RSI and SuperTrend trend-following indicators, delivering exemplary performance in automated trading bots.

Ultimate SuperTrend with Support and ResistanceModified ST with Support and resistance levels. This was developed by SAM team to provide a singular indicator to trade in NIFTY. It can also be used in other securities.
Based on the trading style, can be used for Sell and Buy trades. Provide your comments and guidance.

Heikin Ashi Color Change Alert📈 Heikin Ashi Color Change Alert
This indicator detects color changes in Heikin Ashi candles and issues visual signals and alerts when a change is confirmed at bar close.
🔍 What it does:
Reconstructs Heikin Ashi candles directly from chart prices.
Detects when the color changes from bearish to bullish (or vice versa).
Prints a triangle symbol on the chart when the change occurs.
Allows you to set alerts so you never miss a potential reversal.
✅ How it works:
A bullish signal occurs when a red (bearish) Heikin Ashi candle is followed by a green (bullish) one.
A bearish signal occurs when a green (bullish) candle is followed by a red (bearish) one.
The detection is done only after the current candle is fully closed, ensuring cleaner signals.
🔔 Example Alerts:
"Heikin Ashi candle changed to bullish"
"Heikin Ashi candle changed to bearish"
This indicator is ideal for:
Traders who follow price action
Those who want to filter trends
Anyone who uses Heikin Ashi to smooth market noise and detect reversals

Kalman Moving Average For LoopKey Features of the Indicator:
Flexible Moving Average Calculation (calcMovingAverage):Description: Allows users to select from 10 moving average types (SMA, EMA, DEMA, TEMA, WMA, VWMA, SMMA, HMA, LSMA, ALMA) to process the input price source (pricesource, default: close).
Parameters:
maType: User selects the moving average type (default: HMA).
period: Length of the moving average (default: 14).
almaSigma: Sigma parameter for ALMA (default: 5).
Purpose: Provides versatility in analyzing price trends, with the chosen moving average (maValue) used for comparison with the smoothed Kalman filter output.
Kalman Filter for Price Smoothing:
Description:
Applies a Kalman filter to the price source to produce a filtered price (kalmanFilteredPrice), which is further smoothed using an HMA to create smoothedKalmanPrice.
Parameters:
process_noise: Controls system model noise (default: 0.01).
measurement_noise:
Controls measurement noise (default: 3).
N: Filter order, determining the number of state estimates (default: 3).
smooth_period: HMA period for smoothing kalmanFilteredPrice (default: 9).
Purpose: Reduces noise in price data, providing a smoother trend line for signal generation and plotting.
Historical Analysis with For-Loop:
Description: Uses a for-loop to calculate the average of calcMovingAverage values over a user-defined historical range (from to to_) for historical bars of the price source (pricesource ).
Parameters:
from: Start of the historical range (default: 1).
to_: End of the historical range (default: 25).
Purpose: Computes an average moving average (avgMa) over the specified range to compare with the smoothed Kalman price for signal generation.
Error Handling and Robustness:
Description: Includes checks for na values in the for-loop to ensure only valid calcMovingAverage values contribute to the average (avgMa). Resets signal and plot variables each bar to prevent carryover.
Purpose: Ensures reliable calculations and prevents errors from invalid data.

GOLD Auto-Alert Strategy [Enhanced+Signals+UT Bot]New Version The Indicator
✅ BUY Signal Triggers Only If:
UT Buy signal flips (from down to up)
ADX > Threshold → market has strength
RSI is outside the 40–60 range
Volume is spiking above 20-bar average × 1.2
EMA Fast > EMA Slow → uptrend confirmed
Close > EMA Fast → price above short-term trend
Bullish Engulfing candle
🔻 SELL Signal Triggers Only If:
UT Sell signal flips (from up to down)
ADX > Threshold → market has strength
RSI is outside the 40–60 range
Volume is spiking above average
EMA Fast < EMA Slow → downtrend confirmed
Close < EMA Fast → bearish structure
Bearish Engulfing candle

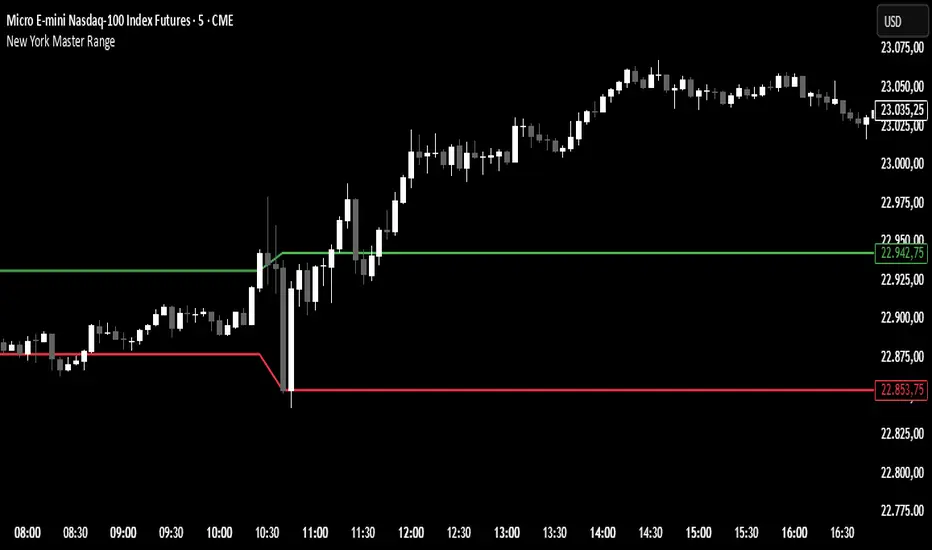
New York Master Range📈 New York Master Range (5-Min Timeframe)
Description:
This custom TradingView indicator captures the opening range based on the body high and low of the first 3 candles after 10:30 AM (BRT – Brasília Time) on the 5-minute timeframe — a technique often used during the New York market session.
🔍 How it works:
At exactly 10:30 AM (BRT), the indicator starts collecting the highs and lows of candle bodies (not wicks) for the next 3 five-minute candles.
Once the 3 candles are processed, the highest close/open (body high) and lowest close/open (body low) are plotted as static green and red lines on the chart.
These levels can act as key intraday support/resistance zones or range breakout triggers.

MAGGIFX - Timings🧲 Maggifx Sessions Indicator
The Maggifx Indicator is designed for intraday traders seeking precision and visual clarity when navigating the market’s main sessions. Built upon the Market Magnetism Theorem, it automatically highlights key time zones — Asia, London, and New York — to help identify imbalances, manipulations, and high-probability entries.
✅ Key Features:
📦 Custom session boxes for Asia, London, and New York.
🔀 Adjustable time zone setting (default: UTC-3).
🧭 Highlights the Asian range midpoint — essential for forecasting directional shifts.
📈 Auto-extension of Asian highs and lows to assess breakouts or liquidity grabs.
🧊 Strategic micro-blocks (5:30, 7:30, 12:00) to mark potential polarity shifts.
🎯 Visual marker for the daily starting point.
🎨 Fully customizable colors and styles, matching any chart layout.
🎓 Perfect for:
Traders of XAUUSD, NASDAQ, SP500, US30, EURUSD, and GBPUSD.
Strategies based on liquidity, inducements, and reaction to key zones.
Anyone using the Maggifx Methodology or working with Session Timing.
Let me know if you want a shorter, punchier version for Instagram or a tech-spec bullet sheet for advanced users.

London Reversal + LazyAlgoLondon Reversal Strategy with FS Entry
This script detects trend reversals during the London session, following the Asian session, using technical signals based on moving averages, Asian range breakouts, and multi-timeframe trend filters. It includes a system of visual signals and alerts, with customizable Stop Loss and Take Profit levels.

Momentum Candle V2 by Sekolah Trading📌 Momentum Candle V2 by Sekolah Trading – Pair-Based Volatility & Wick Ratio Filter
This script provides a structured and adaptive approach to detecting high-probability momentum candles in intraday markets. It dynamically adjusts pip thresholds and wick filtering conditions based on the selected symbol and timeframe, making it highly practical for real-time trading.
🔍 Concept and Originality
Momentum Candle V2 by Sekolah Trading implements a custom-built methodology combining:
Dynamic Pip Calibration
For each supported instrument (e.g., XAUUSD, USDJPY, GBPUSD, AUDUSD, EURUSD, BTCUSD), the user can define a pip threshold that determines the minimum valid body size for momentum candles. These thresholds are tailored for each pair and timeframe (M5, M15, H1), ensuring the logic adjusts to different volatility profiles.
Wick-to-Body Ratio Filtering
The script filters out candles with large wicks by requiring that total wick length (upper + lower) be no more than 30% of the full candle range. This helps identify decisive candles with minimal rejection.
Directional Validation
Bullish momentum is defined as: Close > Open with a shorter upper wick.
Bearish momentum is: Close < Open with a shorter lower wick.
Real-Time Timing Filter
Alerts are only triggered when the current candle is between 20 and 90 seconds from closing, which reduces noise and encourages confirmation-based entry.
Non-Repainting Logic
All calculations run in real-time with confirmed candles only — no lookahead or future leak.
📊 Visual Output – How to Read the Chart
When the conditions above are met, the script displays triangle markers on the chart:
🔺 Red downward triangle above the candle: valid bearish momentum signal
🔻 Blue upward triangle below the candle: valid bullish momentum signal
These shapes appear on live bars during the final moments of the candle to alert traders to potential confirmed momentum.
🔔 Alert Conditions
Two alert types are provided:
Momentum Bullish: Large bullish candle with small upper wick, during last 20–90s of bar
Momentum Bearish: Large bearish candle with small lower wick, same timing window
Alerts are designed for precision entries at candle close.
🧭 How to Use
Apply the script to a 5m, 15m, or 1h chart.
Configure pip thresholds for your preferred pairs from the input settings.
Watch for triangle markers near the close of each candle:
Blue = potential bullish momentum
Red = potential bearish momentum
Set alerts:
Go to Alerts → Select Momentum Bullish or Momentum Bearish
Frequency: Once Per Bar
Customize message: e.g. “Momentum Bullish on XAUUSD M15”
Combine signals with:
EMA, S/R, or trend filters
Volume/Order Flow
Liquidity zone or breakout context
🛡️ Why This Script Is Closed-Source
This script uses proprietary logic developed by Sekolah Trading, including:
Custom pip calibration engine
Adaptive wick filtering
Real-time entry validation with triangle plots
While the code is protected, the methodology has been explained transparently here in accordance with TradingView publishing rules.
⚠️ Disclaimer
This script is provided for educational and technical analysis purposes only.
It does not guarantee results or provide financial advice. Always verify trades with your own strategy and risk controls.
Author: Sekolah Trading
Version: Momentum Candle V2
Built with Pine Script v6
