Trend Band Oscillator📌 Trend Band Oscillator
📄 Description
Trend Band Oscillator is a momentum-based trend indicator that calculates the spread between two EMAs and overlays it with a volatility filter using a standard deviation band. It helps traders visualize not only the trend direction but also the strength and stability of the trend.
📌 Features
🔹 EMA Spread Calculation: Measures the difference between a fast and slow EMA to quantify short-term vs mid-term trend dynamics.
🔹 Volatility Band Overlay: Applies an EMA of standard deviation to the spread to filter noise and highlight valid momentum shifts.
🔹 Color-Based Visualization: Positive spread values are shown in lime (bullish), negative values in fuchsia (bearish) for quick directional insight.
🔹 Upper/Lower Bands: Help detect potential overbought/oversold conditions or strong trend continuation.
🔹 Zero Line Reference: A horizontal baseline at zero helps identify trend reversals and neutral zones.
🛠️ How to Use
✅ Spread > 0: Indicates a bullish trend. Consider maintaining or entering long positions.
✅ Spread < 0: Indicates a bearish trend. Consider maintaining or entering short positions.
⚠️ Spread exceeds bands: May signal overextension or strong momentum; consider using with additional confirmation indicators.
🔄 Band convergence: Suggests weakening trend and potential transition to a ranging market.
Recommended timeframes: 1H, 4H, Daily
Suggested complementary indicators: RSI, MACD, OBV, SuperTrend
✅ TradingView House Rules Compliance
This script is open-source and published under Pine Script v5.
It does not repaint, spam alerts, or cause performance issues.
It is designed as an analytical aid only and should not be considered financial advice.
All calculations are transparent, and no external data sources or insecure functions are used.
====================================================================
📌 Trend Band Oscillator
📄 설명 (Description)
Trend Band Oscillator는 두 개의 EMA 간 스프레드(차이)를 기반으로 한 모멘텀 중심의 추세 오실레이터입니다. 여기에 표준편차 기반의 변동성 밴드를 적용하여, 추세의 방향뿐 아니라 강도와 안정성까지 시각적으로 분석할 수 있도록 설계되었습니다.
📌 주요 특징 (Features)
🔹 EMA 기반 스프레드 계산: Fast EMA와 Slow EMA의 차이를 활용해 시장 추세를 정량적으로 표현합니다.
🔹 표준편차 필터링: Spread에 대해 EMA 및 표준편차 기반의 밴드를 적용해 노이즈를 줄이고 유효한 추세를 강조합니다.
🔹 컬러 기반 시각화: 오실레이터 값이 양수일 경우 초록색, 음수일 경우 마젠타 색으로 추세 방향을 직관적으로 파악할 수 있습니다.
🔹 밴드 범위 시각화: 상·하위 밴드를 통해 스프레드의 평균 편차 범위를 보여주며, 추세의 강약과 포화 여부를 진단할 수 있습니다.
🔹 제로 라인 표시: 추세 전환 가능 지점을 시각적으로 확인할 수 있도록 중심선(0선)을 제공합니다.
🛠️ 사용법 (How to Use)
✅ 오실레이터가 0 이상 유지: 상승 추세 구간이며, 롱 포지션 유지 또는 진입 검토
✅ 오실레이터가 0 이하 유지: 하락 추세 구간이며, 숏 포지션 유지 또는 진입 검토
⚠️ 상·하위 밴드를 이탈: 일시적인 과매수/과매도 혹은 강한 추세 발현 가능성 있음 → 다른 보조지표와 함께 필터링 권장
🔄 밴드 수렴: 추세가 약해지고 있음을 나타냄 → 변동성 하락 또는 방향성 상실 가능성 있음
권장 적용 시간대: 1시간봉, 4시간봉, 일봉
보조 적용 지표: RSI, MACD, OBV, SuperTrend 등과 함께 사용 시 신호 필터링에 유리
✅ 트레이딩뷰 하우스룰 준수사항 (TV House Rules Compliance)
이 지표는 **무료 공개용(Open-Source)**이며, Pine Script Version 5로 작성되어 있습니다.
과도한 리페인트, 비정상적 반복 경고(alert spam), 실시간 성능 저하 등의 요소는 포함되어 있지 않습니다.
사용자는 본 지표를 투자 결정의 참고용 보조 도구로 활용해야 하며, 독립적인 매매 판단이 필요합니다.
데이터 소스 및 계산 방식은 완전히 공개되어 있으며, 외부 API나 보안 취약점을 유발하는 구성 요소는 없습니다.
Exponential Moving Average (EMA)


Momentum Trading StrategyThis is a Trend Following Momentum Strategy, where i used EMA, ADX, RSI, VWAP to take trade with Trend and initiate trade when Momentum builds up.
The Default target is 1:2

10/50 EMA Cloud + 21 EMA + VWAP + FractalsThis indicator is designed for active traders and combines several popular technical analysis tools into a single, easy-to-use overlay. It helps traders identify trend direction, dynamic support and resistance, and potential reversal points, all while providing optional fractal signals for added clarity.
Features and Components
1. EMA Cloud (10/50 EMA)
10-period EMA (Exponential Moving Average): Tracks short-term price momentum.
50-period EMA: Represents a longer-term trend.
Cloud Visualization: The area between the 10 and 50 EMA is filled with color:
Green cloud when the 10 EMA is above the 50 EMA, signaling bullish momentum.
Red cloud when the 10 EMA is below the 50 EMA, signaling bearish momentum.
Purpose: Quickly visualize the prevailing trend and potential trend shifts.
2. 21-period EMA
21 EMA: Plotted as a blue line, this moving average is widely used to gauge intermediate-term trend and dynamic support/resistance.
Purpose: Acts as a reference for trend-following entries and exits.
3. VWAP (Volume Weighted Average Price)
VWAP Line: Plotted in orange, VWAP gives the average price weighted by volume for the session.
Purpose: Useful for identifying fair value, potential bounce/reversal zones, and institutional interest levels.
4. Fractals (Toggleable)
User Option: A setting allows the user to turn fractal signals on or off.
Fractal Logic: Uses a 5-bar pattern:
Up Fractal: Plots a green triangle above the bar if the high of the middle bar (2 bars ago) is higher than the highs of the two bars before and after.
Down Fractal: Plots a red triangle below the bar if the low of the middle bar (2 bars ago) is lower than the lows of the two bars before and after.
Purpose: Highlights potential short-term reversal points or swing highs/lows.
5. Volume Bars
Volume Histogram: Plotted in gray at the bottom of the chart.
Purpose: Provides context for price action, helping to confirm breakouts or identify exhaustion.
How to Use This Indicator
Trend Identification: Use the EMA cloud and 21 EMA to determine the prevailing trend. Trade in the direction of the cloud color and EMA alignment.
VWAP Strategies: Look for price reactions at the VWAP for possible rebounds, breakouts, or reversals.
Fractal Signals: Enable fractals to spot potential reversal zones or to fine-tune entries/exits at swing points.
Volume Confirmation: Use volume bars to validate the strength of moves, especially near key EMAs or VWAP.
Customization
Fractals On/Off: Easily toggle fractal signals in the indicator settings to reduce chart clutter or focus on other signals as needed.

Break & Retest Strategy V2 (Clean Visuals)This strategy is built on a high-probability EMA breakout and retest model, designed for traders who want clean structure-based entries filtered by trend alignment and strong price action. It leverages:
• ✅ A 44 EMA trend filter on the 4H chart
• ✅ HTF directional bias from the Daily 44 EMA
• ✅ Breakout above the EMA followed by a wick-based retest
• ✅ Strong bullish candle confirmation (body > 50% of range)
• ✅ Dynamic stop loss using either the pivot low or a buffer below the EMA
• ✅ Fixed 1:3 Risk:Reward ratio for consistent reward targeting
• ✅ Cooldown system to prevent overtrading
• ✅ Clean, minimal visuals using smart RR boxes instead of chart clutter
This system is fully backtestable and designed with prop firm challenge criteria in mind — prioritizing risk control, clarity, and high-quality trade conditions.
⸻
🔧 Current Development Goals (V3 Roadmap)
We’re actively refining the system to improve win rate and profit factor, while keeping drawdown low. Key upgrades in progress:
1. 📈 Liquidity Trap Filter
• Add logic to confirm a wick below recent lows (liquidity sweep) before retesting the EMA
2. 🧠 Partial Take Profits + Breakeven Logic
• TP1 at 1.5R → move SL to breakeven
• TP2 at 3R → close remaining position
3. 🔁 Trade Session Filter
• Limit entries to London & New York AM sessions to avoid false signals in low volume periods
4. 📉 Short Entry Engine
• Mirror logic for bearish break + retest setups below the EMA
5. 🔔 Live Alerts System
• Entry signal alerts for hands-free, real-time trading decisions
6. 📊 Optimizer Toolkit (future)
• Add ATR/volatility filters
• Add market structure confluence zones (HH/HL filters)
• Smart cooldown timer based on wins/losses or volatility shifts

My scriptTrend gold signal Ema strategy
The system finds the best entries for a trade. Use in gold, all numbers have been customized for it.
Functional
T2 trend gold is the second version of my trading system. Be sure to check out the first part! This system gives a signal earlier.
Key signals
Buy -----> Blue triangle to buy
Sell -----> Red triangle to sell
Remarks
I personally tested this system on my own trading and it helps me find entries for deals. The main thing is, if consolidation has begun, turn off the system, because the trading range is small at this moment, use oscillators


EMA Crossover with ArrowPlots two EMAs with a shape to indicate when the short EMA crosses over the long EMA.
Customizable settings
Short/Long EMA duration
Shape Type/Color/Position

Friedrich's Ichimoku & EMA Strategy📈 Friedrich's Ichimoku & EMA Strategy
This strategy combines the strength of the Ichimoku Cloud with the long-term trend confirmation of the 200 EMA to identify high-probability long entries.
🧠 Strategy Logic
Entry Conditions:
- Price is above the Ichimoku Cloud (bullish confirmation).
- Price is above the 200 EMA (long-term trend is up).
Exit Conditions:
- Price falls below the Ichimoku Cloud, or
- Price drops below the 200 EMA while in an open position.
📊 Visual Features
Plots Lead Line 1 & 2 of the Ichimoku Cloud.
Fills the cloud area for clear visual trend recognition.
Plots the 200 EMA to show long-term trend alignment.
🔔 Alerts
Long Entry Signal: When all conditions align for a long.
Close Signal: When price invalidates the setup.
🕒 Recommended Use
Best used on the 6H (6-hour) timeframe.
Optimized for Bitcoin (BTC/USD), but adaptable to other trending assets.
💡 Use Case
This strategy is designed for traders who want to:
Ride strong trends.
Use a rule-based approach with clear visual guidance.
You can customize the Ichimoku or EMA settings to fit your asset or time frame.

ICT Macro Highlighter + EMA 9/20/200 + Alertstest indicator for Triple ema cross during high probability ICT macros

7 EMA CloudAdvanced 7 EMA Cloud – Adaptive Trend & Signal Suite
This script overlays 7 exponential moving averages (EMAs) and dynamically fills the space between them with visual “clouds” that help you quickly assess trend strength, direction, and momentum alignment.
🔧 Features:
7 Customizable EMAs – Standard periods (8, 13, 21, 34, 55, 89, 144) with individual color-coded lines
EMA Cloud Fills – Gradient clouds show convergence/divergence between EMAs
Color Modes – Classic (rainbow), Monochrome (grayscale), and Heatmap (trend strength)
Crossover Signals – Alerts and visual markers for EMA1 crossing EMA7
Custom Signal Sizes – Choose from 5 shape sizes for crossover events
Optional Cloud Transparency – Adjustable for clean or bold visuals

Friedrich IndicatorThis indicator visualizes trend zones using two Exponential Moving Averages (EMAs) with user-defined lengths (default 32 and 58). It identifies bullish and bearish trends based on the relationship between the shorter and longer EMA and confirms these trends only after they persist for a specified number of bars (confirmBars).
Bullish zone (green): When the shorter EMA remains above the longer EMA for at least the confirmation number of bars, both EMAs and the area between them are colored green, indicating a confirmed upward trend.
Bearish zone (red): When the shorter EMA stays below the longer EMA for at least the confirmation bars, EMAs and the filled zone turn red, signaling a confirmed downward trend.
Neutral zone (white): Before the trend confirmation, the EMAs and the area between are colored white with transparency, representing an unconfirmed or neutral state.
The area between the two EMAs is filled with the respective color, providing an intuitive visual cue of market momentum and trend strength directly on the price chart.

Super Neema!🟧 Super Neema! — Multi-Timeframe EMA-9 Overlay
🔍 What is "Neema"?
The term "Neema" has recently emerged among traders such as Jeff Holden—a top proprietary trading firm trader—whose colleagues colloquially use "Neema" as shorthand for the 9-period Exponential Moving Average (EMA). Due to its increasing popularity and reliability, the phrase caught on quickly as traders needed a quick, memorable name for such an essential tool.
📚 Why the 9-EMA?
Scalping around the 9-EMA is now one of the most widely used intraday trading techniques. Traders of various experience levels frequently rely on it because it effectively highlights short-term momentum shifts.
But there's a crucial nuance: traders across different assets or market periods don't always agree on which timeframe’s 9-EMA to follow. Depending on who's currently active in the market, the dominant "Neema" could be the 1-minute, 2-minute, 3-minute, or 5-minute 9-EMA. This variation arises naturally due to differences in trader populations, risk tolerance, style, and current market conditions.
👥 Social Convention & Normative Social Influence
Trading is fundamentally a social activity, and normative social influence plays a critical role in market behavior. Traders don’t operate in isolation; they follow patterns, respond to cues, and rely on shared conventions. The popularity of any given indicator—like the 9-EMA—is not just technical, but deeply social. Traders adapt to what's socially accepted, recognizable, and effective.
Over time, these conventions shift. What once was "the standard" timeframe can subtly evolve as dominant traders or institutions shift their preferred style or timeframe, creating "variants" of established trends. Understanding this dynamic is essential for market participants because recognizing where the majority of traders currently focus gives a critical edge.
📈 Why Does This Matter? (Market Evolution & Trader Adaptability)
Market trends aren't just technical—they're social constructs. As markets evolve, participants adapt their methods to fit new norms. Traders who recognize and adapt quickly to these evolving norms gain a decisive advantage.
By clearly visualizing multiple Neemas (9-EMAs across timeframes) simultaneously, you don't merely see EMA levels—you visually sense the current social convention of the market. This heightened awareness helps you stay adaptive and flexible, aligning your strategy dynamically with the broader community of traders.
🎨 Transparency Scheme (Visual Identification):
5-minute Neema: Most opaque, brightest line (slowest, most significant trend)
3-minute Neema: Slightly more transparent
2-minute Neema: Even more transparent
1-minute Neema: Most transparent, subtle background hint (fastest, quickest reaction)
This deliberate visual hierarchy makes it intuitive to identify immediately which timeframe is currently dominant, and therefore, which timeframe other traders are using most actively.
✅ Works on:
Any timeframe, any chart. Automatically plots the 1m–5m EMA-9 lines regardless of your current chart.
🧠 Key Insight:
Markets are driven by social trends and normative influence.
Identifying the currently dominant timeframe (the Neema most respected by traders at that moment) is a powerful, socially-informed edge.
Trader adaptability isn't just technical—it's social awareness in action.
Enjoy your trading, and welcome to Super Neema! ⚡


Forex Dynamic Momentum Reversal (FDMR) - AlternativeRed and green dashed lines on the last bar represent the upper and lower volatility bands, extending from the previous bar.
Blue and orange labels on the last bar show the fast and slow EMA values.
Green triangles below bars indicate buy signals; red triangles above bars indicate sell signals.
Enable Alerts: Set up alerts in TradingView for buy/sell signals.

EMA Stack (13–200) Toggle📈 EMA Stack (13–200) Toggle – Color-Coded Trend Filter
Customizable EMA stack with slope-based coloring:
• 🟩 Green = Bullish slope
• 🟥 Red = Bearish slope
• Lengths: 13, 20, 34, 50, 89, 100, 200
• Toggle each EMA on/off in settings
✅ Great for:
• Trend confirmation
• Pullback entries
• Momentum confluence across timeframes
• Heikin Ashi candle setups (as shown in screenshot)
Clean, clear, and built for scalping or trend-riding.

Customizable EMA & SMA ComboThis script includes both EMA and SMA into a single customizable indicatior.

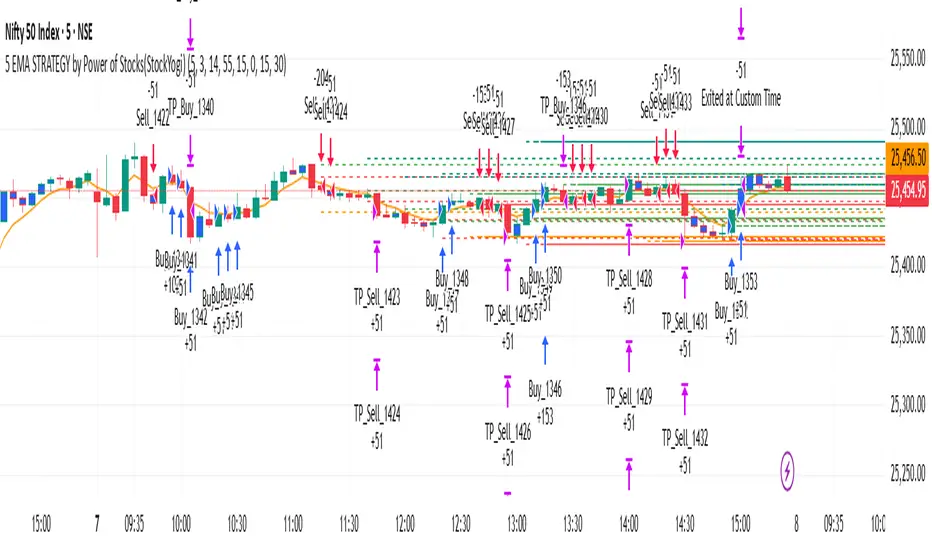
5 EMA STRATEGY by Power of Stocks(StockYogi)5 EMA STRATEGY by Power of Stocks(StockYogi)
This is a 5 EMA Breakout Strategy inspired by the trading principles taught by Shubhashi Pani, founder of the Power of Stocks (POS) community.
The strategy is designed to:
• Detect breakout setups when price breaks the high/low of a signal candle (based on EMA conditions)
• Enter trades only if the breakout occurs within the next 3 candles
• Allow multiple trades in the same direction without closing the earlier one
• Use independent stop-loss (SL) and take-profit (TP) targets for each trade based on a user-defined risk-reward ratio
• Optionally enter trades only at candle close
• Optionally avoid trades during a custom time window (e.g., 3:00 PM to 3:30 PM IST)
• Optionally close all open positions at a defined time (e.g., 3:30 PM IST)
The goal of this strategy is to provide greater flexibility and realism for intraday or short-term traders following structured breakout systems.
Disclaimer: This script is an implementation of technical ideas for educational purposes only. It is not financial advice. All trading involves risk, and past performance does not guarantee future results.
Strategy Credits:
This strategy is based on publicly known breakout rules taught by Shubhashi Pani (Power of Stocks). This is not an official POS script, and I am not affiliated with the Power of Stocks team. This implementation was developed independently to follow the logic shared for educational use.
Feel free to use, backtest, and modify according to your needs. Constructive feedback is welcome!
Smooth MTF CloudsThe smoothness of the "clouds" in the script you provided comes from the combination of plotting moving averages (typically EMA or SMA) and using the fill() function to visually create smooth, overlapping areas between two lines. Additionally, EMAs naturally create smoother curves as they respond to price changes in a lagged, less abrupt way compared to traditional plots.

Volume Spikes with EMA LabelVolume Spikes with EMA Label (by Emilio TRIUNFO)
Highlights significant volume surges by comparing real-time volume against a customizable EMA threshold multiplied by 1.5 (default).
Visually marks high-volume bars with colored labels on the chart to help identify strong market activity and trading opportunities.
Adjustable EMA length and multiplier allow flexibility for different strategies.

EMAs + LSMA Cross Alert (Mejorado)his indicator is designed to identify buy and sell signals based on the behavior of multiple exponential moving averages (EMAs) and a Least Squares Moving Average (LSMA). It includes 5 EMAs and one LSMA, with visual and alert features.
📌 Components:
EMA 4 (purple)
EMA 9 (Fuchsia)
EMA 21 (blue)
EMA 50 (Green)
EMA 200 (maroon)
LSMA 30 (Orange)
🔍 Signal Logic:
✅ Buy Signal:
The LSMA (30) must be below both EMA 4 and EMA 9.
A bullish crossover occurs: EMA 4 crosses above EMA 9.
Only one signal is triggered per crossover, avoiding repeated alerts during trend continuation.
❌ Sell Signal:
The LSMA (30) must be above both EMA 4 and EMA 9.
A bearish crossover occurs: EMA 4 crosses below EMA 9.
Only one signal is triggered per crossover, avoiding repeated alerts during trend continuation.
🖥️ Visual Features:
Option to show/hide each EMA and the LSMA.
Buy/Sell markers appear at cross points.
A white background highlight marks the candle where the signal occurs (optional).
Visuals scale dynamically with the chart zoom and axes.
🔔 Alerts:
Custom alert conditions for Buy and Sell.
Alerts can trigger push notifications to the TradingView mobile app, email, or webhook.
Configured to avoid repeating alerts unless the trend resets and a new valid crossover occurs.
