Dskyz (DAFE) GENESIS Dskyz (DAFE) GENESIS: Adaptive Quant, Real Regime Power
Let’s be honest: Most published strategies on TradingView look nearly identical—copy-paste “open-source quant,” generic “adaptive” buzzwords, the same shallow explanations. I’ve even fallen into this trap with my own previously posted strategies. Not this time.
What Makes This Unique
GENESIS is not a black-box mashup or a pre-built template. It’s the culmination of DAFE’s own adaptive, multi-factor, regime-aware quant engine—built to outperform, survive, and visualize live edge in anything from NQ/MNQ to stocks and crypto.
True multi-factor core: Volume/price imbalances, trend shifts, volatility compression/expansion, and RSI all interlock for signal creation.
Adaptive regime logic: Trades only in healthy, actionable conditions—no “one-size-fits-all” signals.
Momentum normalization: Uses rolling, percentile-based fast/slow EMA differentials, ALWAYS normalized, ALWAYS relevant—no “is it working?” ambiguity.
Position sizing that adapts: Not fixed-lot, not naive—not a loophole for revenge trading.
No hidden DCA or pyramiding—what you see is what you trade.
Dashboard and visual system: Directly connected to internal logic. If it’s shown, it’s used—and nothing cosmetic is presented on your chart that isn’t quantifiable.
Inputs and What They Mean (Read Carefully)
📊 Main Signal Inputs
Maximum Raw Score: How many distinct factors can contribute to regime/trade confidence (default 4). If you extend the quant logic, increase this.
RSI Length / Min RSI for Shorts / Max RSI for Longs: Fine-tunes how “overbought/oversold” matters; increase the length for smoother swings, tighten floors/ceilings for more extreme signals.
⚡ Regime & Momentum Gates
Min Normed Momentum/Score (Conf): Raise to demand only the strongest trends—your filter to avoid algorithmic chop.
🕒 Volatility & Session
ATR Lookback, ATR Low/High Percentile: These control your system’s awareness of when the market is dead or ultra-volatile. All sizing and filter logic adapts in real time.
Trading Session (hours): Easy filter for when entries are allowed; default is regular trading hours—no surprise overnight fills.
📊 Sizing & Risk
Max Dollar Risk / Base-Max Contracts: All sizing is adaptive, based on live regime and volatility state—never static or “just 1 contract.” Control your max exposures and real $ risk.
🔄 Exits & Scaling
Stop/Trail/Scale multipliers: You choose how dynamic/flexible risk controls and profit-taking need to be. ATR-based, so everything auto-adjusts to the current market mode.
Visuals That Actually Matter
Dashboard (Top Right): Shows only live, relevant stats: scoring, status, position size, win %, win streak, total wins—all from actual trade engine state (not “simulated”).
Watermark (Bottom Right): Momentum bar visual is always-on, regime-aware, reflecting live regime confidence and momentum normalization. If the bar is empty, you’re truly in no-momentum. If it glows lime, you’re riding the strongest possible edge.
*No cosmetics, no hidden code distractions.
Why It Wins
While others put out “AI-powered” strategies with little logic or soul, GENESIS is ruthlessly practical. It is built around what keeps traders alive:
- Context-aware signals, not just patterns
- Tight, transparent risk
- Inputs that adapt, not confuse
- Visuals that clarify, not distract
- Code that runs clean, efficient, and with minimal overfitting risk (try it on QQQ, AMD, SOL, etc. out of the box)
Disclaimer (for TradingView compliance):
Trading is risky. Futures, stocks, and crypto can result in significant losses. Do not trade with funds you cannot afford to lose. This is for educational and informational purposes only. Use in simulation/backtest mode before live trading. No past performance is indicative of future results. Always understand your risk and ownership of your trades.
Personal Note to Mods and Traders:
Yes, this statement is DIFFERENT, because this script IS different. If you see this taken down for some technicality (charting labels etc.), know I will fix, adapt, and repost until the system and its truth are visible to the community.
This will not be my last—my goal is to keep raising the bar until DAFE is a brand or I’m forced to take this private.
Use with discipline, use with clarity, and always trade smarter.
— Dskyz, powered by DAFE Trading Systems.
Relative Strength Index (RSI)

Adaptive RSI | Lyro RSThe Adaptive RSI | 𝓛𝔂𝓻𝓸 𝓡𝓢 indicator enhances the traditional Relative Strength Index (RSI) by integrating adaptive smoothing techniques and dynamic bands. This design aims to provide traders with a nuanced view of market momentum, highlighting potential trend shifts and overbought or oversold conditions.
Key Features
Adaptive RSI Calculation: Combines fast and slow Exponential Moving Averages (EMAs) of the RSI to capture momentum shifts effectively.
Dynamic Bands: Utilizes a smoothed standard deviation approach to create upper and lower bands around the adaptive RSI, aiding in identifying extreme market conditions.
Signal Line: An additional EMA of the adaptive RSI serves as a signal line, assisting in confirming trend directions.
Customizable Color Schemes: Offers multiple predefined color palettes, including "Classic," "Mystic," "Accented," and "Royal," with an option for users to define custom colors for bullish and bearish signals.
How It Works
Adaptive RSI Computation: Calculates the difference between fast and slow EMAs of the RSI, producing a responsive oscillator that adapts to market momentum.
Band Formation: Applies a smoothing factor to the standard deviation of the adaptive RSI, generating dynamic upper and lower bands that adjust to market volatility.
Signal Line Generation: Computes an EMA of the adaptive RSI to act as a signal line, providing additional confirmation for potential entries or exits.
Visualization: Plots the adaptive RSI as color-coded columns, with colors indicating bullish or bearish momentum. The dynamic bands are filled to visually represent overbought and oversold zones.
How to Use
Identify Momentum Shifts: Observe crossovers between the adaptive RSI and the signal line to detect potential changes in trend direction.
Spot Overbought/Oversold Conditions: Monitor when the adaptive RSI approaches or breaches the dynamic bands, signaling possible market extremes.
Customize Visuals: Select from predefined color palettes or define custom colors to align the indicator's appearance with personal preferences or chart themes.
Customization Options
RSI and EMA Lengths: Adjust the lengths of the RSI, fast EMA, slow EMA, and signal EMA to fine-tune the indicator's sensitivity.
Band Settings: Modify the band length, multiplier, and smoothing factor to control the responsiveness and width of the dynamic bands.
Color Schemes: Choose from predefined color modes or enable custom color settings to personalize the indicator's appearance.
⚠️ DISCLAIMER ⚠️: This indicator alone is not reliable and should be combined with other indicator(s) for a stronger signal.

Parsifal.Swing.RSIThe Parsifal.Swing.RSI indicator is a module within the Parsifal Swing Suite, which includes a set of swing indicators:
• Parsifal Swing TrendScore
• Parsifal Swing Composite
• Parsifal Swing RSI
• Parsifal Swing Flow
Each module facilitates judgment of the current swing state in the underlying market.
________________________________________
Background
Market movements typically follow a time-varying trend channel within which prices oscillate. These swings within the trend are inherently tradable.
They can be approached:
• One-sidedly, in alignment with the trend (generally safer), or
• Two-sidedly, aiming to profit from mean reversions.
Note: In strong trends, mean reversions often appear as sideways consolidations, making one-sided trades more robust.
________________________________________
The Parsifal Swing Suite
The suite provides insights into current swing states and offers various entry point triggers.
All modules act as weak oscillators, meaning they fluctuate within a range but are not bounded like true oscillators (e.g., the RSI, which ranges from 0 to 100%).
________________________________________
The Parsifal.Swing.RSI – Specifics
The Parsifal.Swing.RSI is the simplest module in the suite. It uses variations of the classical RSI, explicitly combining:
• RSI: 14-period RSI of the market
• RSIMA: 14-period EMA of the RSI
• RSI21: 14-period RSI of the 21-period EMA of the market
• RSI21MA: 14-period EMA of RSI21
Component Behavior:
• RSI: Measures overbought/oversold levels but reacts very sensitively to price changes.
• RSIMA: Offers smoother directional signals, making it better for assessing swing continuation. Its slope and sign changes are more reliable indicators than pure RSI readings.
• RSI21: Based on smoothed prices. In strong trends, it reaches higher levels and reacts more smoothly than RSI.
• RSI21MA: Further smooths RSI21, serving as a medium-term swing estimator and a signal line for RSI21.
When RSI21 exceeds RSI, it indicates trend strength.
• In uptrends, RSI21 > RSI, with larger exceedance = stronger trend
• In downtrends, the reverse holds
________________________________________
Indicator Construction
The Swing RSI combines:
• RSI and RSIMA → short-term swings
• RSI21 and RSI21MA → medium-term swings
This results in:
• A fast swing curve, derived from RSI and RSI21
• A slow swing curve, derived from RSIMA and RSI21MA
This setup is smoother than RSI/RSIMA alone but more responsive than using RSI21/RSI21MA alone.
________________________________________
Background Value
The Background Value reflects the overall market state, derived from RSI21:
• > 0: shaded green → bullish mode
• < 0: shaded red → bearish mode
• The absolute value reflects confidence in the current mode
________________________________________
How to Use the Parsifal.Swing.RSI
Several change points can act as entry triggers:
• Fast Trigger: change in slope of the fast signal curve
• Trigger: fast line crossing slow line or change in slow signal's slope
• Slow Trigger: change in sign of the Background Value
Examples of these triggers are shown in the chart.
Additionally, market highs and lows aligned with swing values can serve as pivot points in evolving price movements.
________________________________________
As always, this indicator should be used alongside other tools and information in live trading.
While it provides valuable insights and potential entry points, it does not predict future price action.
It reflects the latest tendencies and should be used judiciously.

RSI 5 Dakika Al/Sat Alarmırsi 5 dklık grafikte scalp için sinyal üretir. yatırım tavsiyesi değildir.

SuperTrade's Stoch RSI Reversal Strategy with SL/TPThis strategy uses a combination of two tools, the Stochastic RSI (Relative Strength Index) and a simple risk management system, to help traders make better decisions on when to enter or exit a trade. Let's break it down step by step so it's easy to understand.
Check out my other strategies:
SuperTrade Ichimoku Cloud Strategy
SuperTrade ST1 Strategy
Stochastic RSI
The Stochastic RSI is an indicator that combines two popular indicators: the RSI and the Stochastic Oscillator. It measures whether an asset is overbought or oversold. The value of the Stochastic RSI oscillates between 0 and 1. When it's below 0.2, the asset is considered oversold (a potential buying signal), and when it's above 0.8, the asset is overbought (a potential selling signal).
SmoothK and SmoothD
These are two smoothed moving averages of the Stochastic RSI values. "K" and "D" help to smooth out the Stochastic RSI so that signals become clearer and less noisy. The strategy uses these smoothed values to identify when to enter or exit a trade.
Risk Management (Stop Loss and Take Profit)
The strategy includes stop loss and take profit settings, which are used to control the amount of loss or profit you’re willing to accept on each trade. For example, if a trade moves against you by a certain percentage (like 1%), the stop loss will automatically close the trade to prevent further loss. Similarly, when your trade gains a certain percentage (like 2%), the take profit will close the trade to lock in profits.
Long and Short Conditions
Long Condition: A "long" trade is a buy order. The strategy will consider entering a long position when the "K" line crosses above the "D" line, and the "K" line is below 20 (indicating that the asset is oversold, so a buying opportunity may arise).
Short Condition: A "short" trade is a sell order. The strategy will enter a short position when the "K" line crosses below the "D" line, and the "K" line is above 80 (indicating that the asset is overbought, so a selling opportunity may arise).
Entry and Exit
When the conditions for a long or short trade are met, the strategy enters a position.
It also automatically sets stop loss and take profit levels based on the defined percentages to protect against large losses or secure profits.
Plotting
The lines for "K" and "D" are plotted on the chart so you can visually track when the strategy is triggering buy or sell signals. The 80 and 20 lines are also shown to indicate the overbought and oversold levels.
This strategy is designed to help traders make smart decisions based on market conditions and to protect their investments by automatically setting stop loss and take profit levels.

RSI MA Alert on close (One-Shot w/ Reset at 50)🧠🧠 Overview
This script combines the Relative Strength Index (RSI) with a Moving Average (MA) of the RSI to generate "one-shot" alerts for potential overbought or oversold conditions. After triggering an alert, it prevents duplicate signals until the RSI MA resets by crossing the 50 level, helping reduce noise and false signals.
🔒 All signals trigger only after the candle closes, ensuring confirmation and reducing premature alerts during intrabar movement.
⚙️ How It Works
📊 Core Logic
RSI & MA Calculation:
Calculates the RSI using your chosen length.
Applies a Moving Average (SMA or EMA) to the RSI to smooth the signal.
One-Shot Alert Mechanism:
Alerts are triggered only once per cycle when the RSI MA crosses the overbought or oversold threshold.
After an alert fires, it won’t fire again until the RSI MA resets by crossing back through the midpoint level (default: 50).
✅ Alerts only trigger on candle close, helping avoid false breakouts during live price action.
Reset System:
An overbought alert can only trigger if RSI MA first crosses below 50, then above the overbought level.
An oversold alert can only trigger if RSI MA first crosses above 50, then below the oversold level.
📈 Chart Display
Plots the RSI and its MA for visual analysis.
Dashed lines show overbought (default: 60) and oversold (default: 40) levels.
A dotted line marks the reset level (default: 50).
Visual markers ("OB" / "OS") appear when alerts are triggered.
🔔 Custom Alerts
Two customizable alerts are available:
RSI MA Crossed Above Overbought: Triggers after reset when RSI MA crosses above the overbought threshold.
RSI MA Crossed Below Oversold: Triggers after reset when RSI MA crosses below the oversold threshold.
🔄 Each alert triggers only once per reset cycle and only after a candle closes, ensuring reliability.
🛠️ Inputs
RSI Length
MA Length (on RSI)
MA Type: SMA or EMA
Overbought & Oversold Thresholds
Reset Threshold (usually 50)
Enable/Disable individual alerts
✅ Best Use Cases
Traders wanting cleaner RSI signals with fewer false positives.
Situations where signal confirmation is needed through a reset mechanism.
Ideal for trend-following or mean-reversion strategies with customizable tuning.

Alerta Caída Brusca + Confirmación de VolumenTechnical Components of the Indicator
EMA 9 vs EMA 21
Detects momentum shifts via exponential moving average crossovers.
When EMA 9 crosses below EMA 21, it is interpreted as a bearish signal.
Bollinger Band Compression
Identifies periods of low volatility (tight bands).
A breakout following this compression typically precedes sharp and fast price moves.
Ichimoku Cloud (Kumo Breakout)
If the price closes below the Kumo (Ichimoku cloud), it indicates structural bearish pressure.
This confirms the loss of key technical support.
RSI (Relative Strength Index)
A reading below 45 signals price weakness and low buying pressure.
🛑 Conditions to Trigger a Sell Signal
A sell signal is generated when all of the following conditions occur simultaneously:
Bollinger Bands show compression (low volatility).
EMA 9 crosses below EMA 21 (bearish crossover).
Price breaks below the Ichimoku cloud (Kumo).
RSI is below 45, confirming weak buying momentum.
When these conditions are met, a "SELL" label is visually projected on the corresponding candle.
📈 Usage Recommendations
Recommended timeframes: 5 minutes, 15 minutes, or 1 hour.
Useful for anticipating drops, avoiding late entries, and detecting technical breakdowns.
Can be combined with volume, candlestick patterns, or liquidity zones for higher accuracy.

RSI Crosses SMA Buy/Sell StrategyDisclaimer:
// This script is for educational and informational purposes only.
// It does not constitute financial or investment advice.
// Trading involves substantial risk and may not be suitable for all investors.
// Always do your own research or consult with a licensed financial advisor
// before making any trading or investment decisions.
// The author is not responsible for any losses incurred using this script
Key Changes:
Buy at High of the Signal Candle:
The strategy.entry("Buy", strategy.long, limit=high, comment="Buy at High of Signal Candle") line places a buy order at the high of the candle that triggered the signal (i.e., the candle where the RSI crosses above the SMA).
How it works:
When the RSI crosses above the SMA and the buy condition is true, the strategy will place a buy order at the high of that candle.
Exit:
The strategy will exit the position if the RSI crosses below the SMA as usual using strategy.close("Buy").
Example:
If the RSI crosses above the SMA at a specific candle, the strategy will enter a buy order at the high of that candle.
When the RSI crosses below the SMA, it will close the long position.
This should now execute a buy order at the high of the signal candle when the RSI crosses above the SMA, as requested.

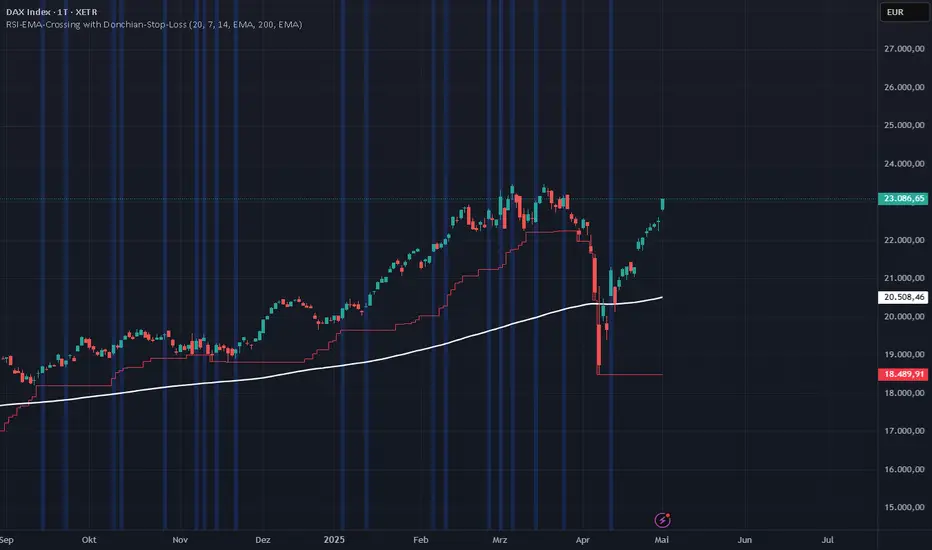
RSI-EMA-Crossing with Donchian-Stop-LossThe Donchian RSI Indicator is a visual tool that combines momentum and trend analysis to identify high-quality long opportunities based on RSI crossovers, price action, and Donchian channel dynamics.
How It Works
Momentum Signal: A bullish RSI crossover is detected when the RSI crosses above its moving average.
Trend Filter: A signal is only valid if the crossover occurs while the price is above its moving average – filtering out entries against the prevailing trend.
Signal Candle: The high of the crossover candle is stored.
Entry Trigger: A valid signal occurs when a later candle closes above that signal high.
Stop-Loss (Visual Only)
The lower band of the Donchian Channel acts as a visual reference for a dynamic stop-loss level.
Features
Customizable RSI, Donchian Channel, and moving average lengths
Selectable MA types: SMA, EMA, WMA, VWMA, HMA
Signal candle highlighted (yellow background)
Entry points labeled on the chart
Price MA and Donchian Channel plotted
Trend filter improves signal quality by confirming upward bias
Use Case
Designed for swing and position traders
Optimized for use on daily or 4H charts
C&B Auto MK5C&B Auto MK5.2ema BullBear
Overview
The C&B Auto MK5.2ema BullBear is a versatile Pine Script indicator designed to help traders identify bullish and bearish market conditions across various timeframes. It combines Exponential Moving Averages (EMAs), Relative Strength Index (RSI), Average True Range (ATR), and customizable time filters to generate actionable signals. The indicator overlays on the price chart, displaying EMAs, a dynamic cloud, scaled RSI levels, bull/bear signals, and market condition labels, making it suitable for swing trading, day trading, or scalping in trending or volatile markets.
What It Does
This indicator generates bull and bear signals based on the interaction of two EMAs, filtered by RSI thresholds, ATR-based volatility, a 50/200 EMA trend filter, and user-defined time windows. It adapts to market volatility by adjusting EMA lengths and RSI thresholds. A dynamic cloud highlights trend direction or neutral zones, with candlestick coloring in neutral conditions. Market condition labels (current and historical) provide real-time trend and volatility context, displayed above the chart.
How It Works
The indicator uses the following components:
EMAs: Two EMAs (short and long) are calculated on a user-selected timeframe (1, 5, 15, 30, or 60 minutes). Their crossover or crossunder triggers potential bull/bear signals. EMA lengths adjust based on volatility (e.g., 10/20 for volatile markets, 5/10 for non-volatile).
Dynamic Cloud: The area between the EMAs forms a cloud, colored green for bullish trends, red for bearish trends, or a user-defined color (default yellow) for neutral zones (when EMAs are close, determined by an ATR-based threshold). Users can widen the cloud for visibility.
RSI Filter: RSI is scaled to price levels and plotted on the chart (optional). Signals are filtered to ensure RSI is within volatility-adjusted bull/bear thresholds and not in overbought/oversold zones.
ATR Volatility Filter: An optional filter ensures signals occur during sufficient volatility (ATR(14) > SMA(ATR, 20)).
50/200 EMA Trend Filter: An optional filter restricts bull signals to bullish trends (50 EMA > 200 EMA) and bear signals to bearish trends (50 EMA < 200 EMA).
Time Filter: Signals are restricted to a user-defined UTC time window (default 9:00–15:00), aligning with active trading sessions.
Market Condition Labels: Labels above the chart display the current trend (Bullish, Bearish, Neutral) and optionally volatility (e.g., “Bullish Volatile”). Up to two historical labels persist for a user-defined number of bars (default 5) to show recent trend changes.
Visual Aids: Bull signals appear as green triangles/labels below the bar, bear signals as red triangles/labels above. Candlesticks in neutral zones are colored (default yellow).
The indicator ensures compatibility with standard chart types (e.g., candlestick or bar charts) to produce realistic signals, avoiding non-standard types like Heikin Ashi or Renko.
How to Use It
Add to Chart: Apply the indicator to a candlestick or bar chart on TradingView.
Configure Settings:
Timeframe: Choose a timeframe (1, 5, 15, 30, or 60 minutes) to match your trading style.
Filters:
Enable/disable the ATR volatility filter to focus on high-volatility periods.
Enable/disable the 50/200 EMA trend filter to align signals with the broader trend.
Enable the time filter and set custom UTC hours/minutes (default 9:00–15:00).
Cloud Settings: Adjust the cloud width, neutral zone threshold, color, and transparency.
EMA Colors: Use default trend-based colors or set custom colors for short/long EMAs.
RSI Display: Toggle the scaled RSI and its thresholds, with customizable colors.
Signal Settings: Toggle bull/bear labels and set signal colors.
Market Condition Labels: Toggle current/historical labels, include/exclude volatility, and adjust decay period.
Interpret Signals:
Bull Signal: A green triangle or “Bull” label below the bar indicates potential bullish momentum (EMA crossover, RSI above bull threshold, within time window, passing filters).
Bear Signal: A red triangle or “Bear” label above the bar indicates potential bearish momentum (EMA crossunder, RSI below bear threshold, within time window, passing filters).
Neutral Zone: Yellow candlesticks and cloud (if enabled) suggest a lack of clear trend; consider range-bound strategies or avoid trading.
Market Condition Labels: Check labels above the chart for real-time trend (Bullish, Bearish, Neutral) and volatility status to confirm market context.
Monitor Context: Use the cloud, RSI, and labels to assess trend strength and volatility before acting on signals.
Unique Features
Volatility-Adaptive EMAs: Automatically adjusts EMA lengths based on ATR to suit volatile or non-volatile markets, reducing manual configuration.
Neutral Zone Detection: Uses an ATR-based threshold to identify low-trend periods, helping traders avoid choppy markets.
Scaled RSI Visualization: Plots RSI and thresholds directly on the price chart, simplifying momentum analysis relative to price.
Flexible Time Filtering: Supports precise UTC-based trading windows, ideal for day traders targeting specific sessions.
Historical Market Labels: Displays recent trend changes (up to two) with a decay period, providing context for market shifts.
50/200 EMA Trend Filter: Aligns signals with the broader market trend, enhancing signal reliability.
Notes
Use on standard candlestick or bar charts to ensure accurate signals.
Test the indicator on a demo account to optimize settings for your market and timeframe.
Combine with other analysis (e.g., support/resistance, volume) for better decision-making.
The indicator is not a standalone system; use it as part of a broader trading strategy.
Limitations
Signals may lag in fast-moving markets due to EMA-based calculations.
Neutral zone detection may vary in extremely volatile or illiquid markets.
Time filters are UTC-based; ensure your platform’s timezone settings align.
This indicator is designed for traders seeking a customizable, trend-following tool that adapts to volatility and provides clear visual cues with robust filtering for bullish and bearish market conditions.

RSI(7) Divergence @10/90 + AlertsThis indicator indicates the divergences on the chart with a sell and buy signal

Custom RSI + EMA Crossover SignalThis indicator indicates when the price rises and when it falls depending on the rsi and the EMA when crossing 10 with 20

Triple Stoch and RSI (4 assets)4 Hour Green Dots -
This indicator looks at four different assets and shows when the RSI and 3 different stochastic RSI levels are all oversold.
You can optionally add Red dots when they are all overbought but doesn't seem to be as accurate.
The assets and levels are all customizable.

[COW] Market DirectionA script that will plot a table on screen that shows your RSI and EMA directions for multiple timeframes. This will help determine your direction and bias for multiple timeframes. I have included some code that I have in a private library as well showing how I handle types with pine script and how they come in handy.
This indicator is useful to help determine chop, directional movement, and more!

Fibonacci - RSI OscillatorIndicator Overview
The Fibonacci RSI Oscillator calculates the Relative Strength Index (RSI) based on a dynamically adjusting level derived from recent price action and a fixed Fibonacci ratio (0.236). This differs from standard RSI, which is calculated directly on the closing price. The objective is to measure momentum relative to a level that adapts to recent peaks and valleys.
Core Calculation Mechanism
Peak/Valley Tracking: The script identifies the highest high (state_peak) and lowest low (state_valley) since the last detected change in short-term directional bias (state_dir).
Dynamic Level Calculation: A level (state_dyn_level) is calculated using a fixed 0.236 Fibonacci ratio relative to the tracked peak and valley:
If bias is up: state_dyn_level = state_peak - (state_peak - state_valley) * 0.236
If bias is down: state_dyn_level = state_valley + (state_peak - state_valley) * 0.236
This level adjusts automatically when a new peak or valley is established in the current directional bias. If price crosses the dynamic level against the current bias, the bias flips, and the level recalculates.
Optional Source Smoothing: The calculated state_dyn_level can optionally be smoothed using a user-selected moving average (SMA, EMA, WMA, HMA, RMA) before the RSI calculation.
RSI Calculation: The standard RSI formula is applied to the (optionally smoothed) state_dyn_level series to produce the primary oscillator value (val_primary_osc).
Signal Line: A moving average (type and length configurable) is calculated on the val_primary_osc to generate the val_sig_line.
Key Features & Components
Dynamic Fibonacci Level: The core input for the RSI calculation, based on recent peaks/valleys and the 0.236 ratio.
Fibonacci Level RSI: The primary oscillator line representing the RSI of the dynamic level.
Signal Line: A moving average of the primary RSI line.
Overbought/Oversold Levels: User-defined threshold lines.
Optional Source Smoothing: Configurable MA smoothing applied to the dynamic level before RSI calculation.
Gradient RSI Color : Option to color the primary RSI line based on its value relative to OB/Mid/OS levels.
Zone & OB/OS Fills: Visual fills for the 0-50 / 50-100 zones and specific fills when the RSI enters OB/OS territory.
Background Gradient: Optional vertical background color gradient based on the RSI's position between 0 and 100.
Configurable Parameters: Inputs for lengths, MA types, OB/OS levels, colors, line widths, and feature toggles.
Visual Elements Explained
Fibonacci Level RSI Line: The main plotted oscillator (color/gradient/width configurable).
Signal Line: The moving average of the RSI line (color/width/MA type configurable).
OB/OS Lines: Horizontal lines plotted at the set OB/OS levels (color/width configurable).
Mid-Line (50): Horizontal line plotted at 50 (color/width configurable).
Zone Fills:
Background fill between 0-50 and 50-100 (colors configurable).
Conditional fill between the RSI line and the 50 line when RSI > OB level or RSI < OS level (colors configurable).
Background Gradient: Optional background coloring where transparency varies vertically with the RSI level (base colors and transparency range configurable).
Configuration Options
Users can adjust the following parameters in the indicator settings:
Smoothing: Enable/disable dynamic level smoothing; set length and MA type.
RSI: Set the RSI calculation length.
Signal Line: Set the signal line smoothing length and MA type.
Levels: Define Overbought and Oversold numeric thresholds.
Visuals: Configure colors and widths for the RSI line, signal line, OB/OS lines, mid-line, zone fills, and OB/OS fills.
Gradients: Enable/disable and configure colors for the RSI line gradient; enable/disable and configure colors/transparency for the background gradient.
Interpretation Notes
The oscillator reflects the momentum of the dynamic Fibonacci level, not directly the price. Divergences, OB/OS readings, and signal line crossovers should be interpreted in this context.
The behavior may differ from standard RSI, potentially offering a smoother output or highlighting different momentum patterns depending on market structure and volatility.
As with any indicator, signals should be used in conjunction with other analysis methods and risk management practices. It is not designed as a standalone trading system.
Risk Disclaimer:
Trading involves significant risk. This indicator is provided for analytical purposes only and does not constitute financial advice. Past performance is not indicative of future results. Use sound risk management practices and never trade with capital you cannot afford to lose.

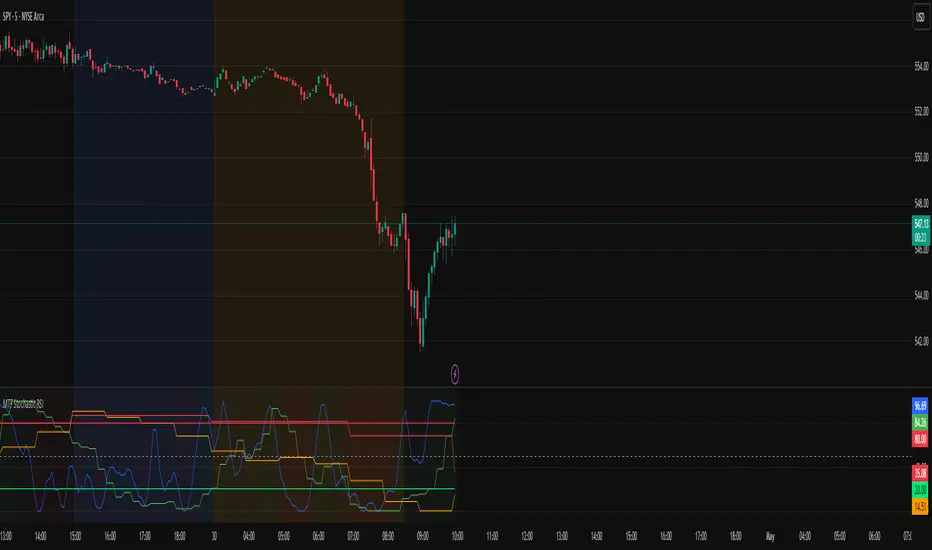
MTF Stochastic RSIOverview: MTF Stochastic RSI
is a momentum-tracking tool that plots the Stochastic RSI oscillator for up to four user-
defined timeframes on a single panel. It provides a compact yet powerful view of how
momentum is aligning or diverging across different timeframes, making it suitable for both
scalpers and swing traders looking for multi-timeframe confirmation.
What it does:
Calculates Stochastic RSI values using the RSI of price as the base input and applies
smoothing for stability.
Aggregates and displays the values for four customizable TF (e.g., 5min, 15min, 1h, 4h).
Highlights potential support and resistance zones in the oscillator space using adaptive zone
logic.
Optionally draws dynamic support/resistance zone lines in the oscillator space based on
historical turning points.
How it works:
Each timeframe uses the same RSI and Stoch calculation settings but runs independently via
the request.security() function.
Stochastic RSI is calculated by first applying the RSI to price, then applying a stochastic
formula on the RSI values, and finally smoothing the %K output.
Adaptive overbought and oversold thresholds adjust based on ATR-based volatility and simple
trend filtering (e.g., price vs EMA).
When a crossover above the oversold zone or a crossunder below the overbought zone
occurs, the script checks for proximity to previously stored zones and either adjusts or
records a new one.
These zones are stored and re-plotted as dotted support/resistance levels within the
oscillator space.
What it’s based on:
The indicator builds upon traditional Stochastic RSI by applying it to multiple timeframes in
parallel.
Zone detection logic is inspired by the idea of oscillator-based support/resistance levels.
Volatility-adjusted thresholds are based on ATR (Average True Range) to make the
overbought/oversold zones responsive to market conditions.
How to use it:
Look for alignment across timeframes (e.g., all four curves pushing into the overbought
region suggests strong trend continuation).
Reversal risk increases when one or more higher timeframes are diverging or showing signs of
cooling while lower timeframes are still extended.
Use the zone lines as soft support/resistance references within the oscillator—retests of
these zones can indicate strong reversal opportunities or continuation confirmation.
This script is provided for educational and informational purposes only. It does not constitute financial advice, trading recommendations, or an offer to buy or sell any financial instrument. Always perform your own due diligence, use proper risk management, and consult a qualified financial professional before making any trading decisions. Past performance does not guarantee future results. Use this tool at your own discretion and risk.
Simple ScreenerThis is a basic easy to use screener.
In the code you will find an area with all the tickers and you can add your own it will look like this.
It uses the RSI, TSI, ADX, AND SUPER TREND! The code is open source if you would like to tinker and make it better with it. please message me if you have any questions or request.
s01 = input.symbol('AMD', group = 'Symbols', inline = 's01')
s02 = input.symbol('GOOG', group = 'Symbols', inline = 's02')
s03 = input.symbol('BKNG', group = 'Symbols', inline = 's03')
s04 = input.symbol('NIO', group = 'Symbols', inline = 's04')
s05 = input.symbol('NVDA', group = 'Symbols', inline = 's05')
s06 = input.symbol('SPY', group = 'Symbols', inline = 's06')
s07 = input.symbol('QQQ', group = 'Symbols', inline = 's07')
s08 = input.symbol('DIA', group = 'Symbols', inline = 's08')
s09 = input.symbol('IWM', group = 'Symbols', inline = 's09')
s10 = input.symbol('LCID', group = 'Symbols', inline = 's10')
s11 = input.symbol('PTON', group = 'Symbols', inline = 's11')
s12 = input.symbol('PLUG', group = 'Symbols', inline = 's12')
s13 = input.symbol('PLTR', group = 'Symbols', inline = 's13')
s14 = input.symbol('TSLA', group = 'Symbols', inline = 's14')
s15 = input.symbol('AMZN', group = 'Symbols', inline = 's15')
s16 = input.symbol('AAPL', group = 'Symbols', inline = 's16')
s17 = input.symbol('BA', group = 'Symbols', inline = 's17')
s18 = input.symbol('VXX', group = 'Symbols', inline = 's18')
s19 = input.symbol('OXY', group = 'Symbols', inline = 's19')
s20 = input.symbol('JNJ', group = 'Symbols', inline = 's20')
Just replace with the ticker that you would prefer!

RTB - Momentum Breakout Strategy V3
📈 RTB - Momentum Breakout Strategy V3 is a directional breakout strategy based on momentum. It combines exponential moving averages (EMAs), RSI, and recent support/resistance levels to detect breakout entries with trend confirmation. The system includes dynamic risk management using ATR-based stop-loss and trailing stop levels. Webhook alerts are supported for external automated trading integrations.
🔎 The strategy was backtested using default parameters on BTCUSDT Futures (Bybit) with 4-hour timeframe and a 0.05% commission per trade.
⚠️ This script is for educational purposes only and does not constitute financial advice. Always do your own research before trading.

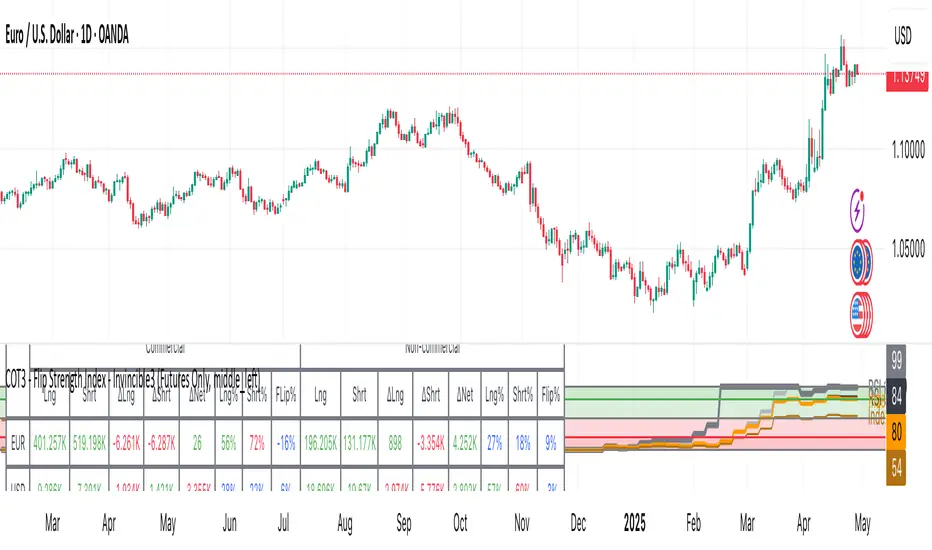
COT3 - Flip Strength Index - Invincible3This indicator uses the TradingView COT library to visualize institutional positioning and potential sentiment or trend shifts. It compares the long% vs short% of commercial and non-commercial traders for both Pair A and Pair B, helping traders identify trend strength, market overextension, and early reversal signals.
🔷 COT RSI
The COT RSI normalizes the net positioning difference between non-commercial and commercial traders over (N=13, 26, and 52)-week periods. It ranges from 0 to 100, highlighting when sentiment is at bullish or bearish extremes.
COT RSI (N)= ((NC - C)−min)/(max-min) x100
🟡 COT Index
The COT Index tracks where the current non-commercial net position lies within its 1-year and 3-year historical range. It reflects institutional accumulation or distribution phases.
Strength represents the magnitude of that positioning bias, visualized through normalized RSI-style metrics.
COT Index (N)= (NC net)/(max-min) x100
🔁 Flip Detection
Flip refers to the crossovers between long% and short%, indicating a change in directional bias among trader groups. When long positions exceed shorts (or vice versa), it signals a possible market flip in sentiment or trend.
For example, Pair B commercial flip is calculated as:
Long% = (Long/Open Interest)×100
Short% = (Short/Open Interest)×100
Flip = Long%−Short%
A bullish flip occurs when long% overtakes short%, and vice versa for a bearish flip. These flips often precede price trend changes or confirm sentiment breakouts.
Flip captures how far current positioning deviates from historical norms — highlighting periods of institutional overconfidence or exhaustion, often leading to significant market turns.
This combination offers a multi-layered edge for identifying when smart money is flipping direction, and whether that flip has strong conviction or is likely to fade.
..........................................................................................................................................................
Color Changing MAs📌 Indicator: Color Changing Moving Averages
This script plots up to four customizable moving averages, each with dynamic color changes based on price positioning and optional RSI filtering.
🧩 Key Features:
✅ 4 independent moving averages (SMA or EMA)
✅ Custom inputs for:
Length
Source (e.g. close, OHLC4, etc.)
Offset
Bullish/Bearish color
✅ Toggle visibility for each MA
✅ Global RSI filter to enhance trend signals:
User-defined RSI length
Adjustable Bullish/Bearish thresholds
Universal neutral color for flat/unclear momentum
✅ Global timeframe control — all MAs and RSI are calculated on a single timeframe of your choice (e.g. D, W, M)
🎯 Color Logic:
Bullish color = MA is below both open and close, and RSI is above threshold
Bearish color = MA is above both open and close, and RSI is below threshold
Neutral gray = MA is trending but RSI contradicts the move (filtered out)
🛠️ Use Cases:
Spot trend changes with visual clarity
Identify pullbacks within strong RSI-confirmed trends
Apply higher-timeframe signals while on lower-timeframe charts
⚠️ Notes:
This version uses request.security() to support global timeframe selection — higher timeframes on lower TF charts will display step-like behavior (as per TradingView architecture).
No smoothing/interpolation is applied to preserve raw signal accuracy.

RSI SR OB Breakouts Strategy PRO (coffeshopcrypto)This was originally an indicator that I took from coffeshopcrypto, all credit to them. I simply turned it into a strategy. Only additions are TP/SL Levels based off of ticks and an optional EMA Filter
Original Script:

RSI Trend Label (Top Right)This is an RSI indicator showing if its rising over last 20 days or falling with the value.

Kevs RSI v2 - Divergence & Signals **Kevs RSI v2 - Divergence & Signals**
**Description:**
Kevs RSI v2 is an enhanced Relative Strength Index (RSI) indicator designed for traders who want more actionable insights from RSI behavior.
It combines a hybrid smoothing technique for a cleaner RSI line with intelligent divergence detection and automatic buy/sell signals.
Key features include:
- **Smoothed RSI** using a blend of WMA and EMA for a sharper, more responsive line.
- **Buy/Sell Signals** generated by oversold/overbought exits and confirmed divergence patterns.
- **Automatic Divergence Detection**, highlighting bullish and bearish divergences visually on the chart.
- **Customizable Settings** for RSI length, overbought/oversold levels, background fill, and divergence sensitivity.
This tool provides an excellent edge for traders who want to combine traditional RSI signals with modern divergence analysis.
---
# **How to Use:**
1. **Add to Chart:**
Apply "Kevs RSI v2 - Divergence & Signals" to your chart from the Indicators menu.
2. **Customize Settings (Optional):**
- Adjust the RSI Length, Overbought, and Oversold levels according to your trading style.
- Turn background fill on or off for better visibility.
- Modify the Divergence Lookback Period or Strength Threshold to fine-tune divergence sensitivity.
3. **Interpret Signals:**
- **Buy Signal:** A green "BUY" label appears when the RSI crosses back above the oversold zone or when bullish divergence is detected.
- **Sell Signal:** A red "SELL" label appears when the RSI crosses below the overbought zone or when bearish divergence is detected.
- **Bullish/Bearish Divergence:** Small green or red diamonds highlight divergence points with optional strength labels.
4. **Trade Responsibly:**
Combine these signals with your broader analysis (price action, trend structure, risk management) for best results.
---
**Notes:**
- Best used on 1-minute to daily charts.
- Ideal for day traders, swing traders, and crypto or forex traders looking to enhance entry/exit precision.
- Divergence detection is dynamic — lower the "Divergence Strength Threshold" to catch more divergences, or raise it to filter out weaker signals.
