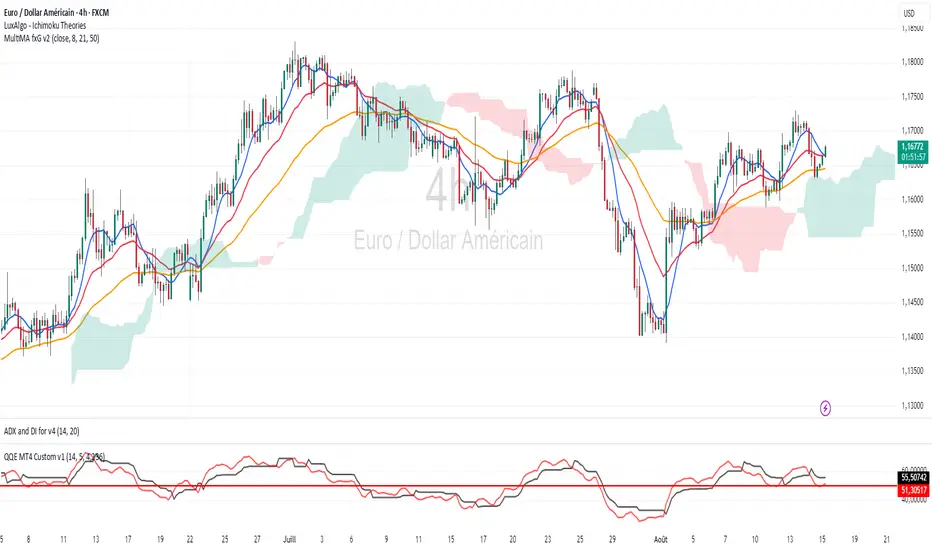
MultiMA fxG v2 Indicateur permettant de centralier 3 moving average :
- Moving average Simple 8 (bleu)
- Moving average Exponentielle 21 (rouge)
- Moving average Exponentielle 50 (Orange)
====================================================
Simple Moving Average (SMA) 8: Displayed in blue, this line provides a quick view of short-term price trends.
Exponential Moving Average (EMA) 21: Shown in red, this average is more sensitive to recent price changes and highlights medium-term momentum.
Exponential Moving Average (EMA) 50: Marked in orange, this line tracks longer-term price movements for overall trend direction.
Traders can use the combination of these moving averages to identify potential crossover signals, trend strength, and possible reversal points.
Simple Moving Average (SMA)
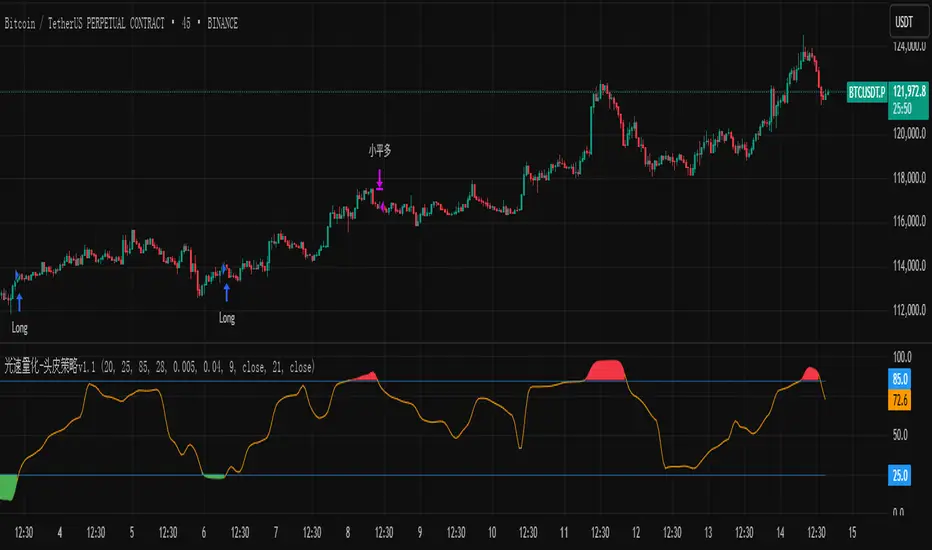
光速量化-头皮策略v1.1Version: Unlimited trial version.
Principle: RSI and moving average complement each other, taking a bite of both oscillation and trend.
Disadvantage: High drawdown.
Disclaimer: The scalp strategy v1.1 of Lightspeed Quantification is designed for trial users. Those who use this strategy are responsible for their own assets, and any losses incurred are not the responsibility of the author.
版本:无期限试用版。
原理:RSI与均线配合,震荡与趋势都吃一口。
缺点:回撤高。
声明:光速量化的头皮策略v1.1是面向试用者体验的,使用该策略的人请为自己的资产负责,产生任何损失与作者无关。
[teachershim] draw sma 9/25/50/100/200/400📌 Description — draw sma 9/25/50/100/200/400
This indicator displays Simple Moving Averages (SMA) for periods 9, 25, 50, 100, 200, and 400 on the chart.
It also marks the last confirmed bar’s SMA values with circular dots positioned to the right by a user-defined offset,
and labels each dot with the SMA period number for quick visual reference.
🔹 Features
SMA Lines
Plots SMA lines for periods 9 / 25 / 50 / 100 / 200 / 400 in distinct colors and thickness.
Last Value Markers
Adds circular markers (dots) at the SMA value of the last confirmed bar, shifted right by the specified offset.
SMA Period Labels
Displays the SMA period number (e.g., "9", "25", "50") just above each dot.
Customizable Parameters
Right offset for marker placement.
Vertical gap between marker and label (in percentage of chart range).
🔹 Parameters
Right Offset: Number of bars to place the marker/label to the right of the last bar.
Text Vertical Gap (%): Percentage offset to position the label above the dot.
🔹 Colors & Line Thickness
SMA 9 → Teal, thickness 1
SMA 25 → Orange, thickness 2
SMA 50 → Blue, thickness 2
SMA 100 → Purple, thickness 1
SMA 200 → Red, thickness 2
SMA 400 → Gray, thickness 1
🔹 Use Cases
Quickly identify key support/resistance levels across multiple SMA periods.
Instantly see the current SMA values without hovering over the chart.
Monitor SMA alignment and spacing for trend analysis or trading setups.
💡 Notes
If the right offset is too large, ensure your chart’s right margin is wide enough to display the markers.
max_labels_count in Pine Script limits how many labels can be displayed at once.
If you want, I can also make you a shorter, more concise “marketplace style” version for TradingView’s public library so it’s punchier and attracts more clicks.
Do you want me to prepare that?

Trend+Volume Confluence IndicatorScalper and swing trading signals: use the 15–30 minute charts for scalps and the 4–8 hour charts for swings. Add the Money Flow Index (MFI) for extra confluence. In an uptrend, if the MFI is at or above the halfway mark and rising, take the long. In a downtrend, if the MFI is at or below the halfway mark and falling, take the short.

MK_OSFT - Multi-timeframe MA Lines with labelsProvides SMA/EMA levels on a chart for the 5m, 15m, 1H and 4H timeframes. It does not draw the full MA's on the chart but provides 'only' the actual MA values at the current candle as a horizontal line with a label.

Trend Impulse Tester | Trend–Impulse–No-Chop (In development) Trend strategy. Regulate your entry and make the drawdown less than 3%, entry at % of capital. Currently under development.
Used on cryptocurrency. The 30 min timeframe was used. Adjust the values yourself, settings are provided

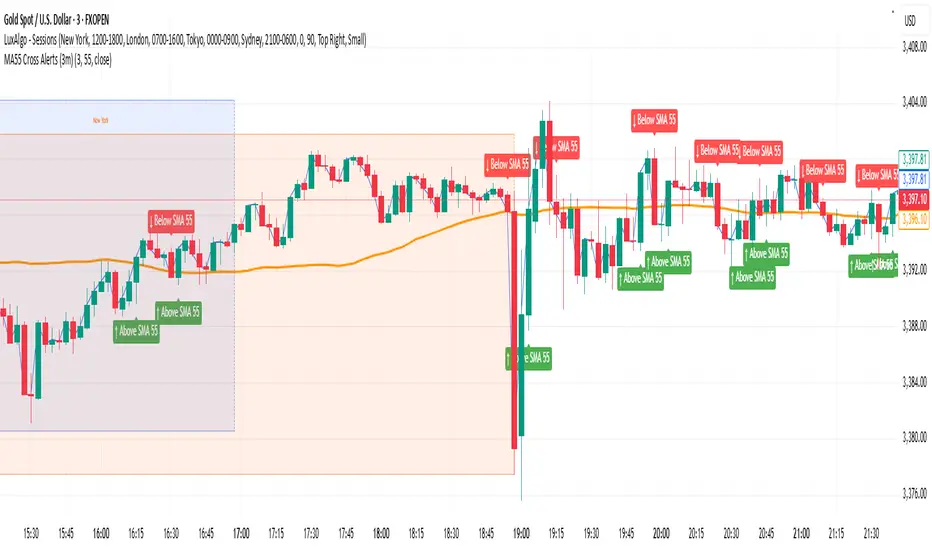
Gold MA55 Cross Alerts (3m) NavThis helps to find the best setup under the London and New York sessions.
The Golden TriggerThe Golden Trigger - XAUUSD
Unlock your trading potential with The Golden Trigger, a powerful technical analysis strategy designed for XAUUSD. This custom indicator combines the synergy of moving averages and the MACD to provide clear buy and sell signals, optimizing your trading decisions.
Key Features:
SMA Crossovers: Utilizes the 2-period and 7-period Simple Moving Averages (SMAs) to spot short-term price momentum shifts, triggering buy or sell signals.
MACD Confirmation: The strategy only acts when the MACD aligns with the price action, ensuring you’re trading with the market's momentum.
Long-Term Trend Filter: The 200-period SMA ensures that your trades align with the overall market trend, helping you avoid counter-trend moves.
Real-Time Alerts: Get notified when it's time to act with the built-in alert conditions for both Buy and Sell signals.
Customizable and User-Friendly: Tailor the strategy to your preferences and trade with confidence.
This indicator is perfect for traders looking to catch short-term trends in gold (XAUUSD), with clear visual buy and sell markers that appear directly on the chart.
Why You Need This Indicator:
Stay ahead of the market with real-time signals
Filter trades to match the prevailing market trend
Enhance your trading strategy with a clear, simple-to-follow system
Unlock the power of The Golden Trigger today and make smarter, more confident trades!

Average VolatilityThis script offers a unique and practical approach to visualizing average volatility by calculating a simple moving average of the daily high-low ranges, directly reflecting price fluctuations over a user-defined period. Unlike standard volatility indicators, it provides customizable options such as adjustable period length, display of absolute and percentage volatility values, and flexible text formatting for clear and tailored insights. This makes it a valuable tool for traders seeking to better understand market volatility trends and manage risk more effectively. Its straightforward visualization supports informed decision-making across various instruments and timeframes.
The indicator displays the average volatility over a configurable period as a bar chart (originally designed for daily intervals). It visualizes the price range (difference between high and low) across a selectable number of periods, as well as its ratio to the closing price, offering various customization options.
For many traders, assets with daily moves of 1% or more may offer greater profit opportunities, especially for short-term trading strategies. Instruments with lower volatility are generally less favored and often not recommended in such approaches due to reduced trading potential. Please note that higher volatility also implies increased risk, and potential losses can be significant. Always use proper risk management.
Detailed description:
The script calculates average volatility as a simple moving average of the high-low ranges (default: 5 periods, intended for daily timeframes). Volatility can be shown as either a bar or line chart. Users can choose to display the absolute volatility values and/or the volatility expressed as a percentage of the closing price. Text size and spacing between labels are adjustable to ensure readability across different instruments. Additionally, the last (unconfirmed) bar can be shown or hidden, since its value depends on the current price. Overall, the script provides a flexible and clear visualization of an instrument’s volatility.
---
Russian:
Индикатор отображает среднюю волатильность как простое скользящее среднее диапазонов «максимум-минимум» (по умолчанию 5 периодов, предназначено для дневных таймфреймов). Волатильность может отображаться в виде столбчатой или линейной диаграммы. Пользователи могут выбрать отображение абсолютных значений волатильности и/или волатильности, выраженной в процентах от цены закрытия. Размер текста и расстояния между надписями регулируются для удобочитаемости на разных инструментах. Кроме того, последний (неподтверждённый) столбец можно показать или скрыть, так как его значение зависит от текущей цены. В общем, скрипт обеспечивает гибкое и наглядное отображение волатильности инструмента.
Активы с волатильностью от 1% и выше дают больше возможностей для краткосрочной торговли, но риск также выше. Инструменты с низкой волатильностью не рекомендуются для таких подходов из-за ограниченного торгового потенциала и сложности в реализации прибыльных сделок. Всегда применяйте риск-менеджмент.
---
Spanish:
El script calcula la volatilidad promedio como un promedio móvil simple de las diferencias entre máximos y mínimos (por defecto 5 periodos, pensado para intervalos diarios). La volatilidad puede mostrarse como gráfico de barras o de líneas. El usuario puede elegir mostrar los valores absolutos de la volatilidad y/o los valores expresados en porcentaje respecto al precio de cierre. El tamaño del texto y el espacio entre las etiquetas son ajustables para garantizar la legibilidad en diferentes instrumentos. Además, se puede mostrar u ocultar la última barra (no confirmada), ya que su valor depende del precio actual. En conjunto, el script proporciona una visualización flexible y clara de la volatilidad del instrumento.
Los activos con una volatilidad del 1% o más ofrecen mayores oportunidades para el trading a corto plazo, pero también conllevan un mayor riesgo. Los instrumentos con baja volatilidad no se recomiendan para este tipo de estrategias debido a su limitado potencial de trading y la dificultad para obtener ganancias. Siempre utilice una gestión de riesgos adecuada.

Bishop Chicken Biryani RibbonChicken Biryani is great and the greatest dish out there, if you havent had it you should defitinitley try it out at your local indian resturaunt
EMA SMA Ribbon IRB IndicatorUsing EMA and SMA to show support and resistance area instead of lines.
And Show Rob Hoffman's IRB indicator for choosing entry point.

AutoTune MA - with crossover alertsThis indicator adapts the length of an EMA based on how far the adaptive MA itself is from the price, normalized by volatility (ATR%). The adaptive length shortens when the MA moves further from price, making the MA more responsive, and lengthens when closer, smoothing the MA. The base SMA is shown for reference only.
How to Use:
Watch the adaptive MA lines for dynamic smoothing that reacts to market volatility and price movement.
Use crossovers of the smallest and medium adaptive MAs for potential entry signals.
The base MA provides a stable benchmark for trend context.
Adjust inputs for base length, minimum length, and effect multiplier to fit your preferred responsiveness and market conditions.

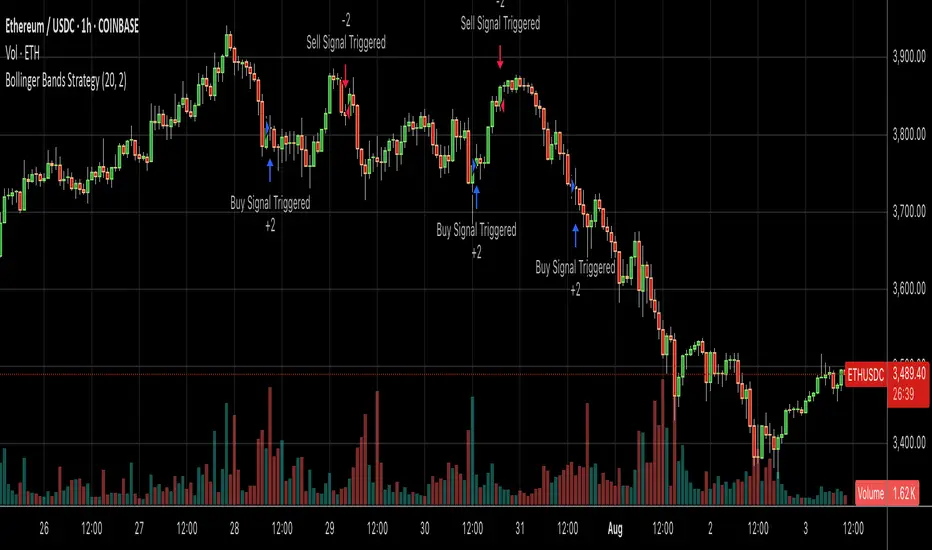
Bollinger Bands SMA 20_2 StrategyMean reversion strategy using Bollinger Bands (20-period SMA with 2.0 standard deviation bands).
Trade Triggers:
🟢 BUY SIGNAL:
When: Price crosses above the lower Bollinger Band
Logic: Price has hit oversold territory and is bouncing back
Action: Places a long position with stop at the lower band
🔴 SELL SIGNAL:
When: Price crosses below the upper Bollinger Band
Logic: Price has hit overbought territory and is pulling back
Action: Places a short position with stop at the upper band
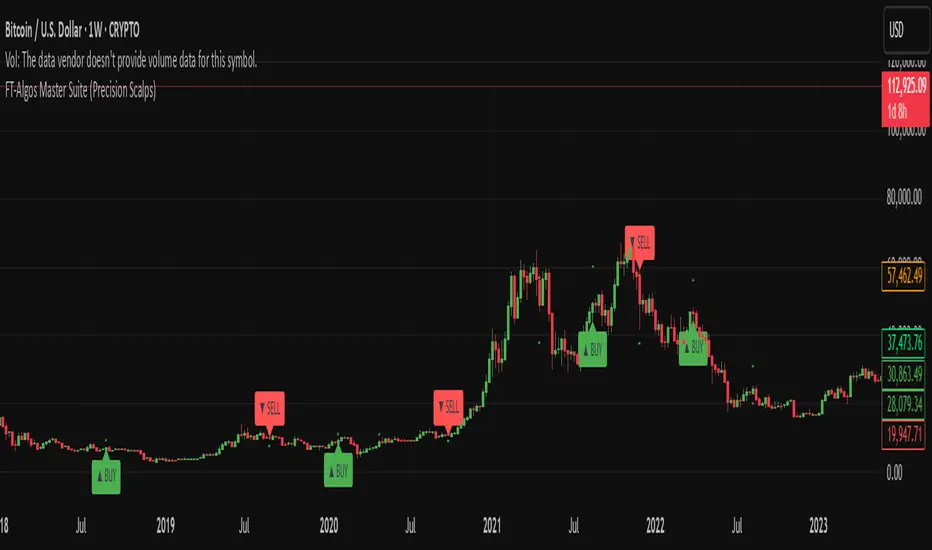
FT-Algos Master SuiteFT-Algos: Unified Alpha Suite
FT-Algos is an all-in-one Pine Script indicator designed to support traders across scalping and swing trading styles with unique multi-strategy logic and clear signals.
Key Features:
Three Trading Modes:
Quick Scalps — Fast momentum-based entries optimized for ultra-short timeframes.
Precision Scalps — Combines MACD flips, Kalman smoothing, Gaussian filters, ZLEMA, and Heikin Ashi SuperTrend to generate high-confidence scalping signals.
Swing Trades — Uses trend stacking with Kalman, ZLEMA, and MACD crossovers confirmed by higher timeframe SuperTrend direction.
Non-Repainting Signals: All entries rely on confirmed candle closes to avoid repainting and false signals.
Visual Entry Markers: Compact BUY and SELL triangle labels placed directly above/below candles for clear signal visualization.
Dynamic Take Profit and Stop Loss Levels: Calculated using Average True Range (ATR) to adjust for current market volatility.
User Configurable Settings: Easily toggle signal visibility, TP/SL display, and short entry signals.
Alert Conditions: Built-in alerts for buy and sell signals enable integration with TradingView’s alert system.
How FT-Algos works:
FT-Algos uniquely blends several filtering methods including Kalman and Gaussian smoothing, momentum evaluation, and multi-timeframe trend validation to minimize noise and improve entry precision. Each mode serves different trading styles—from rapid scalping to higher timeframe swing trading—allowing traders to adapt to their preferred strategy seamlessly.
Disclaimer:
This script is provided as-is for educational and informational purposes only. It does not constitute financial advice. Please test thoroughly and trade responsibly.
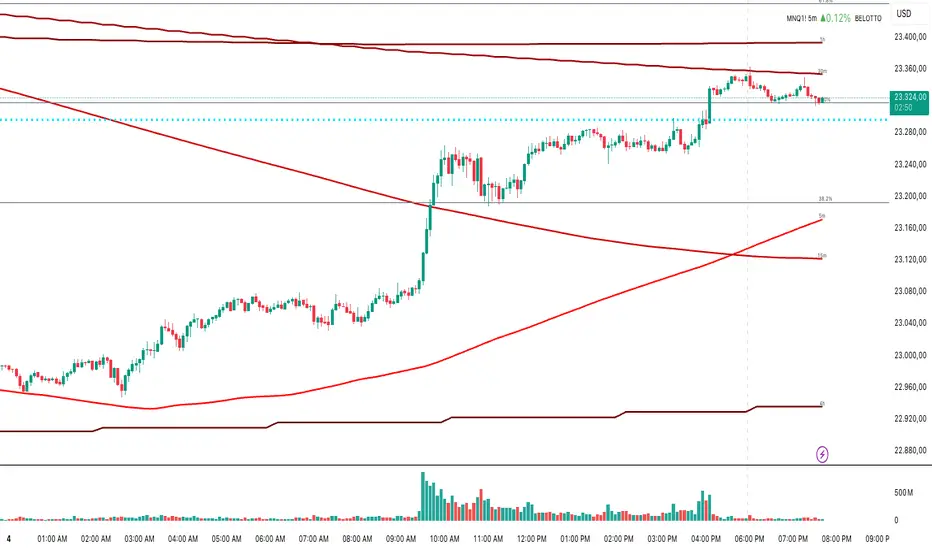
Multi-Timeframe MA 200Multi-Timeframe MA 200
This powerful tool plots the 200-period Moving Average across multiple timeframes (5m, 15m, 30m, 1h, 4h, Daily) directly on your active chart. You can switch between SMA (Simple Moving Average) and EMA (Exponential Moving Average) for all timeframes at once.
Key features:
✅ 100% accurate calculation using the original timeframe
✅ Option to choose SMA or EMA
✅ Visual smoothing for cleaner display
✅ Floating labels showing the origin timeframe
✅ Clean interface – no clutter or legends
✅ Ideal for scalping, intraday, and swing traders
Developed by BELOTTO TRADER, founder of the CLUBE DO GAIN – one of the most engaged trading communities in the Portuguese-speaking world.
Multi Averages - CustomizableThis script adds up to 5 moving averages to your plot!
Both type and length are customizable.

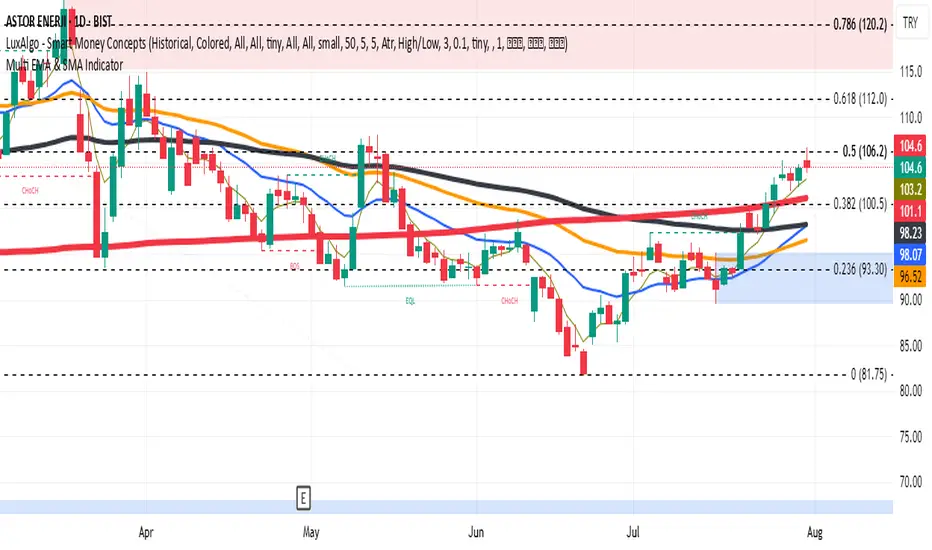
Multi EMA & SMA IndicatorDraws EMA 5/20/50/100 and SMA 200 in different colors and thickness in a single indicator
Super SMA [UnMatrix]Super SMA — Trend-following & Target Tool
The Super SMA is a powerful, user-friendly trend-following indicator designed to help traders identify high-probability entries, exits, and targets on any chart and timeframe. It combines classic moving average cross strategies with volatility, momentum, and separation filters to generate reliable buy and sell signals.
Key Features:
1. Signal Clarity: Instantly spots market momentum shifts using dual SMA crossovers.
2. Volatility Filter: Includes an ATR check to avoid choppy, low-volatility conditions.
3. Momentum Confirmation: Optional filter ensures signals only trigger with supporting candle momentum.
4. Automatic Targets: Instantly plots entry, stop loss, and three take profit levels based on ATR and risk.
5. Clean Visuals: Lines and labels are clearly placed for easy reading without cluttering the chart.
6. No repainting: Once a signal appears, it stays, making backtesting and live trading straightforward.
How it Works:
a) Signal Generation: When the fast SMA crosses above (buy) or below (sell) the slower trend SMA, and all filters are met, a trade signal is issued.
b) Trade Management: The indicator automatically draws lines for Entry (EP), Stop Loss (SL), and Take Profits (TP1, TP2, TP3), helping you manage trades visually.
c) Smart Filtering: Only signals with sufficient volatility, momentum, and SMA separation are triggered — reducing false positives.
Best For:
a) Trend-following traders seeking reliable entries and risk management.
b) Any asset or timeframe, from crypto to forex, stocks, and indices.
How to Use:
a) Wait for a Buy+ or Sell+ signal.
b) Use the plotted entry, stop loss, and targets for trade planning.
c) Optionally, combine with your favorite price action or confirmation tools.
Give Super SMA a try and streamline your trend-trading with confidence!

EMA 10,20 SMA 50, 200This indicator is very helpful for swing traders who plan their trades using EMAs and SMAs. It is used on the daily chart and displays the 10- and 20-EMA, as well as the 50- and 200-SMA.

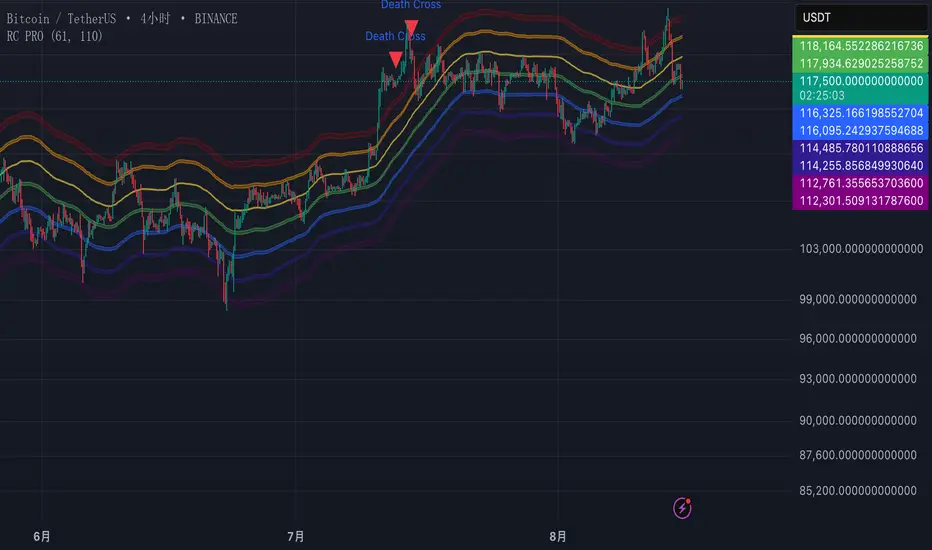
Rainbow Channels(PRO) by MrLazycatPro版和Free版的区别
懒猫先生的免费版Rainbow Channels仅仅展示了价格的虹色通道,没有对价格进入重要压力或支撑区域进行额外视觉提示或警报。
但这个PRO版增加其他功能
1.警报功能: PRO版增加了两个重要警报,帮助用户实时监控市场动态。
当价格从下方升穿红色压力区时,会触发警报,提示用户价格可能进入压力区域。
当价格从上方跌破紫色支撑区时,会触发警报,提示用户价格可能进入支撑区域。
2. 视觉增强功能: PRO版通过填充红色和紫色区域之间的底色,增强了图表的视觉表现,使用户更直观地识别关键压力和支撑区域。
Difference between free version and pro version
The free version Rainbow Channels by MrLazycat displays only the rainbow channels without additional visual cues or alerts for crossing into key pressure or support zones.
This PRO Version Rainbow Channels includes:
1.Alert Feature: The PRO version introduces two critical alerts to help users monitor market dynamics in real-time.
An alert is triggered when the price crosses up from below into the red pressure zone, notifying users of potential entry into a pressure area.
An alert is triggered when the price breaks down from above into the purple support zone, notifying users of potential entry into a support area.
2.Enhanced Visuals: The PRO version fills the areas between the red and purple lines, enhancing the chart's visual representation and allowing users to more intuitively identify key pressure and support zones.
This PRO version provides a more comprehensive toolset for traders by combining real-time alerts with enhanced visual cues, making crucial zones easier to spot and react to.

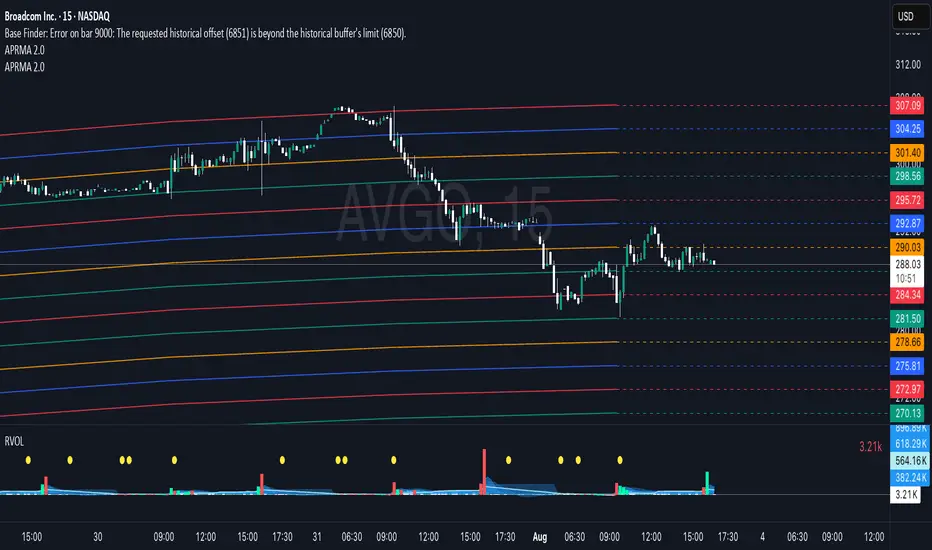
Adjustable Percentage Range Moving Average - Add'l LinesThe Adjustable Percentage Range Moving Average (APRMA), originally developed by @ReallyWendy, is a versatile PineScript indicator designed for traders and market analysts to analyze market volatility and identify trends dynamically. Building on the original concept, this updated version plots a central moving average (MA) with four customizable percentage-based range bands around it. Users can select the MA type (SMA, EMA, HMA, RMA, SWMA, TMA, WMA, VWMA), timeframe, and length, tailoring the indicator to their trading style. Each range band (upper and lower) is calculated as a percentage offset from the MA, with adjustable colors and transparency settings for enhanced visual clarity. Extension lines project the latest values forward, with customizable styles (solid, dashed, dotted). The indicator includes toggleable display options for the MA and each range pair, making it an effective tool for identifying price ranges, support/resistance levels, and trend dynamics.
Credit to @ReallyWendy for the foundational concept.
200 SMA (5%/-3% Buffer) for SPY & QQQ In my testing TQQQ is an absolute monster of an ETF that performs extremely well even from a buy and hold standpoint over long periods of time, its largest drawback is the massive drawdown exposure that it faces which can be easily sidestepped with this strategy.
This strategy is meant to basically abuse TQQQ's insane outperformance while augmenting the typical 200SMA strategy in a way that uses all of its strengths while avoiding getting whipsawed in sideways markets.
The strategy BUYS when price crosses 5% over the 200SMA and then SELLS when price drops 3% below the 200SMA. Between trades I'll be parking my entire account in SGOV.
So maximizing profit while minimizing risk.
You use the strategy based off of QQQ and then make the trades on TQQQ when it tells you to BUY/SELL.
Here are some reasons why I will be using this strategy:
Simple emotionless BUY and SELL signals where I don't care who the president is, what is happening in the world, who is bombing who, who the leadership team is, no attachment to individual companies and diversified across the NASDAQ.
~85% win percentage and when it does lose the loses are nothing compared to the wins and after a loss you're basically set up for a massive win in the next trade.
Max drawdown of around 53% when using TQQQ
You benefit massively when the market is doing well and when there is a recession you basically sit in SGOV for a year and then are set up for a monster recovery with a clear easy BUY signal. So as long as you're patient you win regardless of what happens.
The trades are often very long term resulting in you taking advantage of Long Term Capital Gains tax advantage which could mean saving up to 15-20% in taxes.
With only a few trades you can spend time doing other stuff and don't have to track or pay attention to anything that is happening.
Simple, easy, and massively profitable.
