ZigZag PercentZigZag percentage is based on MT5 ZigZag indicator with the advantage of showing each move's percentage change.
Measuring the moves can help you predict future move sizes.
Ketidakstabilan

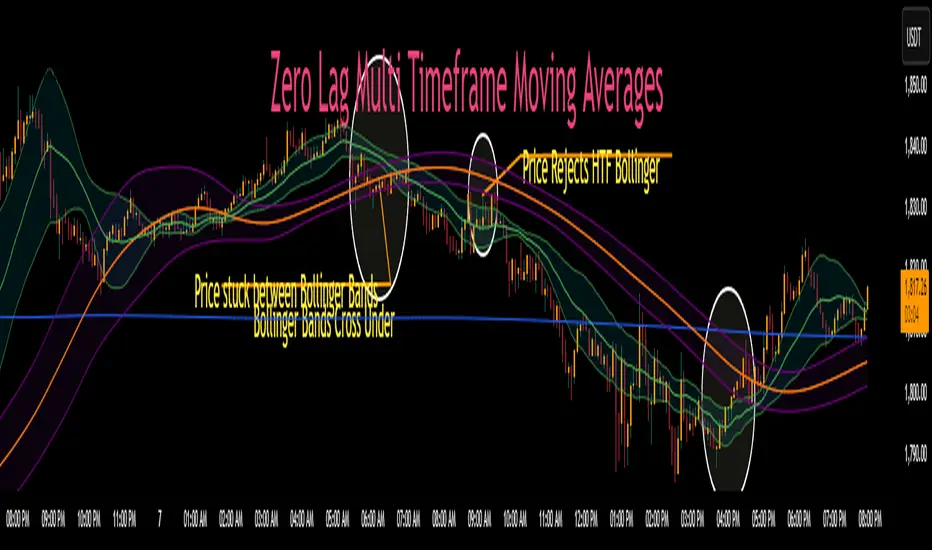
Zero Lag MTF Moving Average by CoffeeshopCryptoBased on Moving Average Types supplied by @TradingView www.tradingview.com
Ideas and code enhanced to show higher timeframe by @CoffeeShopCrypto
It’s time to take the guesswork out of moving averages and multiple timeframes when day trading. Moving averages are a cornerstone of many trading strategies, often viewed as dynamic support and resistance levels. Traders rely on these levels to anticipate price reactions, whether it’s a bounce in a trending market or a reversal in a ranging one. Additionally, the direction and alignment of multi timeframe moving averages—whether they’re moving in the same direction or diverging—provide critical clues about market momentum and potential reversals. However, the traditional higher timeframe moving average indicators force traders to wait for higher timeframe candles to close, creating lag and missed opportunities.
The Old Way
For example: If you are on a 5 minute chart and you want to observe the location and direction of a 30 minute chart Moving Average, you'll need to wait for a total of 6 candles to close, and again every 6 candles after that. This only creates more lag.
The New Way
Now there is no waiting for high timeframe session candles to close. No matter what timeframe Moving Average you want to know about, this indicator will show you its location on your current chart at any time in real time.
For those who prefer Bollinger Bands, this indicator adds a whole new dimension to your strategy. Traders often wait for price action to break outside the lower time frame Bollinger bands before considering a trade, while still seeking key support or resistance levels beyond them. But if you don't know the position of your higher time frame Bollinger, you could be trading into a trap. With Zero Lag Multi Timeframe Moving Average, you can view both your current and higher timeframe Bollinger Bands simultaneously with zero waiting. This lets you instantly see when price action is traveling between the bands of either timeframe or breaking through both—indicating a strong trend in that direction. Additionally, when both sets of Bollinger Bands overlap at the same price levels, it highlights areas of strong consolidation and ranging conditions, giving you a clear picture of market dynamics. This is a key element in price action that tells you there is currently no direction to the market and both the current and higher time frames are flat.
Enter Zero Lag Multi Timeframe Moving Average—the ultimate tool for real-time higher timeframe moving averages and Bollinger Bands. This innovative indicator eliminates the delay, delivering instant, precise values for higher timeframe averages and bands, even on open candles. Seamlessly combining current and higher timeframe data, it allows traders to identify key moments where moving averages or Bollinger Bands align or diverge, signaling market conditions. Whether you’re gauging the strength of a trend, pinpointing potential reversals, or identifying consolidation zones, Zero Lag Multi Timeframe Moving Average gives you the clarity needed to make better trading decisions according to market conditions.
Why is this "Mashup" of moving averages different and important?
Honestly its really about the calculation thats imported through the "import library" function.
Heres what it does:
The ZLMTF-MA is designed to help traders easily see where higher timeframe moving averages and Bollinger Bands are—without needing to switch chart timeframes or wait for those larger candles to close. It works by adjusting common moving average types like SMA, EMA, and VWMA to show what they would look like if they were based on a higher timeframe, right on your current chart. This helps users stay focused on their main timeframe while still having a clear view of the bigger picture, making it easier to spot trend direction, key support and resistance levels, and overall market structure. The goal is to keep things simple, fast, and more visually informative for everyday traders.
Bollinger Bands
When working with Bollinger Bands, a common strategy is to take the trades once price action has escaped through the top or bottom of your current Bollinger Band.
A false breakout occurs when both Bollinger Bands are not moving in the same direction as eachother or when they are overlapping.
Moving Averages as Support and Resistance:
Traders who use Moving Averages as support or resistance, looking for rejections or failures of these areas can now see multiple timeframe price action instantly and simultaneously.
Trading Setup Examples:
Price Action Scenario 1:
Higher Timeframe Ranging-
When price action breaks through a current moving average headed toward a higher timeframe moving average, trades are taken with caution if the moving averages are converging.
Price Action Scenario 2:
Strong Trending Market -
If the moving averages are in the same direction, and your price action is now leading the low timeframe moving average, you have re-entered a strong trend.
Price Action Scenario 3:
High Timeframe Rejections -
If you have a rejection of a higher timeframe moving average, and your both averages are still diverging, this is the end of a pullback as you re-enter a strong trend in the original direction
Price Action Scenario 4:
Trend Reversals -
If you close beyond both the low and high timeframe moving averages, you can consider that price action is strong enough to change direction here and you should prepare for trade setups in the opposite direction of the previous.
HTF MA Label Information:
Even if your high timeframe moving average is turned off, you can still see this label.
It gives you a quick reminder of what high timeframe settings you have used to see MA values.
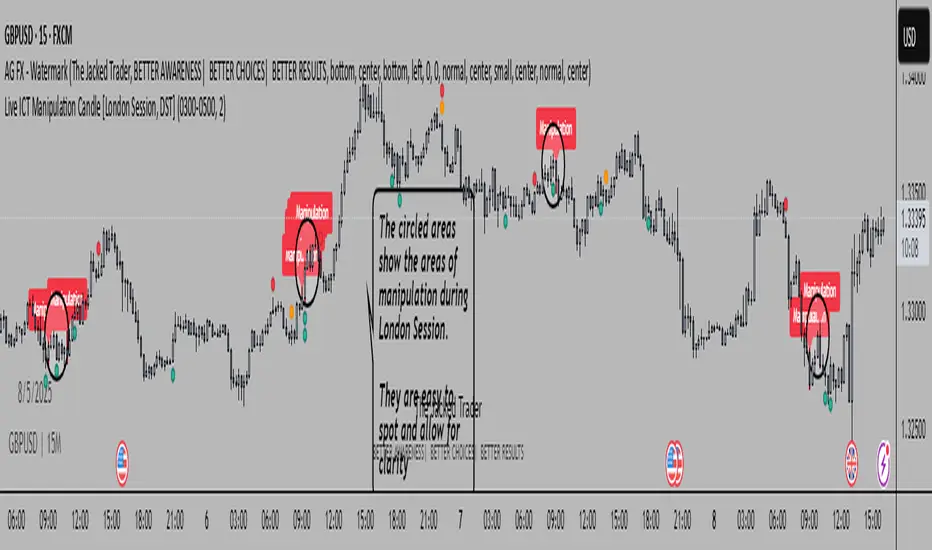
Live ICT Manipulation Candle [London Session, DST]📌 Live ICT Manipulation Candle
🔍 What This Script Does:
This indicator highlights the most volatile ( manipulative ) candle during the London session, based on range and volume, in real-time. It is designed specifically for intraday traders who follow ICT ( Inner Circle Trader ) concepts.
Key Features:
Tracks and highlights the manipulation candle between 3:00 AM to 5:00 AM NY time, adjusted for daylight savings (DST).
Displays a colored box around the manipulation candle and optionally shows a "Manipulation" label ( see chart below ).
Works on 1m, 5m, or 15m charts only — ensures high accuracy and alignment with ICT intraday concepts.
Designed for clarity during live session development.
⚠️ Disclaimer & Transparency:
This script was previously removed by TradingView due to being published with protected ( closed ) source code. I apologize for that oversight.
If you're studying ICT concepts or trading the London session volatility, this script can help you visually anchor the key manipulation point each day!
The indicator doesn't put the circles on. I put them to show the key manipulation areas per London session.
Happy trading and stay sharp!
@TJT_Pro
Scalping Singals [VM]Scalping Signals
Overview
The Scalping Signals is a Pine Script indicator designed for TradingView to provide precise buy and sell signals for scalping strategies. Created by Vlad_Mind (Telegram: @Dreamer528), this indicator combines multiple technical indicators (RSI, Stochastic, SMI, Bollinger Bands, and a Higher Timeframe Supertrend) with an EMA filter to identify high-probability entry points for short-term trades. It is optimized for fast-paced trading environments and includes a trend filter and trade cooldown to enhance signal reliability.
The indicator is tailored for the 5-minute timeframe, which is the recommended setting for optimal performance. Other settings are best left at their default values to maintain the indicator's intended behavior.
Features
Scalping-Focused Signals: Generates clear "Buy" and "Sell" labels for quick entry decisions on the 5-minute chart.
Multi-Indicator Confirmation:
RSI: Detects overbought (>70) and oversold (<30) conditions.
Stochastic Momentum Index (SMI): Confirms momentum with thresholds at +40 (overbought) and -40 (oversold).
Stochastic Oscillator: Identifies extreme price levels (<20 for buys, >80 for sells).
Bollinger Bands: Ensures price is outside the bands (below lower band for buys, above upper band for sells).
Higher Timeframe (HTF) Trend Filter: Uses a Supertrend indicator on a user-defined HTF (default: 60 minutes) to align trades with the broader trend.
EMA Filter: Optional filter (default: enabled) to ensure trades align with the trend relative to a 1000-period EMA.
Trade Cooldown: Prevents overtrading by enforcing a minimum time gap (default: 360 minutes) between signals.
Visual Elements:
Plots the HTF Supertrend and EMA for trend context.
Displays "Buy" (green) and "Sell" (red) labels directly on the chart.
How It Works
The indicator generates signals based on the following logic:
Buy Signal:
RSI < 30, SMI < -40, Stochastic < 20, and price below the lower Bollinger Band.
HTF Supertrend indicates an uptrend (if trend filter is enabled).
Price is above the EMA (if EMA filter is enabled).
Cooldown period since the last buy signal has expired.
Sell Signal:
RSI > 70, SMI > 40, Stochastic > 80, and price above the upper Bollinger Band.
HTF Supertrend indicates a downtrend (if trend filter is enabled).
Price is below the EMA (if EMA filter is enabled).
Cooldown period since the last sell signal has expired.
Signals are marked with labels ("Buy" or "Sell") at the respective candle's low or high, making them easy to spot.
Settings
Recommended Timeframe: 5 minutes (optimal for scalping).
Other Settings: Keep at default values for best results:
HTF Timeframe: 60 minutes.
HTF ATR Factor: 5.
HTF ATR Length: 10.
Trade Cooldown: 360 minutes.
Enable EMA Filter: True.
EMA Period: 1000.
Usage
Apply the Scalping Signals to a 5-minute chart on TradingView.
Leave all settings at their default values for optimal performance.
Look for "Buy" (green) and "Sell" (red) labels to identify entry points.
Use the plotted EMA and HTF Supertrend to confirm the broader trend context.
Combine with proper risk management and other technical analysis tools to validate trades.
Notes
The indicator is designed specifically for the 5-minute timeframe to capture short-term price movements.
The trade cooldown (default: 360 minutes) ensures signals are spaced out, reducing the risk of overtrading.
The HTF Supertrend and EMA filters enhance signal reliability by aligning trades with the broader market trend.
Contact Vlad_Mind (Telegram: @Dreamer528) for support or feedback.
Disclaimer
This indicator is provided for educational and informational purposes only. It does not constitute financial advice. Always conduct your own research and consult with a professional before making trading decisions.
Happy scalping!

Ultimate Adaptive Multi-Regime Trading System🧩 What is the UA-MTS Indicator?
UA-MTS is an intelligent trading indicator built for scalping, day trading, and adaptive decision-making. It analyzes price action, trend, volatility, volume, and patterns across multiple timeframes to give traders clear, context-aware buy and sell signals.
It’s like having a smart assistant on your chart that tells you:
What kind of market you’re in (trend, range, volatility, etc.)
What patterns are forming and how reliable they are
When a high-confidence trade opportunity appears
How far price might go next (via projection lines)
⚙️ What Does It Do?
Detects Market Regime
Identifies whether the market is Trending, Ranging, Volatile, Accumulating, or Distributing
Adjusts strategy logic based on the regime
Scans for Patterns
Finds smart price patterns (like engulfing, divergences, fractals, head & shoulders)
Evaluates pattern quality and importance
Uses AI-like Logic
Includes a mini neural network that digests market data and projects price movement
Confirms with Volume and Volatility
Filters out weak signals based on how strong the volume and volatility are
Gives Trade Signals
Shows Buy or Sell markers with scores and confidence %
Highlights high-quality trades with a star (★)
Visual Tools
Confidence bands (projected price range)
Prediction lines
Color-coded market regime
🕹 How to Use It (in TradingView)
Use the Regime Label
Bottom of chart will say "Regime: Trending (80%)" or similar
Trust trend signals more in Trending regime, reversal patterns more in Ranging
Enable Multi-Timeframe Analysis (optional)
It blends data from multiple timeframes (like 1m + 5m + 15m) to sharpen signal logic
Confirm Before Entering
Look at the Score and Confidence %
Use it with other tools like support/resistance or price structure for even better entries
📈 Best Use Cases
Scalping on 1m/5m/15m charts
Day trading breakouts or reversals
Filtering trades during sideways markets
Avoiding traps in high volatility
Projecting short-term price direction

V2 – Trailing SL Optimize | Universal EMA+RSI StrategyA clean and flexible trend-following strategy using RSI and EMA, combined with a trailing stop-loss system.
Features:
– RSI crossover at 50 level as entry signal
– EMA 200 trend filter
– ATR-based dynamic stop-loss
– Trailing stop to let winners run
– No take profit: exits are managed dynamically
– Suitable for NASDAQ (NAS100), Gold (XAUUSD), and similar trending assets
– Default position size: 1 contract
This is the universal version of the strategy, without max loss enforcement or volatility filters. Ideal for well-behaved, non-explosive markets.

Futures Globex SessionThis is a simple indicator that will highlight the globex range based on the unique trading hours of each product. To get this to work correctly, you will need to use it on a continuous unadjusted chart (MES1!). Here are the start and stop times for each futures contract:
ES1!
18:00 to 09:30 ET
NQ1!
18:00 to 09:30 ET
RTY1!
18:00 to 09:30 ET
YM1!
18:00 to 09:30 ET
ZN1!
18:00 to 08:20 ET
ZB1!
18:00 to 08:20 ET
GC1!
18:00 to 08:20 ET
CL1!
18:00 to 09:00 ET
NG1!
18:00 to 09:00 ET
ZS1!
20:00 to 09:30 ET
ZW1!
20:00 to 09:30 ET
MES1!
18:00 to 09:30 ET
MYM1!
18:00 to 09:30 ET
MNQ1!
18:00 to 09:30 ET
M2K1!
18:00 to 09:30 ET
MCL1!
18:00 to 09:00 ET
MGC1!
18:00 to 08:20 ET

ADR & ATR OverlayADR & ATR Overlay
This indicator will display the following as an overlay on your chart:
ADR
% of ADR
ADR % of Price
ATR
% of ATR
ATR % of Price
Description:
ADR : Average Day Range
% of ADR : Percentage that the current price move has covered its average.
ADR % of Price : The percentage move implied by the average range.
ATR : Average True Range
% of ATR : Percentage that the current price move has covered its average.
ATR % of Price : The percentage move implied by the average true range.
Options:
Time Frame
Length
Smoothing
Enable or Disable each value
Text Color
Background Color
How to use this indicator:
The ADR and ATR can be used to provide information about average price moves to help set targets, stop losses, entries and exits based on the potential average moves.
Example: If the "% of ADR" is reading 100%, then 100% of the asset's average price range has been covered, suggesting that an additional move beyond the range has a lower probability.
Example: "ADR % of Price" provides potential price movement in percentage which can be used to asses R/R for asset.
Example: ADR (D) reading is 100% at market close but ATR (D) is at 70% at close. This suggests that there is a potential move of 30% in Pre/Post market as suggested by averages.
Notes:
These indicators are available as oscillators to place under your chart through trading view but this indicator will place them on the chart in numerical only format.
Please feel free to modify this script if you like but please acknowledge me, I am only a hobby coder so this takes some time & effort.

Price Lag Factor (PLF)📊 Price Lag Factor (PLF) for Crypto Traders: A Comprehensive Breakdown
The Price Lag Factor (PLF) is a momentum indicator designed to identify overextended price movements and gauge market momentum. It is particularly optimized for the crypto market, which is known for its high volatility and rapid trend shifts.
🔎 What is the Price Lag Factor (PLF)?
The PLF measures the difference between long-term and short-term price momentum and scales it dynamically based on recent volatility. This helps traders identify when the market might be overbought or oversold while filtering out noise.
The formula used in the PLF calculation is:
PLF = (Z-Long - Z-Short) / Stdev(PLF)
Where:
Z-long: Z-score of the long-term moving average (50-period by default).
Z-short: Z-score of the short-term moving average (14-period by default).
Stdev(PLF): Standard deviation of the PLF over a longer period (50-period by default).
🧠 How to Interpret the PLF:
1. Trend Direction:
Positive PLF (Green Bars): Indicates bullish momentum. The long-term trend is up, and short-term movements are confirming it.
Negative PLF (Red Bars): Indicates bearish momentum. The long-term trend is down, and short-term movements are consistent with it.
2. Momentum Strength:
PLF near Zero (±0.5): Low momentum; trend direction is not strong.
PLF between ±1 and ±2: Moderate momentum, indicating that the market is moving with strength but not in an overextended state.
PLF beyond ±2: High momentum (overbought/oversold), indicating potential trend exhaustion and a possible reversal.
📈 Trading Strategies:
1. Trend Following:
Bullish Signal:
Enter long when PLF crosses above 0 and remains green.
Confirm with other indicators like RSI or MACD to reduce false signals.
Bearish Signal:
Enter short when PLF crosses below 0 and remains red.
Use trend confirmation (e.g., moving average crossover) for better accuracy.
2. Reversal Trading:
Overbought Signal:
If PLF rises above +2, look for signs of bearish divergence or a reversal pattern to consider a short entry.
Oversold Signal:
If PLF falls below -2, watch for bullish divergence or a support bounce to consider a long entry.
3. Momentum Divergence:
Bullish Divergence:
Price makes a lower low while PLF makes a higher low.
Indicates weakening bearish momentum and a potential bullish reversal.
Bearish Divergence:
Price makes a higher high while PLF makes a lower high.
Signals weakening bullish momentum and a potential bearish reversal.
💡 Best Practices:
Combine with Volume:
Volume spikes during high PLF readings can confirm trend continuation.
Low volume during PLF extremes may hint at false breakouts.
Watch for Extreme Levels:
PLF beyond ±2 suggests overextended price action. Use caution when entering new positions.
Confirm with Other Indicators:
Use with Relative Strength Index (RSI) or Bollinger Bands to get a better sense of overbought/oversold conditions.
Overlay with a moving average to gauge trend consistency.
🚀 Why the PLF Works for Crypto:
Crypto markets are highly volatile and prone to rapid trend changes. The PLF's adaptive scaling ensures it remains relevant regardless of market conditions.
It highlights momentum shifts more accurately than static indicators because it accounts for changing volatility in its calculation.
🚨 Disclaimer for Traders Using the Price Lag Factor (PLF) Indicator:
The Price Lag Factor (PLF) indicator is designed as a technical analysis tool to gauge momentum and identify potential overbought or oversold conditions. However, it should not be relied upon as a sole decision-making factor for trading or investing.
Important Points to Consider:
Market Risk: Trading cryptocurrencies and other financial assets involves significant risk. The PLF may not accurately predict future price movements, especially during unexpected market events.
Indicator Limitations: No technical indicator, including the PLF, is infallible. False signals can occur, particularly in low-volume or highly volatile conditions.
Supplementary Analysis: Always combine PLF insights with other technical indicators, fundamental analysis, and risk management strategies to make informed decisions.
Personal Judgment: Traders should use their own discretion when interpreting PLF signals and never trade based solely on this indicator.
No Guarantees: The PLF is designed for educational and informational purposes only. Past performance is not indicative of future results.
Always perform thorough research and consider consulting with a professional financial advisor before making any trading decisions.

NY Open Market Condition Analyzer – TTR & RI - Beta 0.1.3📌 NY Open Market Condition Analyzer – TTR & RI - Beta 0.1.3
Built for NQ/MNQ scalpers who thrive on structure, this indicator evaluates market conditions at the New York Open (6:30–8:30AM PST) and only flashes green when high-probability conditions align.
📊 Core Filters
TTR (Total Trading Range): Measures volatility from 2:00–6:30AM PST
5-Min Candle Body: Captures the size of the opening impulse
VWAP Distance: Gauges market expansion from a mean
MNQ/MES Divergence: Confirms directional alignment between indices
UT Bot Alerts: Integrates an ATR/EMA-based trend confirmation system
🎯 Primary Objective
Filter out weak sessions and trade only when structure supports movement.
Avoid choppy Mondays and Fridays unless volatility proves otherwise
Combine system rules with momentum-based confluence
Preserve your edge and mental capital by only trading when it’s worth it
✅ Features
Smart Session Filter Logic:
Premarket Range ≥ X pts
Opening 5-Min Candle Body ≥ Y pts
VWAP Distance ≥ Z pts
Divergence filter to ensure MNQ & MES are not in conflict
UT Bot Buy Signal required (if enabled)
Visual Feedback:
Colored background: 🟩 GOOD or 🟥 SKIP
Chart labels: GOOD SETUP or SKIP SESSION
Optional UT Bot signal markers (Buy)
Toggle visibility for GOOD and SKIP signals
Dashboard Panel (top-right):
Displays real-time data for all active filters
Premarket Range
5-Min Candle Body
VWAP Distance
Divergence Status
UT Bot Buy Signal
Final Verdict: ✅ GOOD or ⚠️ SKIP
🔔 How to Use Alerts
Click the “Alerts” (🔔) tab
Create a new alert
Condition: NY Open Market Condition Analyzer – TTR & RI + UT Bot → Good Setup Alert
Set action (push, webhook, etc.)
Use “Once Per Bar” for 1-minute charts
🧠 Best For:
MNQ/NQ scalpers
Traders using MAS Capital’s Reversal Indicator
1R–2R scalping models (10–30pt targets)
Traders looking for pre-trade confirmation based on structure AND momentum

Atlas BBTlevelsAtlas BBTlevels is a custom Bollinger Bands-based indicator that measures the momentum and strength of price trends using the difference between short- and long-period Bollinger Bands. Inspired by John Bollinger’s official tools like BBTrend, %b, and Bandwidth, this script adds adjustable horizontal threshold levels so traders can mark important reaction zones on their charts.
It visualizes when markets may be entering overheated or exhausted conditions — either for trend continuation or potential reversals — and works across crypto, stocks, forex, spot, or perpetual charts.
How I personally use it:
I apply Atlas BBTlevels across three timeframes:
Low timeframe (LTF): 5m–15m
Mid timeframe (MTF): 1h–6h
High timeframe (HTF): 1d–2d
I review where the indicator historically spiked during major moves. For example, if the 4-hour chart shows repeated spikes to +10 or −10, I’ll set my positive and negative thresholds near those levels. This lets me anticipate zones where the market may reverse, cool off, or break out. I then compare LTF, MTF, and HTF levels to look for confluence. When multiple timeframes align near key levels, it gives me higher confidence to prepare for a trade — but I always combine this with price action and other confirmation tools.
How others can use it:
Identify overbought/oversold zones by adjusting the thresholds to match historical extremes on your chosen asset.
Use it as a trend strength gauge: when the histogram is near or above the top threshold, the trend is likely strong; when it fades back toward zero, momentum is weakening.
Watch for volatility expansions or contractions as the indicator accelerates away from or returns toward zero.
Combine it with price action (support/resistance, trendlines, chart patterns) or other momentum tools to reduce false signals.
Apply it across multiple timeframes to look for confluence — this increases reliability compared to using it on just one chart.
Important tips:
Positive spikes (above zero) usually indicate strength or overextension upward; negative spikes (below zero) show weakness or downward exhaustion.
You can reverse the color logic if you want (for example, highlight negative spikes as green for buy interest and positive spikes as red for sell interest) — this is just a visual preference.
This is not a standalone buy/sell system. Always combine it with other tools, market context, and risk management.

VWPAZ - Volume Weighted Price Action ZonesDisclaimer: The content provided in my scripts, indicators, ideas, algorithms, and systems is for educational and informational purposes only.
This indicator was developed for high-volatility assets like GME, this adaptive indicator dynamically maps the zones where price and volume converge, revealing key buy/sell territory, institutional footprints, and areas of high trade interest.
📌 What It Does:
Calculates a Volume-Weighted Average Price (VWAP) across the session(s) of your choice
Builds high-probability support/resistance zones using ATR-based deviations
Automatically tracks and adapts to 1-day, 3-day, or weekly price behavior
Visually highlights the zone with shaded regions, giving you clear trade zones at a glance
🔧 Features:
🧩 Session Toggle: Switch between 1D, 3D, or Weekly zones for swing/intraday context
🔶 VWAP Line: Anchors the average price weighted by volume
🔼🔽 ATR Zones: Defines realistic price extremes around VWAP using true range
🟧 Shaded Forecast Channel: Gives a “volume-approved” path forward
📈 How to Use It:
Inside the orange shaded zone? Expect price to stall or consolidate — institutions may be active here.
Breaking above the green ATR band? Momentum breakout — watch for volume confirmation.
Rejecting near the red ATR band? Potential reversal zone or liquidity trap.
👨💻 Ideal For:
Day and swing traders
Volume-based analysts
Volatile tickers (e.g., GME, TSLA, crypto)
Anyone seeking real volume acceptance levels vs. subjective trendlines

KindBTCUSDT.P (Binance) 15m Long Pyramiding Strategy
- Stop-loss restriction at the middle band
- Using only long strategies improves the risk-reward ratio
- Utilizing the optimal Bollinger Bands period

Buzzy DraftAbove EMA breakout, when price closes above EMA 10 and RSI confirms through a threshold there are entries. Has consecutive count for further confirmation and uses automatic TP and SL using bolling bands of the EMA 10.
For Buzzydaze.

ATR in Percentagethe script calculates ATR in percentage instead of money units, useful for comparison
Created by me using ChatGPT orders.
hope it is useful you can put alerts too

ATR Usage % (Legacy-Compatible)What It Does:
• Calculates how much of today’s ATR has already been used.
• Shows a label above price bar with % usage.
• Color-coded:
• Green if usage < 80%
• Orange if 80–100%
• Red if over 100% → Possible exhaustion

SuperTrade ST1 StrategyOverview
The SuperTrade ST1 Strategy is a long-only trend-following strategy that combines a Supertrend indicator with a 200-period EMA filter to isolate high-probability bullish trade setups. It is designed to operate in trending markets, using volatility-based exits with a strict 1:4 Risk-to-Reward (R:R) ratio, meaning that each trade targets a profit 4× the size of its predefined risk.
This strategy is ideal for traders looking to align with medium- to long-term trends, while maintaining disciplined risk control and minimal trade frequency.
How It Works
This strategy leverages three key components:
Supertrend Indicator
A trend-following indicator based on Average True Range (ATR).
Identifies bullish/bearish trend direction by plotting a trailing stop line that moves with price volatility.
200-period Exponential Moving Average (EMA) Filter
Trades are only taken when the price is above the EMA, ensuring participation only during confirmed uptrends.
Helps filter out counter-trend entries during market pullbacks or ranges.
ATR-Based Stop Loss and Take Profit
Each trade uses the ATR to calculate volatility-adjusted exit levels.
Stop Loss: 1× ATR below entry.
Take Profit: 4× ATR above entry (1:4 R:R).
This asymmetry ensures that even with a lower win rate, the strategy can remain profitable.
Entry Conditions
A long trade is triggered when:
Supertrend flips from bearish to bullish (trend reversal).
Price closes above the Supertrend line.
Price is above the 200 EMA (bullish market bias).
Exit Logic
Once a long position is entered:
Stop loss is set 1 ATR below entry.
Take profit is set 4 ATR above entry.
The strategy automatically exits the position on either target.
Backtest Settings
This strategy is configured for realistic backtesting, including:
$10,000 account size
2% equity risk per trade
0.1% commission
1 tick slippage
These settings aim to simulate real-world conditions and avoid overly optimistic results.
How to Use
Apply the script to any timeframe, though higher timeframes (1H, 4H, Daily) often yield more reliable signals.
Works best in clearly trending markets (especially in crypto, stocks, indices).
Can be paired with alerts for live trading or analysis.
Important Notes
This version is long-only by design. No short positions are executed.
Ideal for swing traders or position traders seeking asymmetric returns.
Users can modify the ATR period, Supertrend factor, or EMA filter length based on asset behavior.

NeuroTrendNeuroTrend is an advanced, self-adjusting trend analysis system that continuously adapts to changing market conditions using volatility-aware smoothing, momentum weighting, and intelligent trend classification. It provides real-time trend detection, confidence scoring, early reversal warnings, and slope projection, all delivered through a coaching dashboard and structured rule-based commentary system.
At its core, NeuroTrend uses two EMAs whose smoothing lengths change automatically based on current volatility, measured by the ATR relative to price, and momentum bias, measured by RSI displacement from the neutral level. These adaptive EMAs create a flexible baseline that adjusts to the pace of the market. From these EMAs, the system calculates angular slope and derives a slope power score, which reflects directional momentum weighted by volatility.
NeuroTrend classifies each bar into one of five market phases: Impulse, Cooling, Reversal Risk, Stall, or Neutral. This classification is based on slope strength, slope variability, and RSI behavior. Each phase offers specific context for whether to enter, continue, or avoid a position.
The indicator uses what is referred to as a neural memory engine, which is inspired by the idea of memory but is not a neural network or machine learning model. Instead, it is a statistical recalibration system that adjusts thresholds using recent ATR conditions and slope standard deviation. This allows the indicator to remain aligned with the current market environment without the need for manual tuning.
Although NeuroTrend is fully adaptive, it includes inputs for the base fast and slow EMAs. These inputs define the central anchor points around which the adaptive logic operates. This gives the trader the ability to control the default behavior of the indicator while still benefiting from real-time responsiveness to volatility and momentum.
To assess the strength of a trend, NeuroTrend computes a confidence score based on four elements: DMI trend strength, directional bias from DI+ and DI–, slope normalization, and volatility efficiency measured by ATR in relation to EMA distance. This score is used to inform alerts, commentary, and dashboard visualization.
The indicator also includes a slope projection engine that estimates near-term direction based on slope change and acceleration. This projection is scaled and clamped using a dynamic volatility factor to prevent unrealistic or unstable values.
Reversal and stall detection are built in. Reversal detection is based on slope collapsing, sign flipping, and RSI weakness. Stall detection is triggered when slope magnitude is low, RSI is flat, and ATR is compressed. These filters help prevent entries in low-quality or high-risk environments.
The system also includes AI-style commentary. This feature is not powered by machine learning or natural language processing. It is rule-based, using prioritized conditions to generate clear statements that reflect the current market state. Messages such as "Strong trend forming" or "Reversal risk rising" are created by predefined logic that adapts to the market.
A visual dashboard is provided on the chart. It displays the current phase, trend direction, slope score, confidence level, reversal status, stall condition, and projected slope angle. This helps traders interpret market behavior at a glance without scanning multiple indicators.
Alerts are triggered only when specific conditions are met: trend strength must be in the impulse phase, confidence must be high, and there must be no active reversal or stall conditions. This ensures alerts are reserved for high-quality setups with strong directional alignment.
Disclaimer:
This script is intended for educational and informational use only. It does not constitute financial advice. The author accepts no responsibility for any trading or investment decisions made using this tool. Always do your own research and consult a licensed financial advisor before making financial decisions.

Relative After-Hours AVOLThis script calculates and plots the relative after-hours volume (AVOL) as a percentage of the stock’s average daily volume, helping you measure how active a stock is during extended trading hours (premarket + after-hours) compared to its normal daily activity.


Options Series - Anchored VWAP Ribbonindicator with the objetive to automatically anchor AVWAP for the entire session without blowing the capacity of TRADINGVIEW plotting objects.
we shall observe a ribbon of vwaps aiming to spot trading oportunities within the "spaces" among the lines due to volatility bars.
market often uses those horizons as objetives.
this indicator will plot only the firt 30 min as the next one will plot the next 30, and then next 30.... and so ON until the end of the session.

ADX Supertrend | [DeV]The "ADX Supertrend" indicator is a user-friendly tool that blends two popular trading indicators—the Supertrend and the Average Directional Index (ADX)—to help traders spot trends and make smarter trading decisions. By combining these two, it offers a clearer picture of when a market is trending strongly and in which direction, while cutting down on misleading signals. Here’s a straightforward explanation of how each part works, how they team up, the benefits of using them together, and why the ADX makes the Supertrend even better.
Supertrend:
It's like a guide that follows the market’s price movements to tell you whether prices are trending up or down. It creates two lines, one above and one below the price, based on how much the market is bouncing around (its volatility). When the price moves above the upper line, it signals an uptrend (a good time to buy), and the indicator draws a line below the price to show support. When the price drops below the lower line, it signals a downtrend (a potential time to sell), and the line appears above the price as resistance. The Supertrend is great because it adjusts to market conditions, widening the gap between lines in wild markets and tightening it in calm ones.
Average Directional Index:
The ADX is all about measuring how strong a trend is, without caring whether it’s going up or down. Think of it as a meter that tells you if the market is charging forward with purpose or just drifting aimlessly. It uses a scale from 0 to 100, where higher numbers mean a stronger trend. For example, an ADX above 25 often suggests a solid trend worth paying attention to, while a low ADX signals a sleepy, sideways market. The ADX also looks at whether buyers or sellers are in control to confirm the trend’s direction.
Confluence:
The Supertrend is great at spotting trends, but it can be a bit trigger-happy, giving signals in markets that aren’t really trending. That’s where the ADX shines. It acts like a quality control check, making sure the Supertrend’s signals only count when the market is moving with conviction. By filtering out weak or messy trends, the ADX helps you avoid wasting time on trades that fizzle out. It also double-checks the trend’s direction, so you’re not just guessing whether buyers or sellers are in charge. This teamwork means you get signals that are more reliable and less likely to lead you astray, especially in tricky markets where prices bounce around without a clear path.
Bollinger Bands ETSOverview
Bollinger Bands ETstyle (BB ETS) is an advanced volatility and breakout detection indicator, building upon the classic Bollinger Bands. This script introduces adaptive ATR-based band width smoothing and clear squeeze detection, making it a versatile tool for traders seeking more responsive and actionable volatility analysis.
Features
Dual Bollinger Bands: Plots both standard and outer bands around a configurable moving average, allowing visualization of typical and extreme volatility ranges.
ATR-Based Band Smoothing (Optional): When enabled, the bands automatically widen during low-volatility periods using the Average True Range (ATR), reducing false signals and making the bands more adaptive.
Squeeze Detection (Optional): Highlights periods when the bands contract below a user-defined threshold, signaling potential breakout setups. Squeeze periods are visually marked with a background highlight for easy identification.
Customizable Settings: Users can adjust band length, standard deviation multipliers, ATR parameters, and squeeze thresholds. Both ATR smoothing and squeeze detection can be toggled on or off.
Clean Chart Output: The indicator overlays directly on price with clear, distinguishable visuals for all features.
How It Works
The indicator calculates a moving average (basis) and plots upper and lower bands at user-selected standard deviations.
If ATR smoothing is enabled, the band width expands by a multiple of the ATR, adapting to real-time volatility.
The script computes the relative band width ("bandwidth"). When this falls below your chosen threshold, the background is highlighted to indicate a "squeeze"-a period of reduced volatility that often precedes breakouts.
How to Use
Trend & Volatility Analysis: Use the bands to identify overbought/oversold conditions and current market volatility. Price touching or crossing the outer bands may signal trend exhaustion or continuation.
Breakout Anticipation: Watch for background highlights indicating a squeeze. These periods suggest the market is coiling for a potential significant move.
Adaptive Sensitivity: Enable ATR smoothing to keep bands relevant during both calm and volatile markets, reducing false signals in low-volatility conditions.
Customization: Adjust all parameters in the settings to match your trading style and the asset’s behavior.
Limitations
The indicator is designed for standard price charts and may not perform as intended on non-standard chart types (such as Renko or Heikin Ashi).
As with all technical tools, best results are achieved when used alongside other forms of analysis.
Summary
Bollinger Bands ETstyle (BB ETS) offers a modern, adaptive approach to volatility and breakout analysis by combining classic bands with ATR-based smoothing and clear squeeze visualization. It is suitable for trend-following and breakout strategies, and requires no additional scripts-simply apply to your chart and adjust the settings as needed.
